A modification for Yamaha synthesizers to add optical audio out.
This mod has been especially designed for:
Yamaha MU100
Yamaha MU100R
Yamaha MU90
Yamaha MU90R
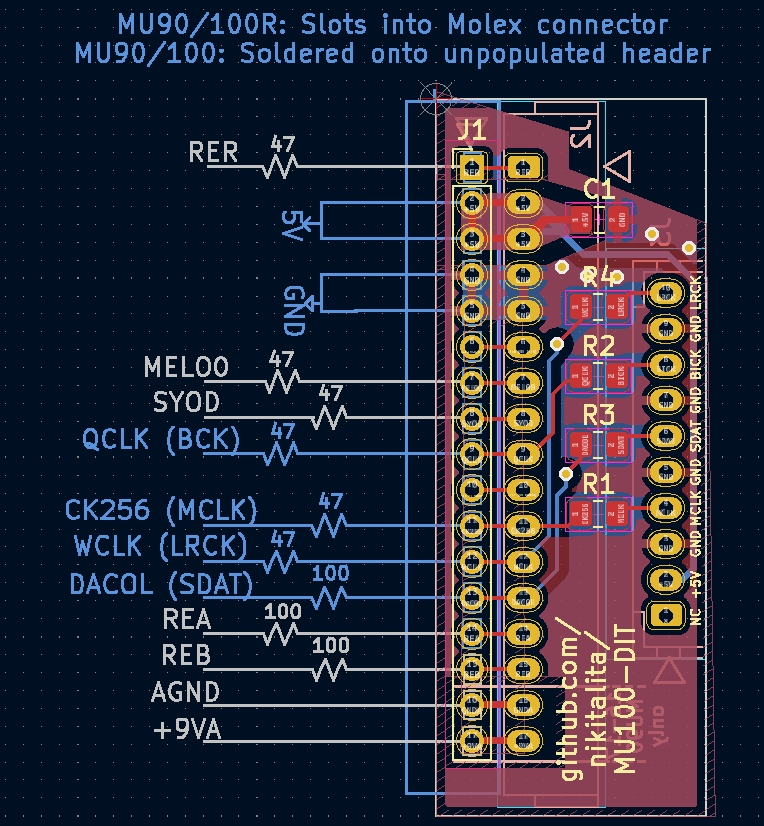
For these synths, a connector board has been designed that enables this mod to be installed with little-to-no board modification.
On the MU100/MU90, this involves soldering an unpopulated header and bridging some pads.
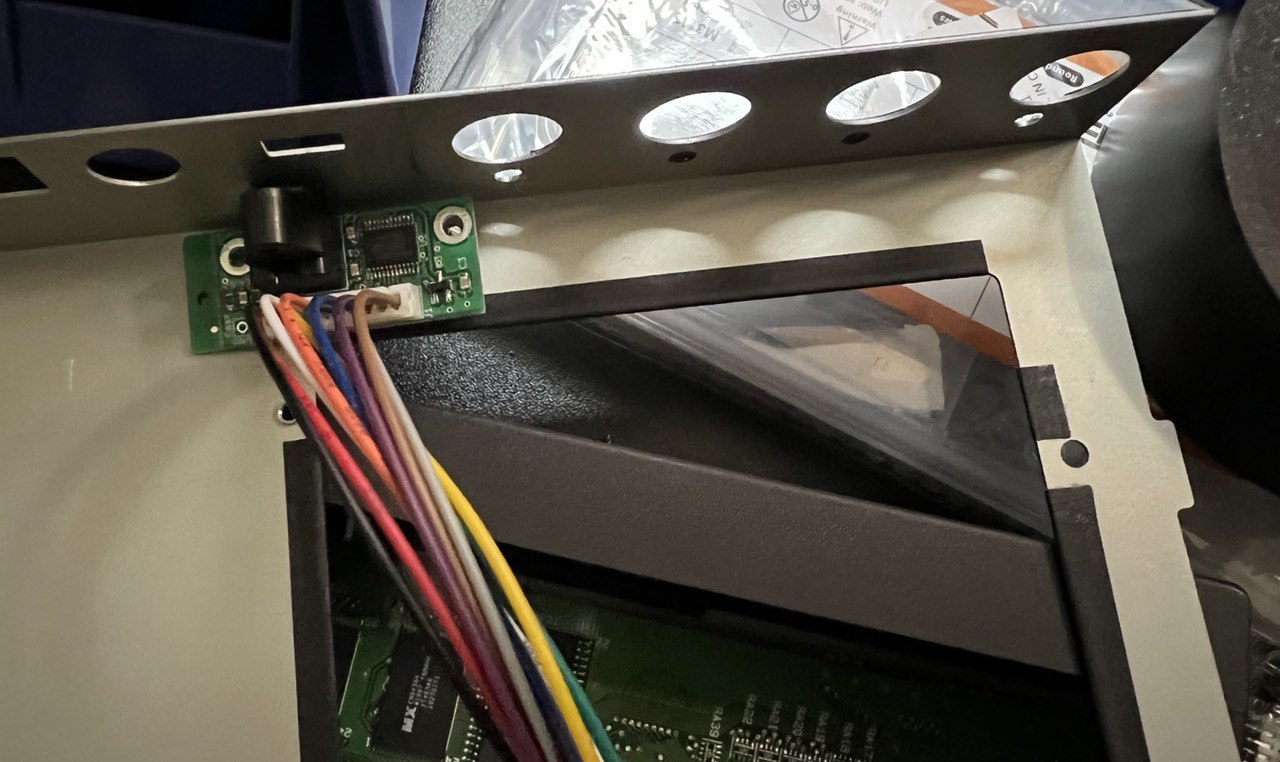
On the Rackmount versions of these, the MU100R/MU90R, this will plug in directly to the molex connector for the analog board, no board modification required:
The main board has been designed to fit within the limited back panel space on the MU100/MU90 and to not run into the MU100/MU100R’s expansion cards.
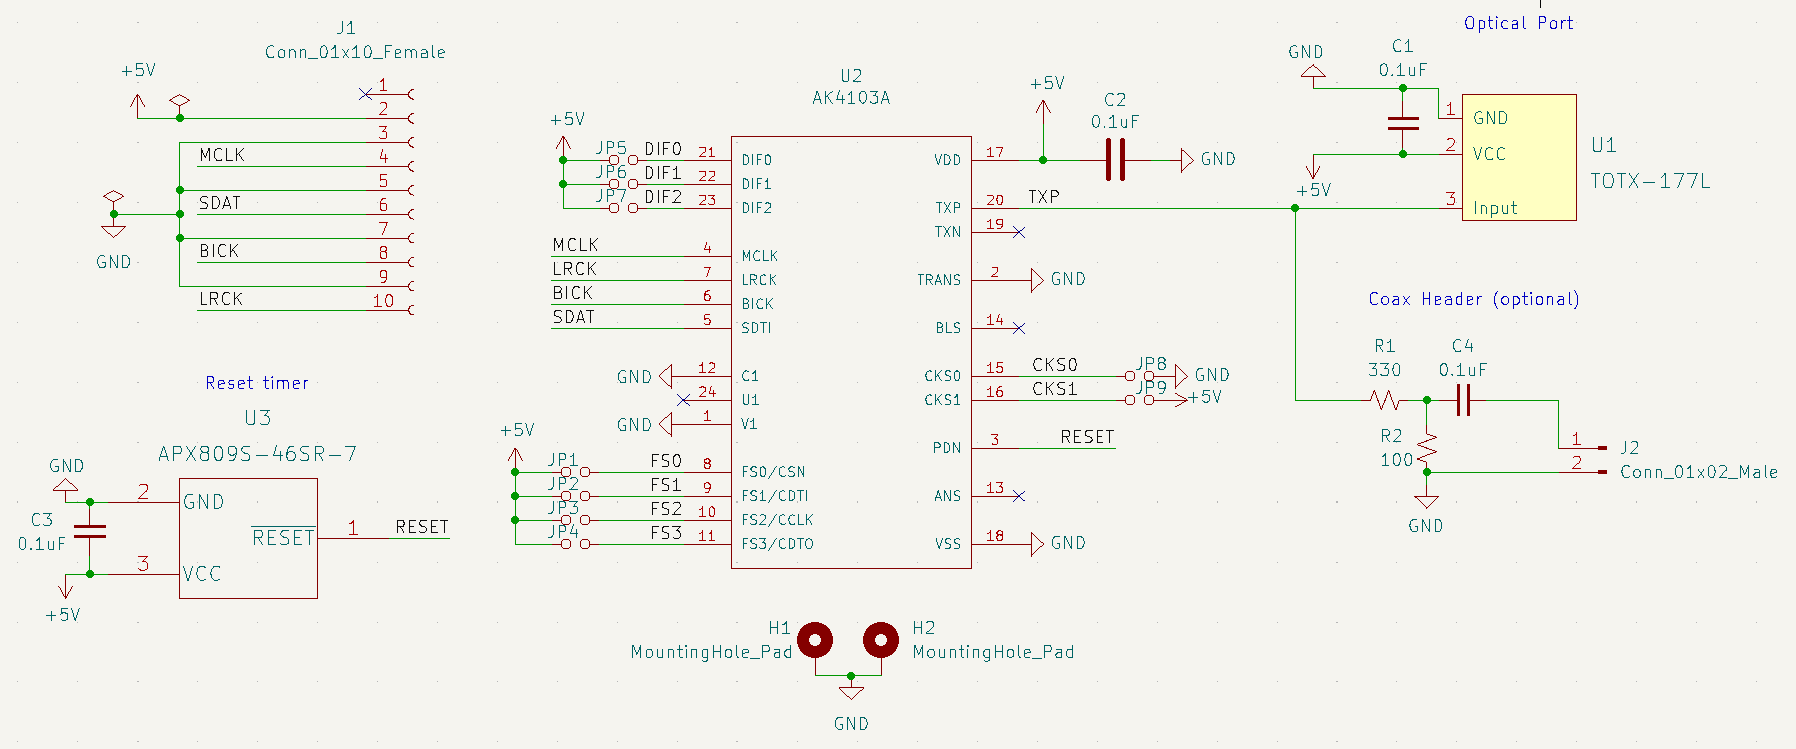
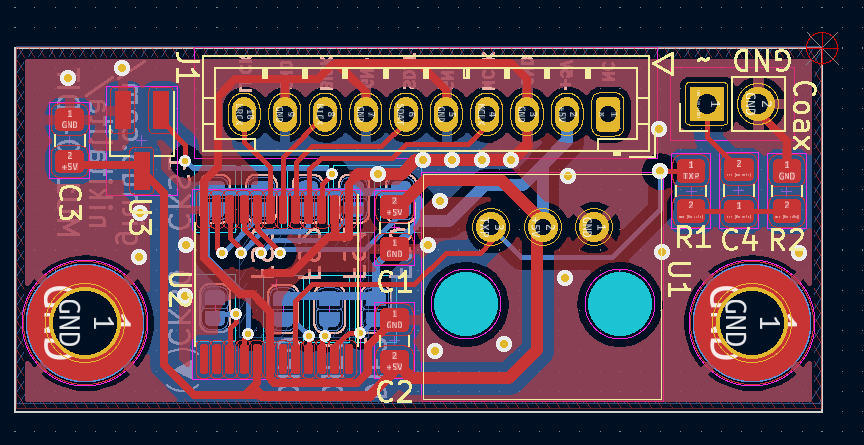
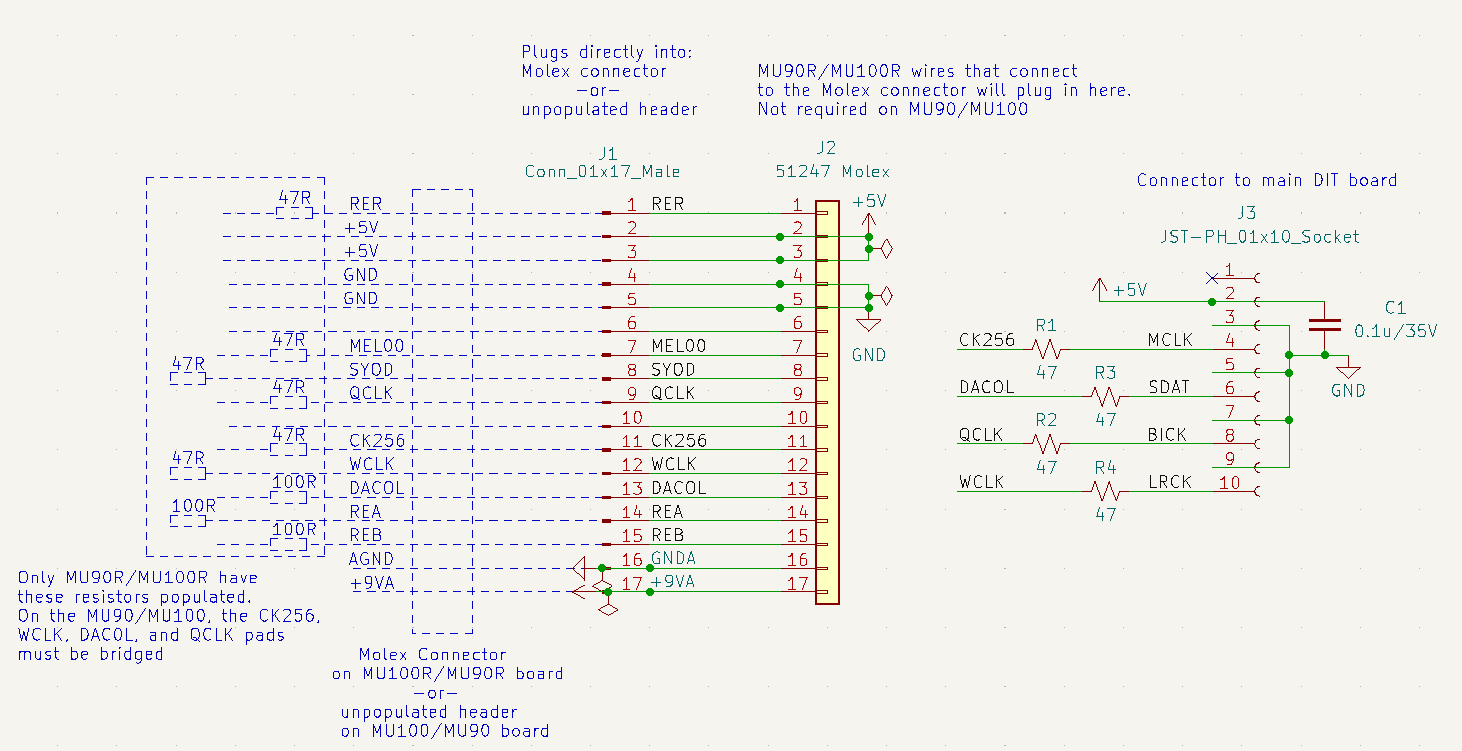
Schematics:
Main board
MU100/MU90 Connector board
Installation instructions:
For the Yamaha MU100/MU90, the DIF0 must be bridged, all others left floating.
TODO: Rest of instructions
Other compatible synths
This includes the following synthesizers:
Yamaha MU128
Yamaha AN200
…and many others. This mod will work for any device that has a 16-bit, 18-bit, 20-bit, or 24-bit PCM/I2S data stream feeding into the DAC, and has a consistent sample rate of 32/44.1/48/88.2/96khz. If you would like to test this out on other devices, please feel free to submit a pull request detailing what device and what settings you set.
A modification for Yamaha synthesizers to add optical audio out.
This mod has been especially designed for:
Yamaha MU100
Yamaha MU100R
Yamaha MU90
Yamaha MU90R
For these synths, a connector board has been designed that enables this mod to be installed with little-to-no board modification.
On the MU100/MU90, this involves soldering an unpopulated header and bridging some pads.
On the Rackmount versions of these, the MU100R/MU90R, this will plug in directly to the molex connector for the analog board, no board modification required:
The main board has been designed to fit within the limited back panel space on the MU100/MU90 and to not run into the MU100/MU100R’s expansion cards.
Schematics:
Main board
MU100/MU90 Connector board
Installation instructions:
For the Yamaha MU100/MU90, the DIF0 must be bridged, all others left floating.
TODO: Rest of instructions
Other compatible synths
This includes the following synthesizers:
Yamaha MU128
Yamaha AN200
…and many others. This mod will work for any device that has a 16-bit, 18-bit, 20-bit, or 24-bit PCM/I2S data stream feeding into the DAC, and has a consistent sample rate of 32/44.1/48/88.2/96khz. If you would like to test this out on other devices, please feel free to submit a pull request detailing what device and what settings you set.
(This has been deprecated. Tasker-WA will succeed it)
Description
Send WhatsApp Text/Images/Videos/PDF/Documents/Voice/Poll Messages, plus many more types, automatically using Tasker.
Also supports sending WhatsApp messages from the Terminal(Termux).
Previous post intro:-
Recently I’ve been getting a lot of inquiries on how to send images, videos or documents in WhatsApp using Tasker.
Possibly with the screen off, phone locked, without unlocking, etc.
Details
Contains assets that are used for running Mdtest V5 directly in Tasker.
Also supports sending WhatsApp messages from the Terminal(Termux).
Made for Project Mdtest V5.
List Of Supported Features
Send Text Messages
Send Images
Send Videos
Send Audio
Send PDF/Documents
Send Link Previews (New!)
Send List messages (New!)
Experimental support for sending list messages.
WhatsApp business account not supported, only normal WhatsApp account.
More about it here #372.
Send Poll messages
Mark as read
Revoke messages
Download Media Messages (New!)
Now includes downloading media like:-
Images
Videos
Audio
Documents
Status
Contacts
Link previews
Location previews
Mute/Unmute chats (New!)
Pin/Unpin chats (New!)
Archive/Unarchive chats (New!)
Multi-Number/User support (New!)
Previously Mdtest could support only one WhatsApp number, but now you can have as many as you want
Receive details of incoming messages as Tasker variables. Can use this for automated replies. -> Be sure to check VARIABLE.md for all the available variables.
Current list of message types that are supported and can be received as Tasker variables:-
Text message
text body
Image message
caption message
image file
Video message
caption message
video file
Audio message
audio file
Document
caption message
document name
document file
Status message
caption message
status media file
Contact message
contact display name
contact .vcf file
Link message
text body
link title
link description
link url
image preview file
Location message
latitude
longitude
image preview file
Poll response message
poll question
poll selected options
Button response message
button title
button body
button footer
selected button
List response message
list title
list body
list footer
list header
list button text
selected title
selected description
Added support to link WhatsApp using phone number pairing method
Changes in Mdtest V5 Compared To Previous V4
Now can link WhatsApp using phone number pairing method. (Old V4) Previous method of scanning QR code was tiresome and needed a spare device. (New V5) Now with the new pairing method everything is done from the main device in a few seconds.
Better support for sending images/videos/audio. (Old V4) Previously needed to send an image thumbnail seperately along with the main media file. (New V5) Now no longer necessary, Mdtest(V5) handles it.
Added support for receiving media messages and downloading the media file.
Includes downloading images/videos/audio/documents/status/contacts/links/location previews.
To enable receiving media messages and downloading media in Tasker set variable %save_media = true
The media files are stored in /data/data/net.dinglisch.android.taskerm/files/whatsmeow5/mdtest.7774/media(where 7774 = %port)
To enable receiving media messages and in Terminal(Termux) pass the --save-media flag when starting mdtest.
The media files are stored in ~/whatsmeow5/mdtest/media
Added support to send link preview messages.
Only for websites that support the Open Graph protocol. Eg:- https://github.com/HunterXProgrammer/Tasker-MdtestV5
Disclaimer
You are responsible for what you do with this.
Instructions
For Tasker Users
Check the Tasker Reddit post for more info and importable Taskernet links.
For CLI Users
NOTE:-
This section is helpful for those who want to make shell scripts to use mdtest to send messages
Not recommended for Tasker beginners since there are ready made Taskernet links in the Tasker Reddit Post that you can import.
CLI In Tasker
Added preliminary CLI support to run mdtest from within Tasker itself using action [Run Shell].
1) Set it up as described in this Tasker Reddit post.
This will prepare Tasker to enable CLI support natively.
Your [Run Shell] action to use mdtest will look like this –
#!/system/bin/sh
mdtest_dir="/data/data/net.dinglisch.android.taskerm/files/whatsmeow5/mdtest"
cd $mdtest_dir/../mdtest.7774
sh $mdtest_dir/mdtest COMMAND PARAMETERS
You can build and compile it by yourself in Termux –
rm -rf Tasker-MdtestV5 &>/dev/null
git clone https://github.com/HunterXProgrammer/Tasker-MdtestV5
cd Tasker-MdtestV5
bash build_whatsmeow5.sh
cd ..
3) After that link with WhatsApp like this –
Now to connect it to WhatsApp –
Type –
cd ~/whatsmeow5/mdtest; ./mdtest pair-phone 919876543210
(Here “91” is the country code and “9876543210” is the number. Adjust as needed)
This will generate the linking code.
You can copy the linking code and paste it in WhatsApp via notification
or by open WhatsApp -> ⋮ (menu) -> Linked Devices -> Link with phone number
Wait about 20s for pairing to complete. All done.
This finishes the CLI setup.
Your script will look like this –
#!/data/data/com.termux/files/usr/bin/bash
cd ~/whatsmeow5/mdtest
./mdtest FLAGS COMMAND PARAMETERS
Commands And Parameters
The FLAGS are –
--mode <value>
      Select mode: none, both or send
      (default option: none)
      - both -> Mdtest will receive mesages and as well as send messages
      - send -> Mdtest will only send messages, not receive.

--save-media
      Download And Save Media.
      - This flag also enables receiving media message types
        such as:- images, videos, audio, documents, contacts,
        status, location previews.
      - Media saved to ~/whatsmeow5/mdtest/media
      - Note:- To be used in conjuction with "--mode <value>"
               Will only be effective if "<value>" is "both"

--port <value>
      Port can be anything from 1024 ~ 65535
      It must not be 9990
      (default option: 7774)
      - Mdtest accepts requests on this port.
      - Note:-  To be used in conjuction with "--mode <value>"
                Will only accept requests if "<value>" is "both" or "send"

--auto-delete-media
      Delete Downloaded Media After 30s
      - Useful for auto-deleting rubbish media that probably won't
        ever be used.
      - The idea is that if the user doesn't use the
        downloaded media after 30s, save space by deleting
        what is most likely redundant files.
      - Note:- To be used in conjunction with "--save-media"
The “<>” means required, the “[ ]” means optional.
Note About JID
For single contacts, JID is usually the country-code followed by the phone-number and appended with “@s.whatsapp.net”. Eg:- Say country-code is “91”, then JID will be -> 919876543210@s.whatsapp.net
For group contacts, JID is usually the group phone-number appended with “@g.us”. Eg:-1234567890987654321@g.us
A simple tool for showing local and pivot coordinate system of SCNNode.
Initially created during experiments with ARKit + SceneKit.
Color notation
Coordinate System
X
Y
Z
Local
Pivot
If you like this tool, please give your ⭐ to this repository.
Installation
CocoaPods
To install it through CocoaPods, add the following line to your Podfile:
pod 'SCNNodeVisualDebugger', :git => 'git@github.com:handsomecode/SCNNodeVisualDebugger.git'
Please, don’t forget to run pod update command to update your local specs repository during migration from one version to another.
Carthage
To install it through Carthage, add the following line to your Cartfile:
github "handsomecode/SCNodeVisualDebugger"
Usage
Importing the library to get access to API
import SCNNodeVisualDebugger
Adding debug axes to the specific node
letnode:SCNNode= // provide SCNNode instance
node.addDebugAxes()
If you need to add debug axes to child nodes as well you should pass a flag recursively as true as a parameter of the method. By default, recursively value is false
node.addDebugAxes(recursively =true)
Removing debug axes from the specific node
node.removeDebugAxes()
If you need to remove debug axes from child nodes as well you should pass a flag recursively as true as a parameter of the method. By default, recursively value is false
node.removeDebugAxes(recursively =true)
Checking debug axes from the specific node
if node.hasDebugAxes(){
// some actions
}
Adding and removing debug axes to node by double tap
It can be useful to show or remove debug axes at runtime. For this purpose, you can use a double tap on a specific node.
Set enableDebugAxesByDoubleTap property of SCNView instance to true to enable double tap trigger.
OwOwning with the Windows API is a presentation given during the DEFCON Furs 2020 virtual conference.
During the presentation, I (secfurry) explore the methods and function calls used to spoof parent process relationships in Windows and inject shellcode into Windows applications.
I cover many undocumented or lesser known functions and provide code (saved here) to experiment and modify as you see fit.
PS: The code used in this presentation was given to one of my friends @iDigitalFlame to use in development for his malware framework XMT, go check it out if you’re interested in more cool stuff like this.
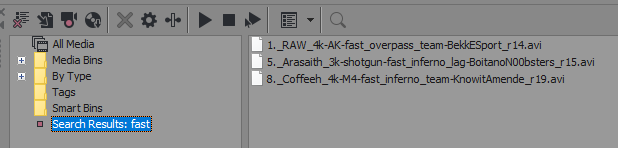
A CLI tool that consumes JSON files exported from CS:GO Demos Manager and spits out readable highlights meant as helpful filenames for CS:GO fragmovie recording.
spread (as in the frags being “spread out”) is labelled for any 3k, 4k or ace where at least 15 seconds elapsed between two or more of the eliminations.
fast is labelled for any highlight where all the kills happen within six seconds.
The timestamp listed at the end of each highlight represents the time shown on the ingame clock when the first frag of the highlight occurs.
The tick listed at the end of each highlight is the tick right before the first opponent elimination of the highlight occurs. Including demo_gototick is meant for easier copy/paste to the in-game console.
The tick after the demo name, for example playdemo astralis-vs-complexity-m3-nuke@128052 makes it so that you’re taken to the start of the first highlight when the demo loads (the tick buffer here is larger than the tick at the end of the highlight text since the demo seems to play in the background for some time when loading, making it so the first few frags might have already happened when you start watching).
The round number is shown at the end of each highlight, for example r25 for round 25.
the x._ preceding every highlight is meant to be replaced by a number when you have recorded the highlight, making the whole line appropriate as a filename for your video file. The information provided in the filename will then be easily searchable in your editing software, serving as helpful tags. For example:
Open the demos in CS:GO Demos Manager, select all and and click “analyze”. With all demos still selected, right click and click “Export JSON”. Move the exported files to the json folder.
Run npm run build and npm start. The text file containing the highlights for all demos will be created in the exports folder.
If you want to run the script again with different JSON files, move the already exported text file to a different location to prevent it from being overwritten.
Options
If you want to get frags of a single player only, add their STEAMID64 to getFrags in src/app.ts:
getFrags({playerSteamId: "76561198036024464",});
Example
You can see an example of exported highlights in the exports folder.
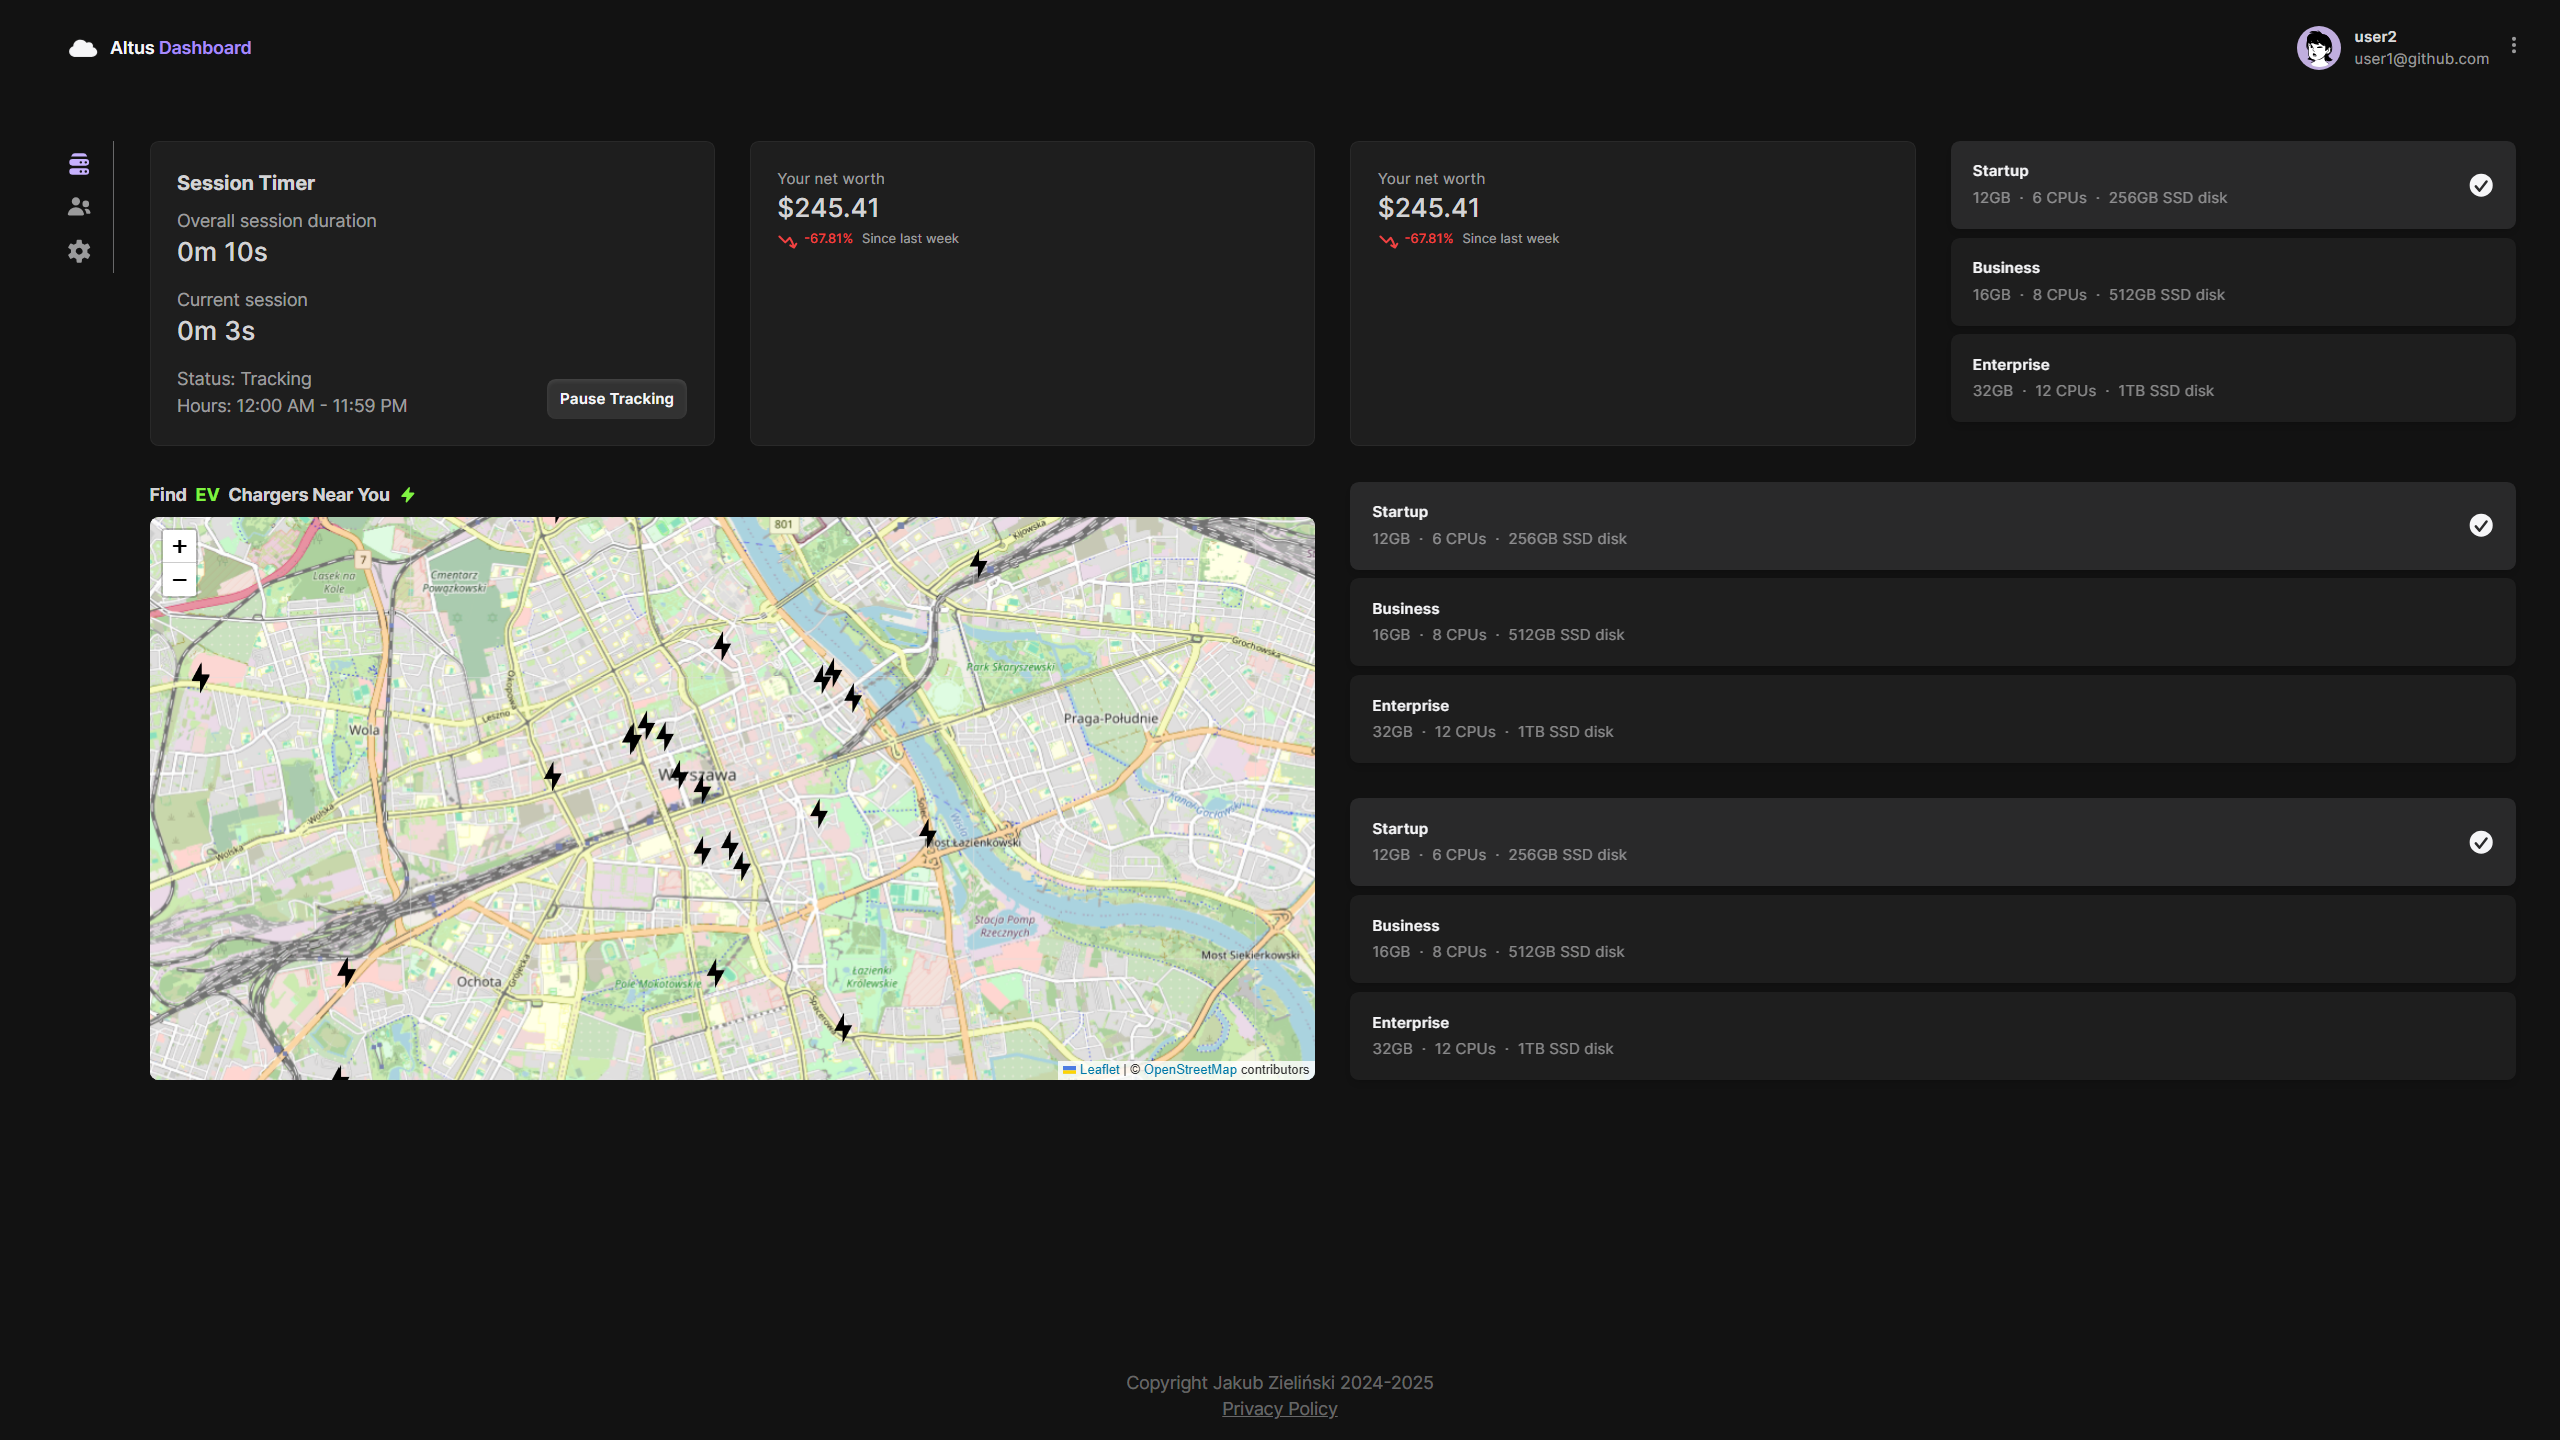
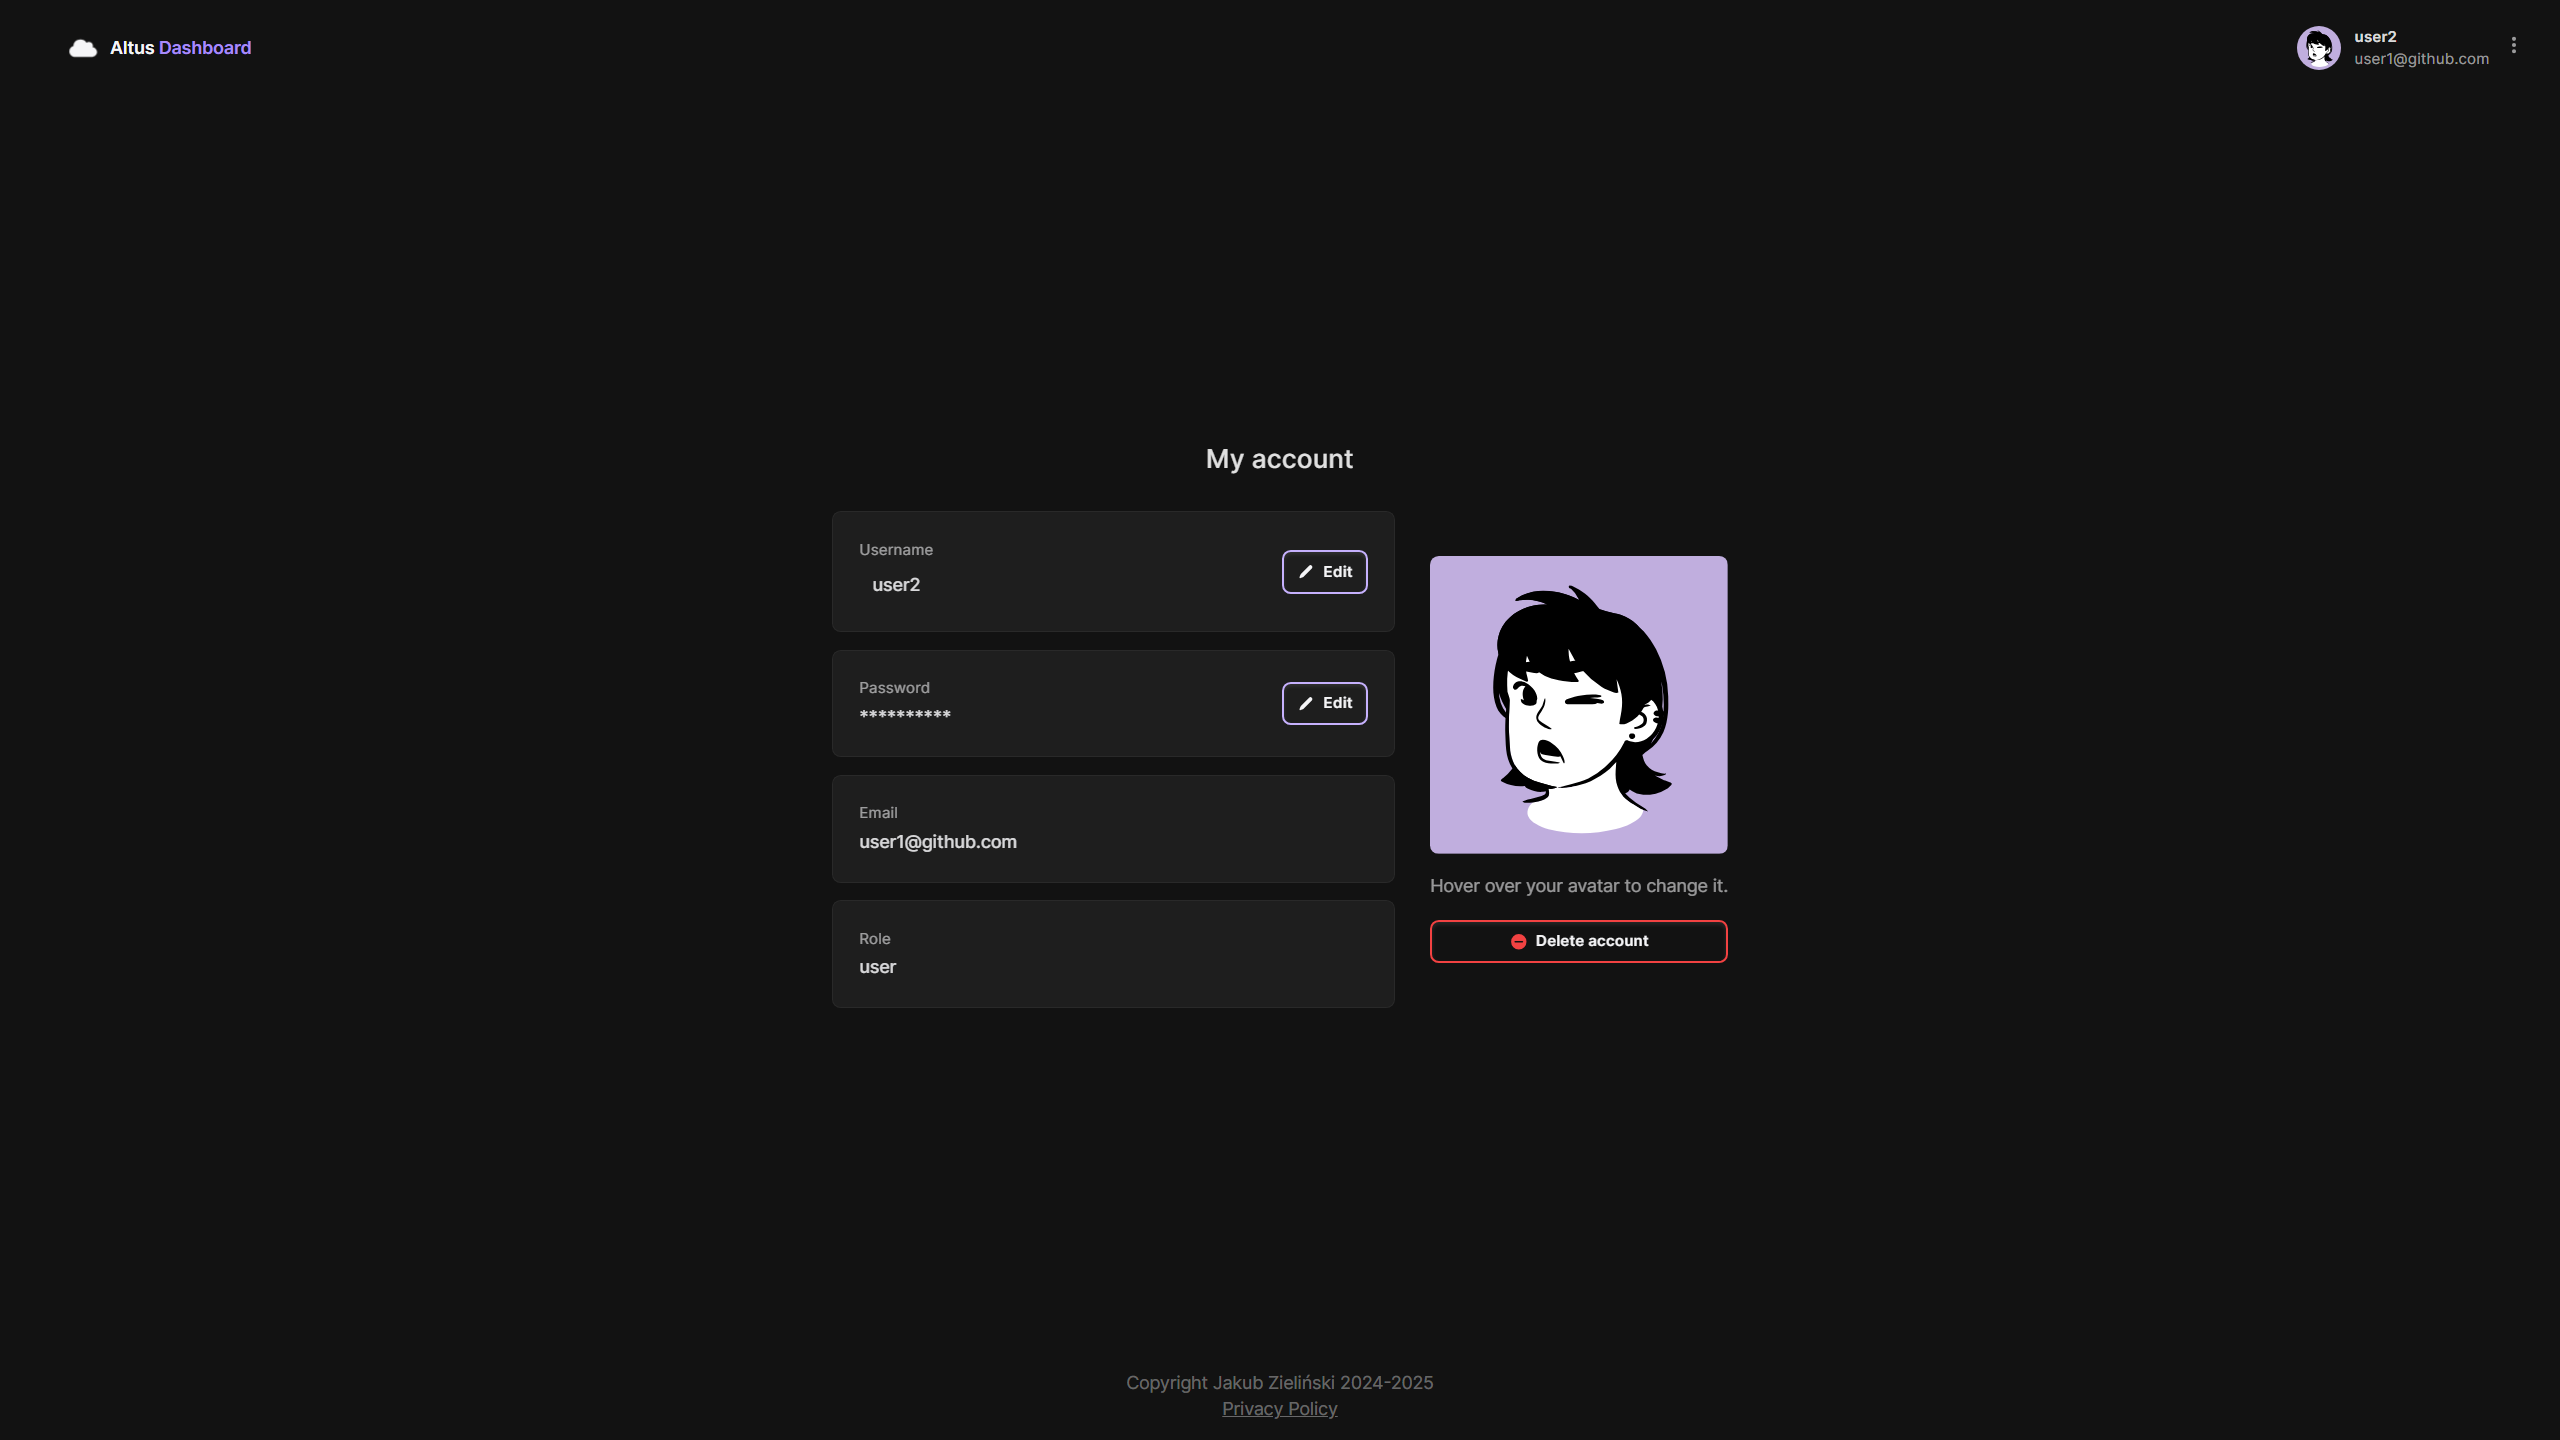
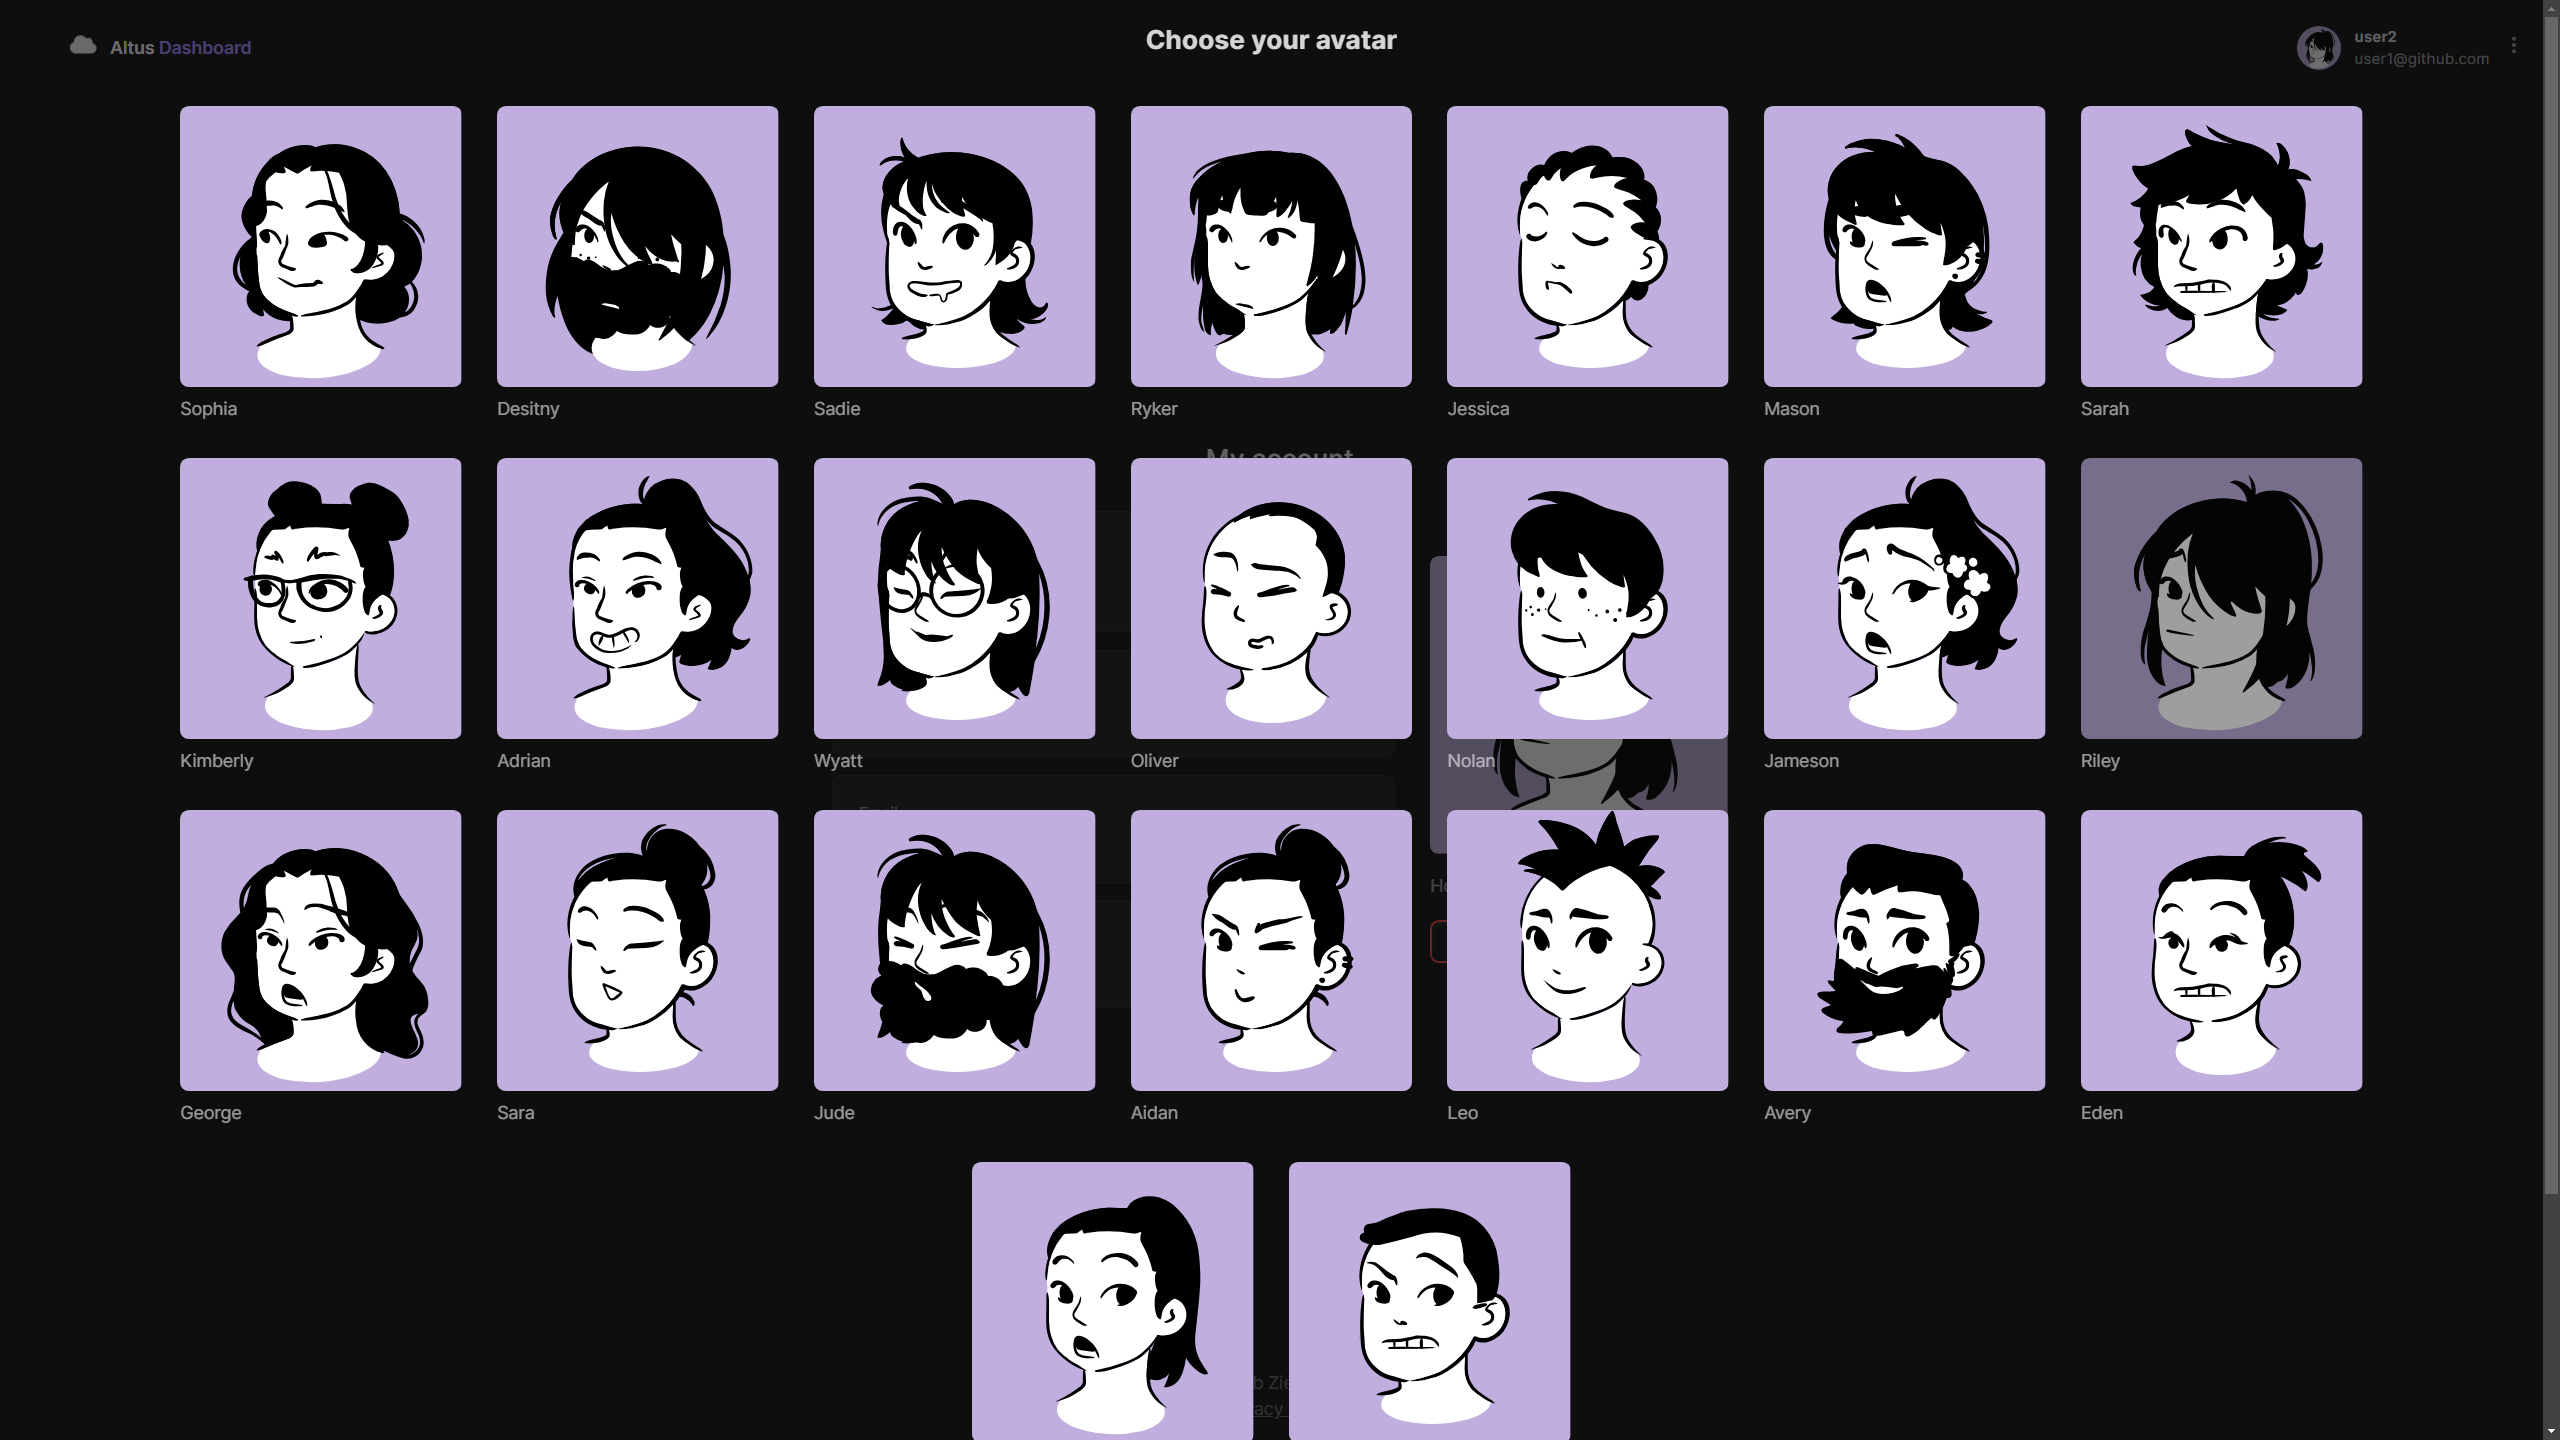
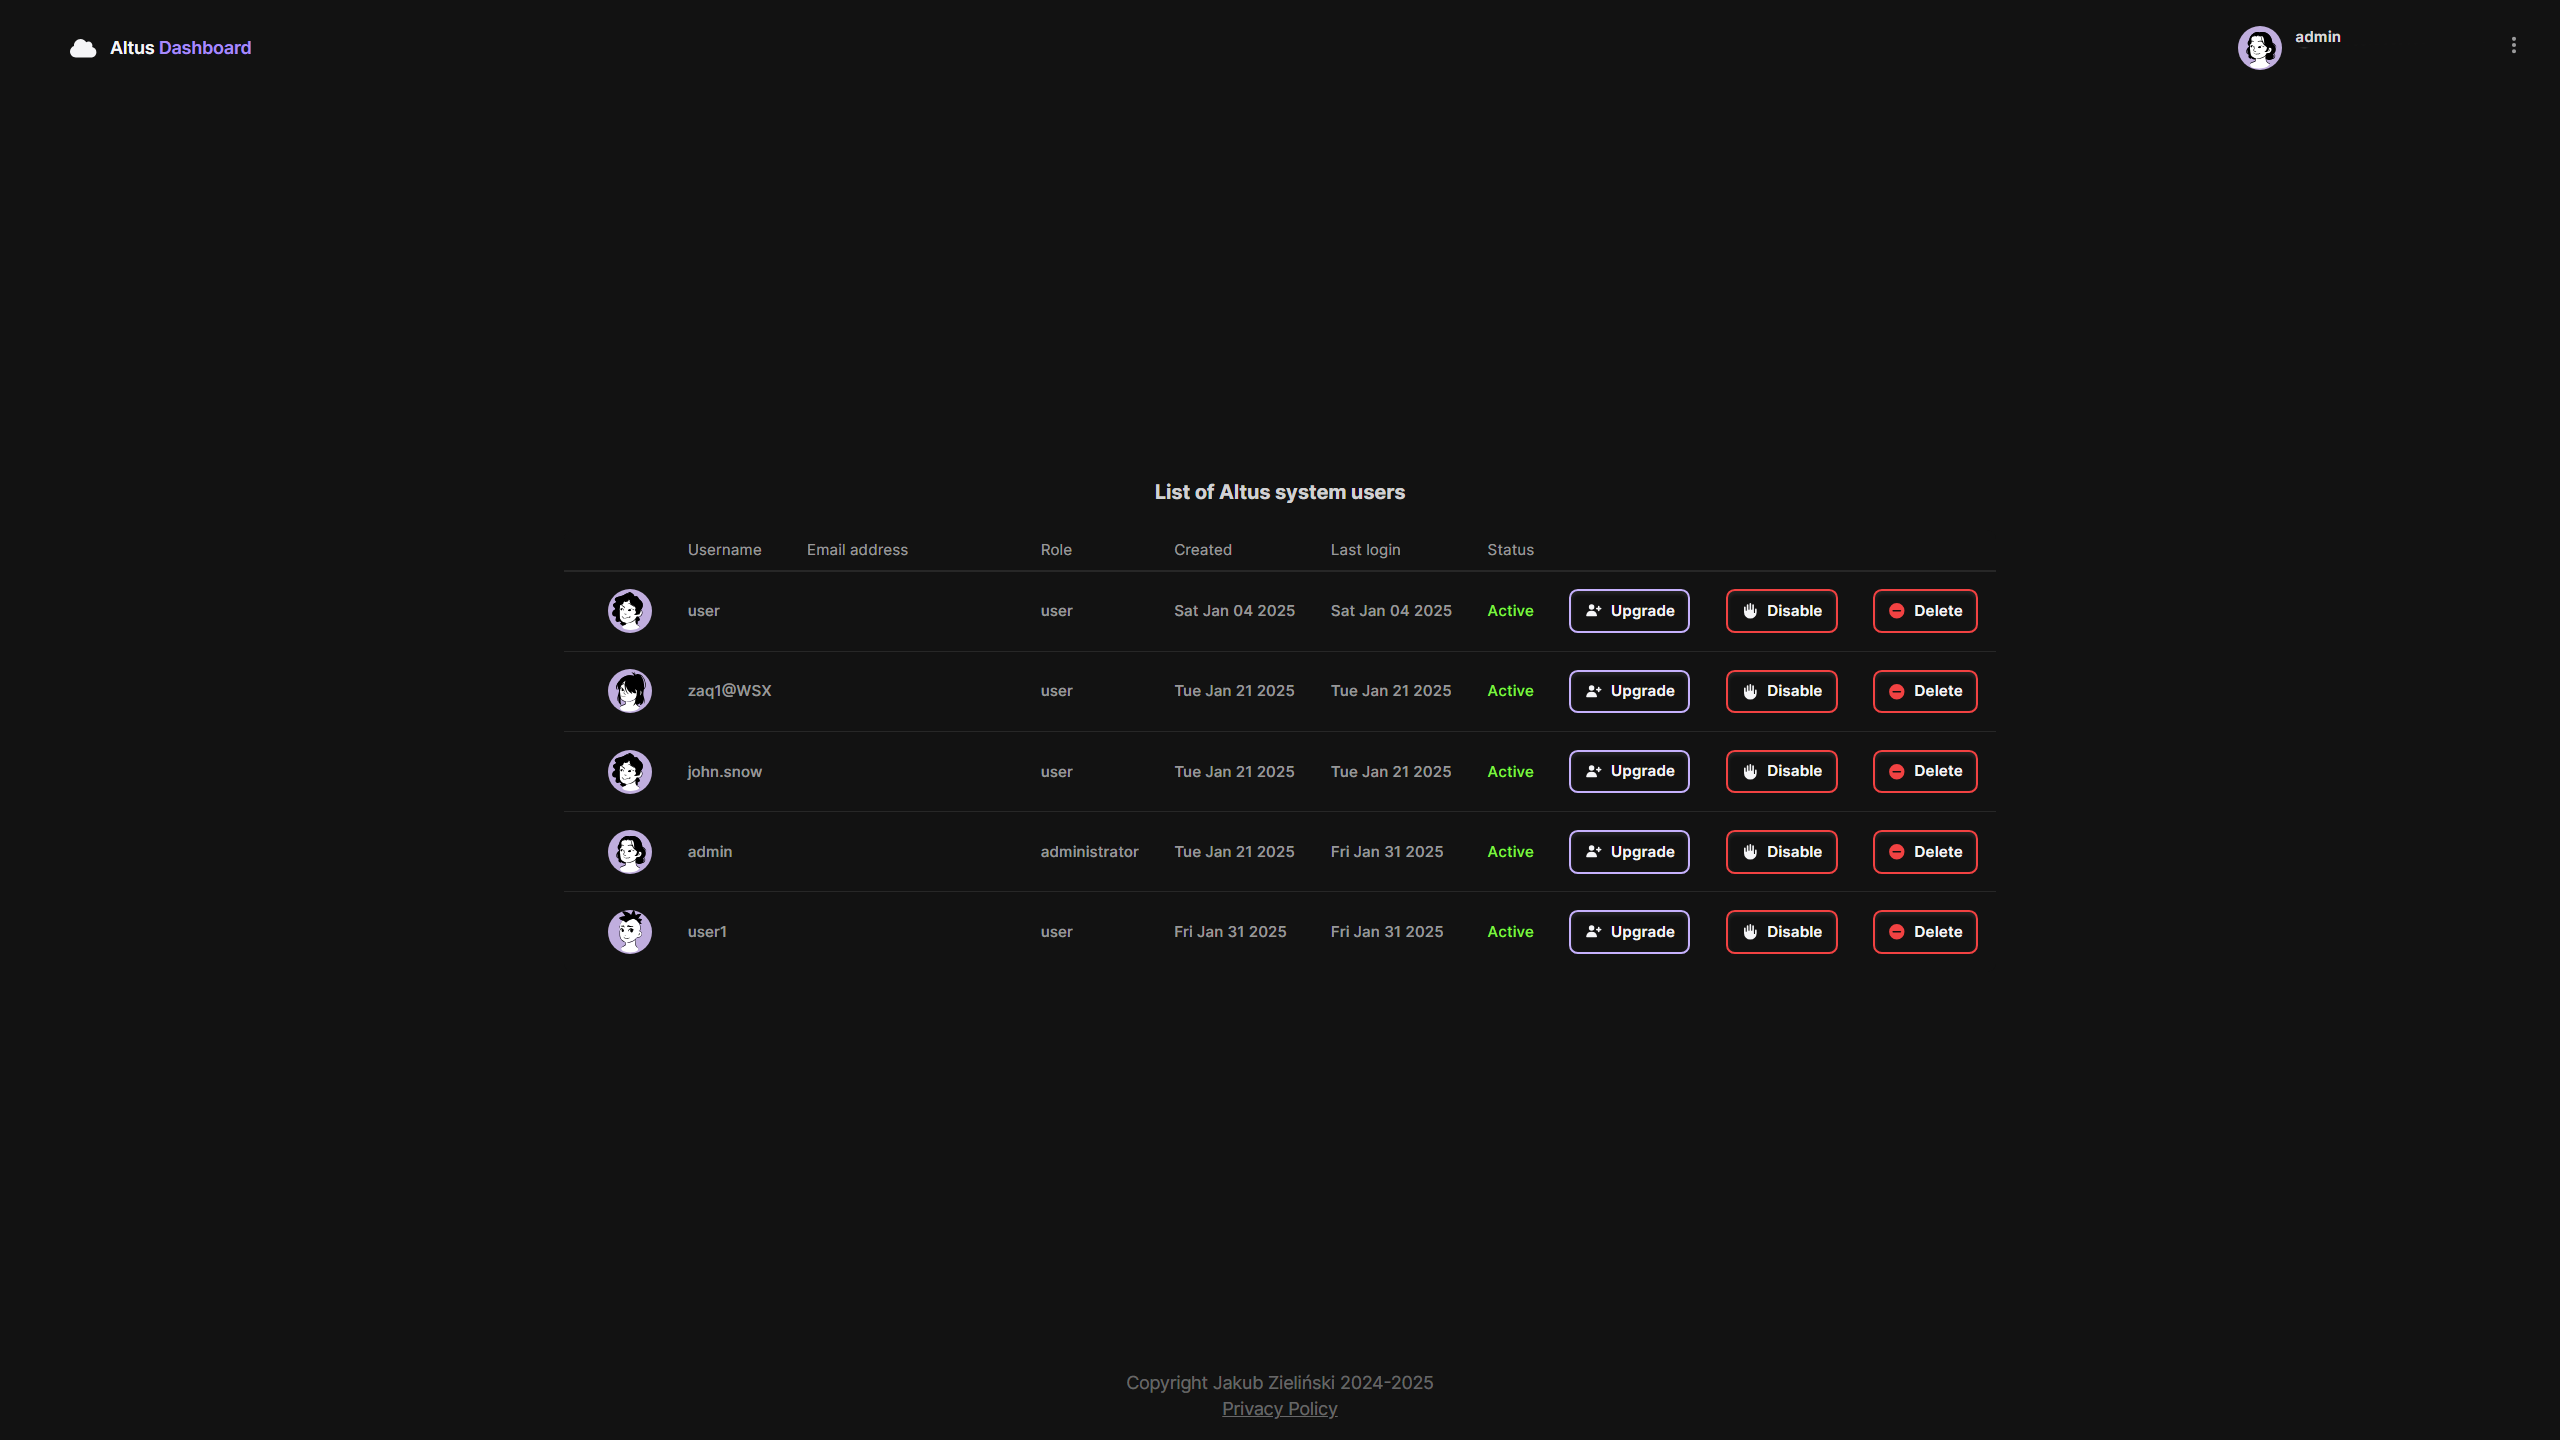
Altus is a fully functional dashboard that embodies my long-standing vision of a clean and intuitive web application. For several years, I aspired to create such a project but lacked the time while working as a barista at Krakow International Airport. By the last quarter of 2024, I successfully delivered it in its Minimum Viable Product (MVP) state. The app steadily progressed as I developed it alongside my primary university tasks, working on it in my spare time, driven by a passion to create something unique and truly my own in a field I was deeply passionate about. Inspired by the quote Non omnis moriar, Altus stands as a reflection of my journey and growth as a web developer.
This project is licensed under the Creative Commons Attribution-NonCommercial 4.0 International (CC BY-NC 4.0).
You may use, share, and adapt this project for non-commercial purposes only.
For commercial use, please contact me at jzielinski47dev@gmail.com.
API Reference
Authentication Endpoints
Sign Up a User
POST /api/auth/signup
Creates a new user account.
Parameter
Type
Description
username
string
Required. Username of the user
email
string
Required. Email of the user
password
string
Required. Password for the user
Log In a User
POST /api/auth
Authenticates a user.
Parameter
Type
Description
username
string
Required. Username of the user
password
string
Required. Password of the user
Log Out a User
POST /api/auth/logout
Logs out the currently authenticated user.
Check Authentication Status
GET /api/auth/status
Returns the authentication status of the current user.
User Management Endpoints
Get All Users
GET /api/users
Returns a list of all users.
Get Active Users Count
GET /api/users/count
Returns the count of currently active users.
Delete a User
POST /api/users/delete/:username
Deletes a user. Administrator rights required.
Parameter
Type
Description
username
string
Required. Username of the user to delete
Update a User’s Username
PATCH /api/users/patch/username/:username
Updates the username of an existing user.
Parameter
Type
Description
username
string
Required. Current username of the user
newUsername
string
Required. New username to update to
Grant Administrator Rights
PATCH /api/users/grant/:username
Grants administrator rights to a user. Administrator rights required.
Parameter
Type
Description
username
string
Required. Username of the user to promote
Get User Details (Current User)
GET /api/users/me
Returns the details of the authenticated user.
Get All User Data (Admin Only)
GET /api/admin
Returns detailed data for all users. Administrator rights required.
Key Functionalities:
Complex user authentication system (Sessions)
Role-based access control (RBAC) with security measures
An easy-to-deploy Tailscale + Caddy container with plugins.
Expose Caddy services through Tailscale for secure, private connections.
Optionally run Caddy with Cloudflare DNS challenges, or any other Caddy plugins.
Now includes an image with Sablier out-of-the-box!
The idea was to make a container that would allow you to simply follow this tutorial: Remotely access and share your self-hosted services. I decided to create this project after having trouble with existing solutions.
The container on Docker Hub is built with the Cloudflare plugin preinstalled, but if you need different plugins, you can build your own image by following the instructions below.
Getting Started
If you want to use the Cloudflare plugin:
1) Pull & Run
See Environment Variable below and set your own values here before running. The only mandatory variable is TAILSCALE_AUTHKEY.
This container tries to load /etc/caddy/Caddyfile at launch, which you can mount at deployment. However, if you do not provide one, you can create one later. Just shell into the container after deployment and use vim to create the Caddyfile. Make sure to put your Caddyfile in /etc/caddy/ if you want it to persist after restart. Check out the tutorial in the introduction to help you get started with integrating Tailscale with Caddy in the Caddyfile.
Environment Variables
TAILSCALE_AUTHKEY
The auth key used to join your Tailnet. Once authenticated, you typically do not need this again (it’s stored in /tailscale/tailscaled.state).
TAILSCALE_HOSTNAME (optional)
Hostname for your Tailscale node. Defaults to “tailgate.”
TAILNET_NAME (optional)
Your Tailnet name for MagicDNS.
CADDY_WATCH (optional)
Sets the caddy --watch option to automatically reload the configuration when changes are made to the Caddyfile.
CLOUDFLARE_API_TOKEN (optional)
If you’re using the Cloudflare plugin for ACME challenges, set your token here. Then in your Caddyfile add:
(cloudflare) {
    tls {
        dns cloudflare {env.CLOUDFLARE_API_TOKEN}
    }
}
yourdomain.com {
    import cloudflare
    # Whatever you want, e.g.
    # reverse_proxy my-server.my-tailnet.ts.net:80
}
I am new to Docker, so this container might be a bit “chubby.” It’s built on Debian Bookworm and includes some debugging tools that you might find helpful (ping, dig, and nslookup), should any issues arise. As such, any bug reports or pull requests with improvements are most welcome!
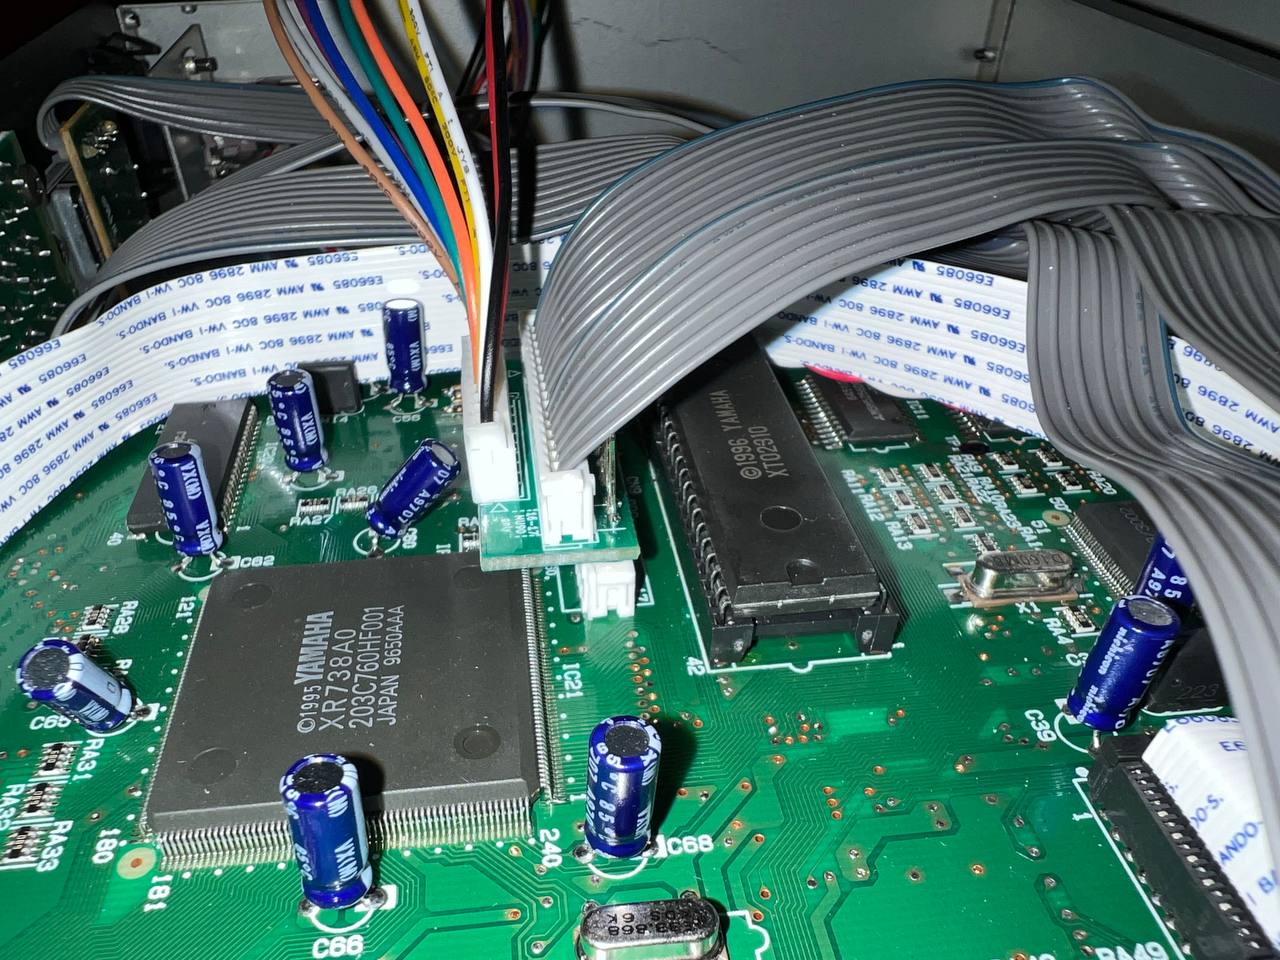


 https://github.com/nikitalita/MU100-DIT