Code computes the potential (current-free) magnetic field on a rectilinear mesh in a Cartesian box, given
the normal component of the magnetic field on each boundary face. The solution is computed using geometric multrigrid applied
to a finite-difference scheme. The method computes the magnetic field via a vector potential formulation. The code returns both the vector
potential in Coulomb gauge and the corresponding magnetic field.
The code uses a second-order finite-difference scheme for the discretization. In principle, this
means that the numerical truncation error should decrease as the square of the mesh spacing.
The backbone of the code is a set of modules for solving Poisson’s equation in N dimensions
using geometric multigrid. This multigrid solver was written first, and then the vector potential
code was added later.The name of the code NDSM is derived from the original set of modules, i.e.
N-Dimensional Solver Multigrid (NDSM). The vector-potential module, however, is specifically
designed for 3D, but leverages the more general N-dimensional backend.
Code is written in Fortran 2003 and tested using the gfortran 8.3.0 compiler. It has only been
tested on a Linux platform.
An earlier version of this code was used and is decribed in the paper Yang K.E., Wheatland M.S., and Gilchrist S.A.: 2020, ApJ,984,151.
Paper DOI: 10.3847/1538-4357/ab8810
Mesh and dimensions
The mesh is rectilinear, i.e. it is described by three mesh vectors x,y,z. These are assumed
to have fixed spacing. The code makes no explicit assumptions about the units of either B or A, although the
length scales are non-dimensional.
Vector Potential Gauge
The vector potential is computed in the Coulomb gauge. However, note that in a box,
the Coulomb gauge is not necessarily unique when the boundary conditions are on the normal component
of the magnetic field. The NDSM code makes a particular choice in resolving this ambiguity. See
the paper and the notes for more details.
Convergence
The multigrid method arrives at a solution via iteration.
When convergence is poor, the output of the code may not accurately represent the
solution to the underlying boundary-value problem (see ndsm_notes.pdf for details of the BVP).
This has several consequences. Firstly, the magnetic field may not be a potential field, and significant electric
currents may exist within the volume. Secondly, the normal component of the magnetic
field may not match the normal component specified as boundary conditions.
Metric
Two metrics are available for measuring the convergence of the solution:
the max or mean difference between iterations. By default, the max is used.
The max is sensitive to failure of convergence at any point, and therefore may be inappropriate
for many practical problems, but is useful for testing. The mean is a
more robust convergence metric and may be more appropriate for practical problems.
Setting mean=True, will use the mean rather than the max.
Tolerances
The code has two tolerance parameters that determine when to stop
iterating.
vc_tol
The V cycle iteration stops when the max/mean difference is less than
vc_tol. If vc_tol is large, the code may return quickly, but the solution
may not be an accurate solution of the BVP.
ex_tol
The multrigrid method requires solution of a BVP on the coarsest mesh.
This is solved via relaxation. The relaxation stops when the change in
solution is less than ex_tol. Setting this to a large value will
result in inefficient V cycles, because the BVP is not being accurately
solved at each V cycle iteration.
Choice of vc_tol and ex_tol
When testing the code on analytic solutions, both vc_tol and ex_tol
can be set to very small values. The default values defined in ndsm.py
reflect values used for testing.
For some practical problems, the change in solution between iterations
may never reach the desired value of vc_tol: the solution is not improving
with additional V cycles. In this case, the iteration
will run until ncycles_max is reached. This may take a long time
depending on how ncycles_max is chosen. A warning will be printed
if the code returns without achieving vc_tol.
Setting a large value for vc_tol (and ex_tol) may prevent the
code from running to ncycles_max, but a large value of vc_tol
in particular will mean the solutions is poorly converged: the numerical
solution is not an accurate solution of the underlying boundary-value problem.
Compile shared library
The core Fortran code builds a shared library.
Running make will build the shared library, called ndsm.so by default.
OpenMP
The code is parallelized using the OpenMP standard. However, it should compile and run without OpenMP,
it will just be very slow on a multicore machine.
REAL and INTEGER Types
The core Fortran modules are written with a real type defined in NDSM_ROOT as REAL(FP). By default
this is set to C_DOUBLE. This can be changed to any supported Fortran real type without
breaking anything in the Fortran modules, however the Python interface only works with a real type
that is intercompatible with C_DOUBLE.
Similarly, the basic integer type used throughout the code is INTEGER(IT), with IT = C_INT64_T.
This again can be changed without resulting compiler errors. However, making the int size too small
may lead to overflow if large meshes are used, since the total number of mesh points is stored as a signed
Fortran integer. In addition, changing IT will break the Python wrapper.
Python
The shared library can be called via the ndsm.py module. The module calls the subroutines
in the shared library using the Python ctypes module. The shared library needs to be compiled
first and either exist in sys.path, or else the explicit path to the shared library needs to
be passed as an argument to the function (see the docstring).
The basic Python module only requires numpy and ctypes. Some of the tests require more
modules, e.g. matplotlib.
Tests
The repository contains code for running a number of integration and unit tests. Some are
written in Fortran, while others are written in Python. The main integration test is designed
to demonstrate that the truncation error has the correct scaling with mesh spacing. This is
a basic test of correctness for the method.
The truncation error is estimated by applying the code to a known analytic test case and computing metrics
for the difference between the numerical and analytic solutions. The error metrics used are the max.
and mean magnitude of the difference between the numerical and analytic vector fields. For a correctly
implemented second-order scheme, (generally) both these metrics should decrease with the square of the mesh spacing
(for a uniform mesh). The max. error in particular may not achieve second order scaling for certain problems.
A more complete description of the testing and results is included in the notes.
Licensed to the Apache Software Foundation (ASF) under one
or more contributor license agreements. See the NOTICE file
distributed with this work for additional information
regarding copyright ownership. The ASF licenses this file
to you under the Apache License, Version 2.0 (the
“License”); you may not use this file except in compliance
with the License. You may obtain a copy of the License at
Unless required by applicable law or agreed to in writing,
software distributed under the License is distributed on an
“AS IS” BASIS, WITHOUT WARRANTIES OR CONDITIONS OF ANY
KIND, either express or implied. See the License for the
specific language governing permissions and limitations
under the License.
LuaJIT FFI bindings to ICU (International Components for Unicode). ICU provides a robust date and time library that correctly and efficiently handles complexities of dealing with dates and times:
Date and time formatting
Date and time parsing
Date and time arithmetic (adding and subtracting)
Time zones
Daylight saving time
Leap years
ISO 8601 formatting and parsing
Usage
localicu_date=require"icu-date-ffi"-- Create a new date object.localdate=icu_date:new()
-- You can get and set the date's timestamp.date:get_millis() -- Defaults to current time.date:set_millis(1507836727123)
-- You can generate an ISO 8601 formatted string.localformat_iso8601=icu_date.formats.iso8601()
date:format(format_iso8601) -- "2017-10-12T19:32:07.123Z"-- You can generate a custom formatted string.localformat_custom=icu_date.formats.pattern("EEE, MMM d, yyyy h:mma zzz")
date:format(format_custom) -- "Thu, Oct 12, 2017 7:32PM GMT"-- You can parse a string using various formats.localformat_date=icu_date.formats.pattern("yyyy-MM-dd")
date:parse(format_date, "2016-09-18")
date:format(format_iso8601) -- "2016-09-18T00:00:00.000Z"-- You can extract specific date or time fields.date:get(icu_date.fields.YEAR) -- 2016date:get(icu_date.fields.WEEK_OF_YEAR) -- 39-- You can set specific date or time fields.date:set(icu_date.fields.YEAR, 2019)
date:format(format_iso8601) -- "2019-09-18T00:00:00.000Z"-- You can perform date or time arithmetic,date:add(icu_date.fields.MONTH, 4)
date:format(format_iso8601) -- "2020-01-18T00:00:00.000Z"date:add(icu_date.fields.HOUR_OF_DAY, -2)
date:format(format_iso8601) -- "2020-01-17T22:00:00.000Z"-- Timezones are fully supported.date:get_time_zone_id() -- "UTC"date:set_time_zone_id("America/Denver")
date:format(format_iso8601) -- "2020-01-17T15:00:00.000-07:00"-- Daylight saving time is also fully supported.date:set_millis(1509862770000)
date:format(format_iso8601) -- "2017-11-05T00:19:30.000-06:00"date:add(icu_date.fields.HOUR_OF_DAY, 5)
date:format(format_iso8601) -- "2017-11-05T04:19:30.000-07:00"
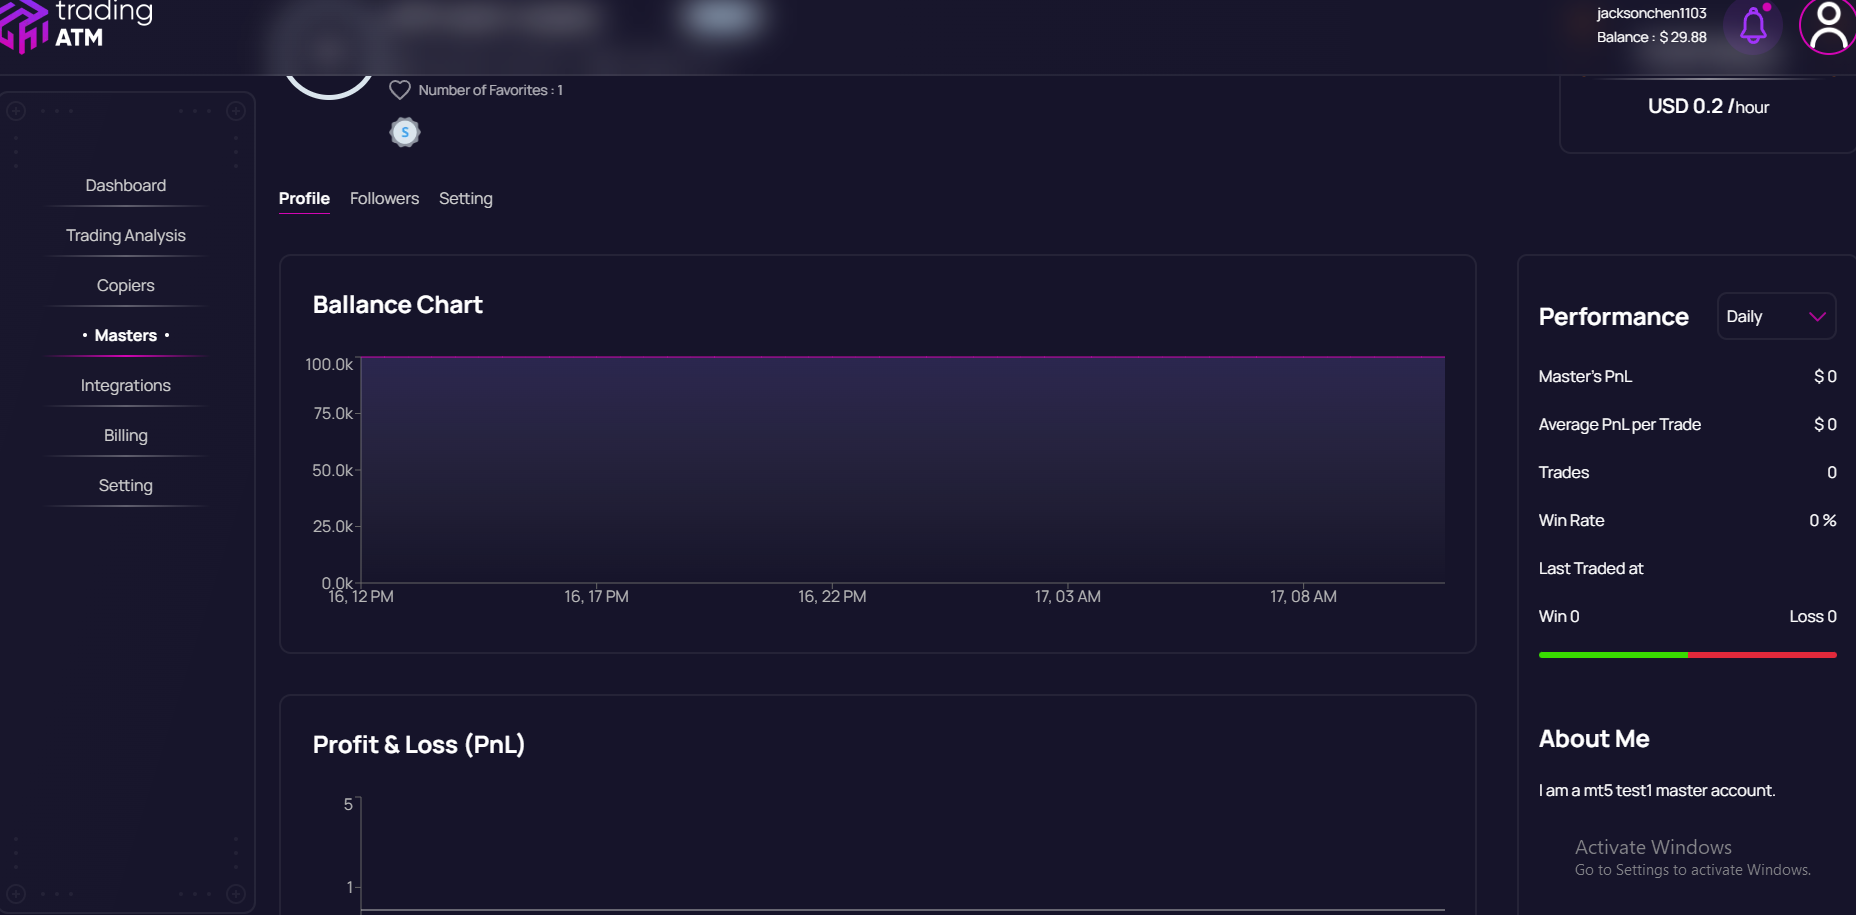
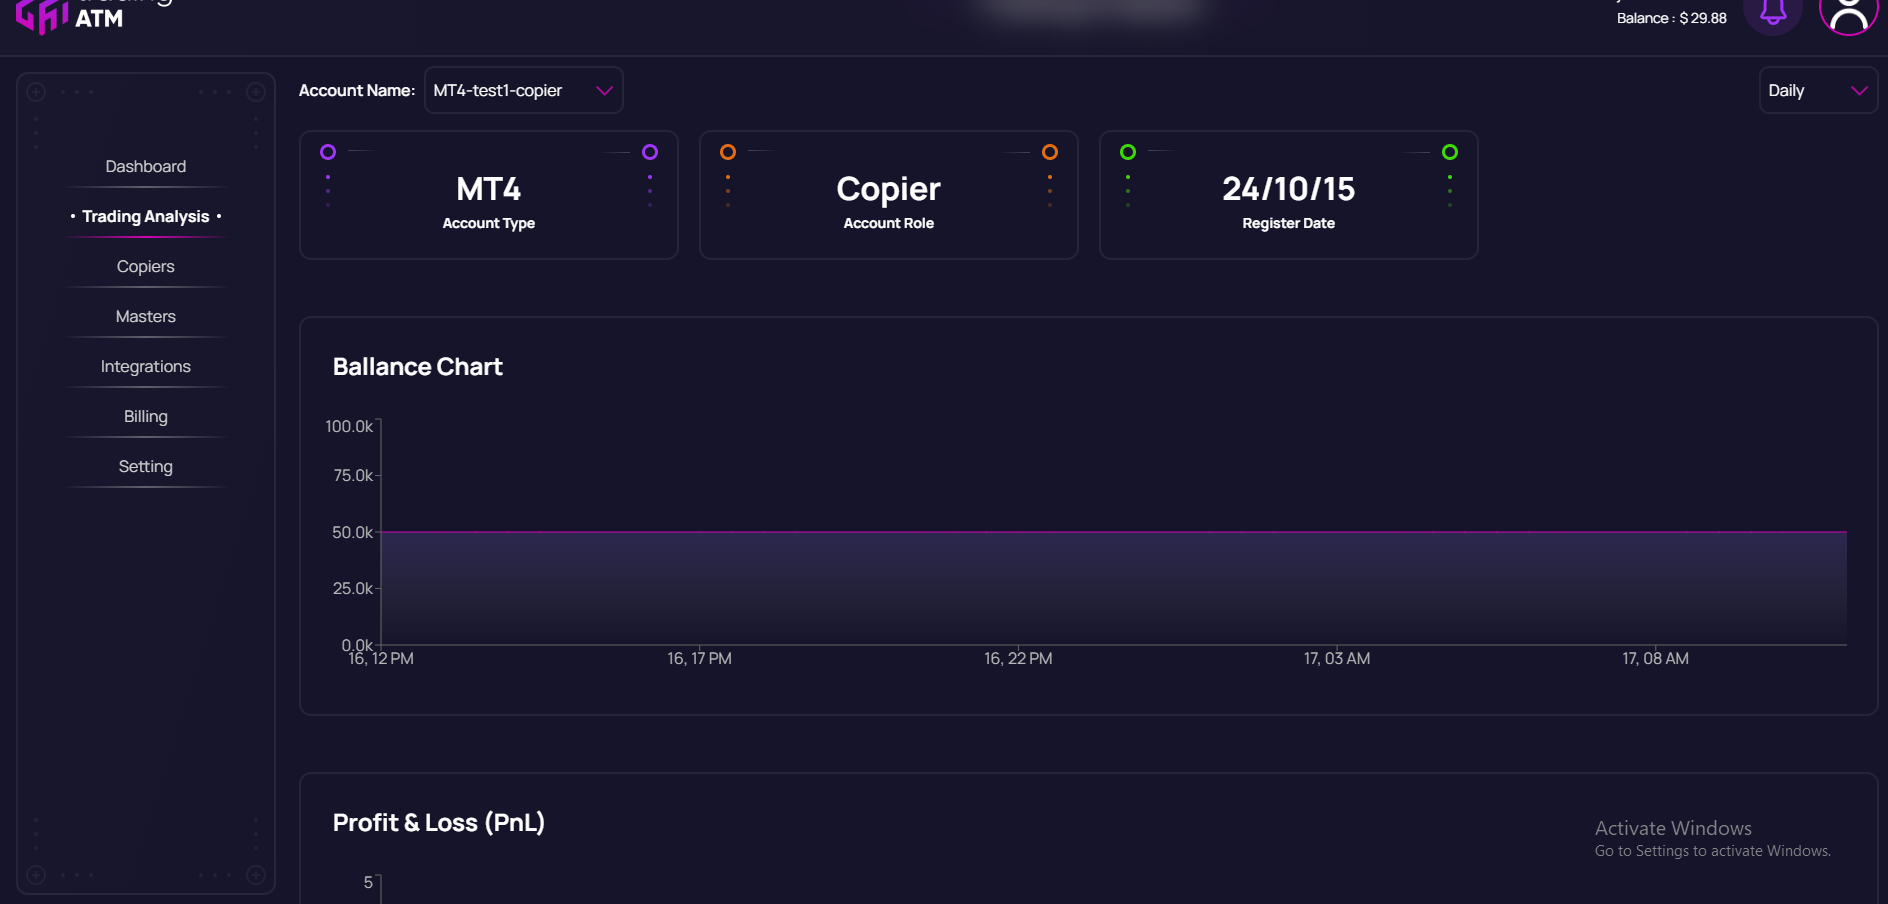
TradingATM is an innovative social copy trading platform designed to facilitate seamless copy trading across multiple trading platforms, including TradeLocker, MetaTrader 4 (MT4), and MetaTrader 5 (MT5). This Software as a Service (SaaS) platform allows users to register their trading accounts as “masters,” enabling the tracking of their trading activities, which are then displayed in both chart and numerical formats. Other users can view the performance of all master accounts and choose to copy trades from profitable masters by registering their accounts as “copiers.” The platform also provides tools for copiers to monitor their account performance effectively.
Images
Images to showcase the site.
Workflow Video
To understand how TradingATM works, watch our workflow video:
Technical Implementation
Homepage
Built on WordPress, providing a user-friendly interface for information dissemination and user engagement.
Dashboard Frontend
Developed using React, ensuring a dynamic and responsive user experience for both master and copier accounts.
Main Backend
Leveraging Node.js for efficient server-side operations, handling user registrations, transactions, and data management.
MetaTrader API Backend
Implemented using ASP.NET, facilitating robust integration with MT4 and MT5 for real-time trade execution and account management.
Payment Integration
To enhance user accessibility, TradingATM incorporates CryptoChill, a third-party cryptocurrency payment platform. This integration allows users to make payments using various cryptocurrencies, aligning with the growing trend of digital asset utilization in financial transactions.
Role and Responsibilities
In this project, my primary responsibilities include backend development, where I focus on creating and maintaining the server-side functionalities that support the core operations of the platform. Additionally, I actively participate in the frontend dashboard development to ensure a cohesive user experience across the application.
Conclusion
TradingATM represents a significant advancement in the realm of copy trading by providing a comprehensive platform that bridges various trading environments. With its focus on user engagement, real-time performance tracking, and cryptocurrency payment options, it positions itself as a leader in the evolving landscape of social trading solutions.
Extra reactor utils that aren’t included in either core or addons
ReactorUtils#intersect
Intersects multiple publishers. All distinct identical elements are emitted.
importcom.jidda.reactorUtils;
Flux<String> f1 = Flux.just("A","B","C");
Flux<String> f2 = Flux.just("D","C","A");
Flux<String> f3 = Flux.just("F","B","D");
ReactorUtils.intersect(f1,f2).subscribe() //Emits C,A//Can also be used with prefetch value, default is UnboundedReactorUtils.intersect(f1,f2,32).subscribe() //Emits C,A//Can also be used with list of publishersReactorUtils.intersect(Arrays.asList(f1,f2,f3)).subscribe() //Emits C,A,B,D
ReactorUtils#joinIf
Joins two publishers values, emits based upon filter condition.
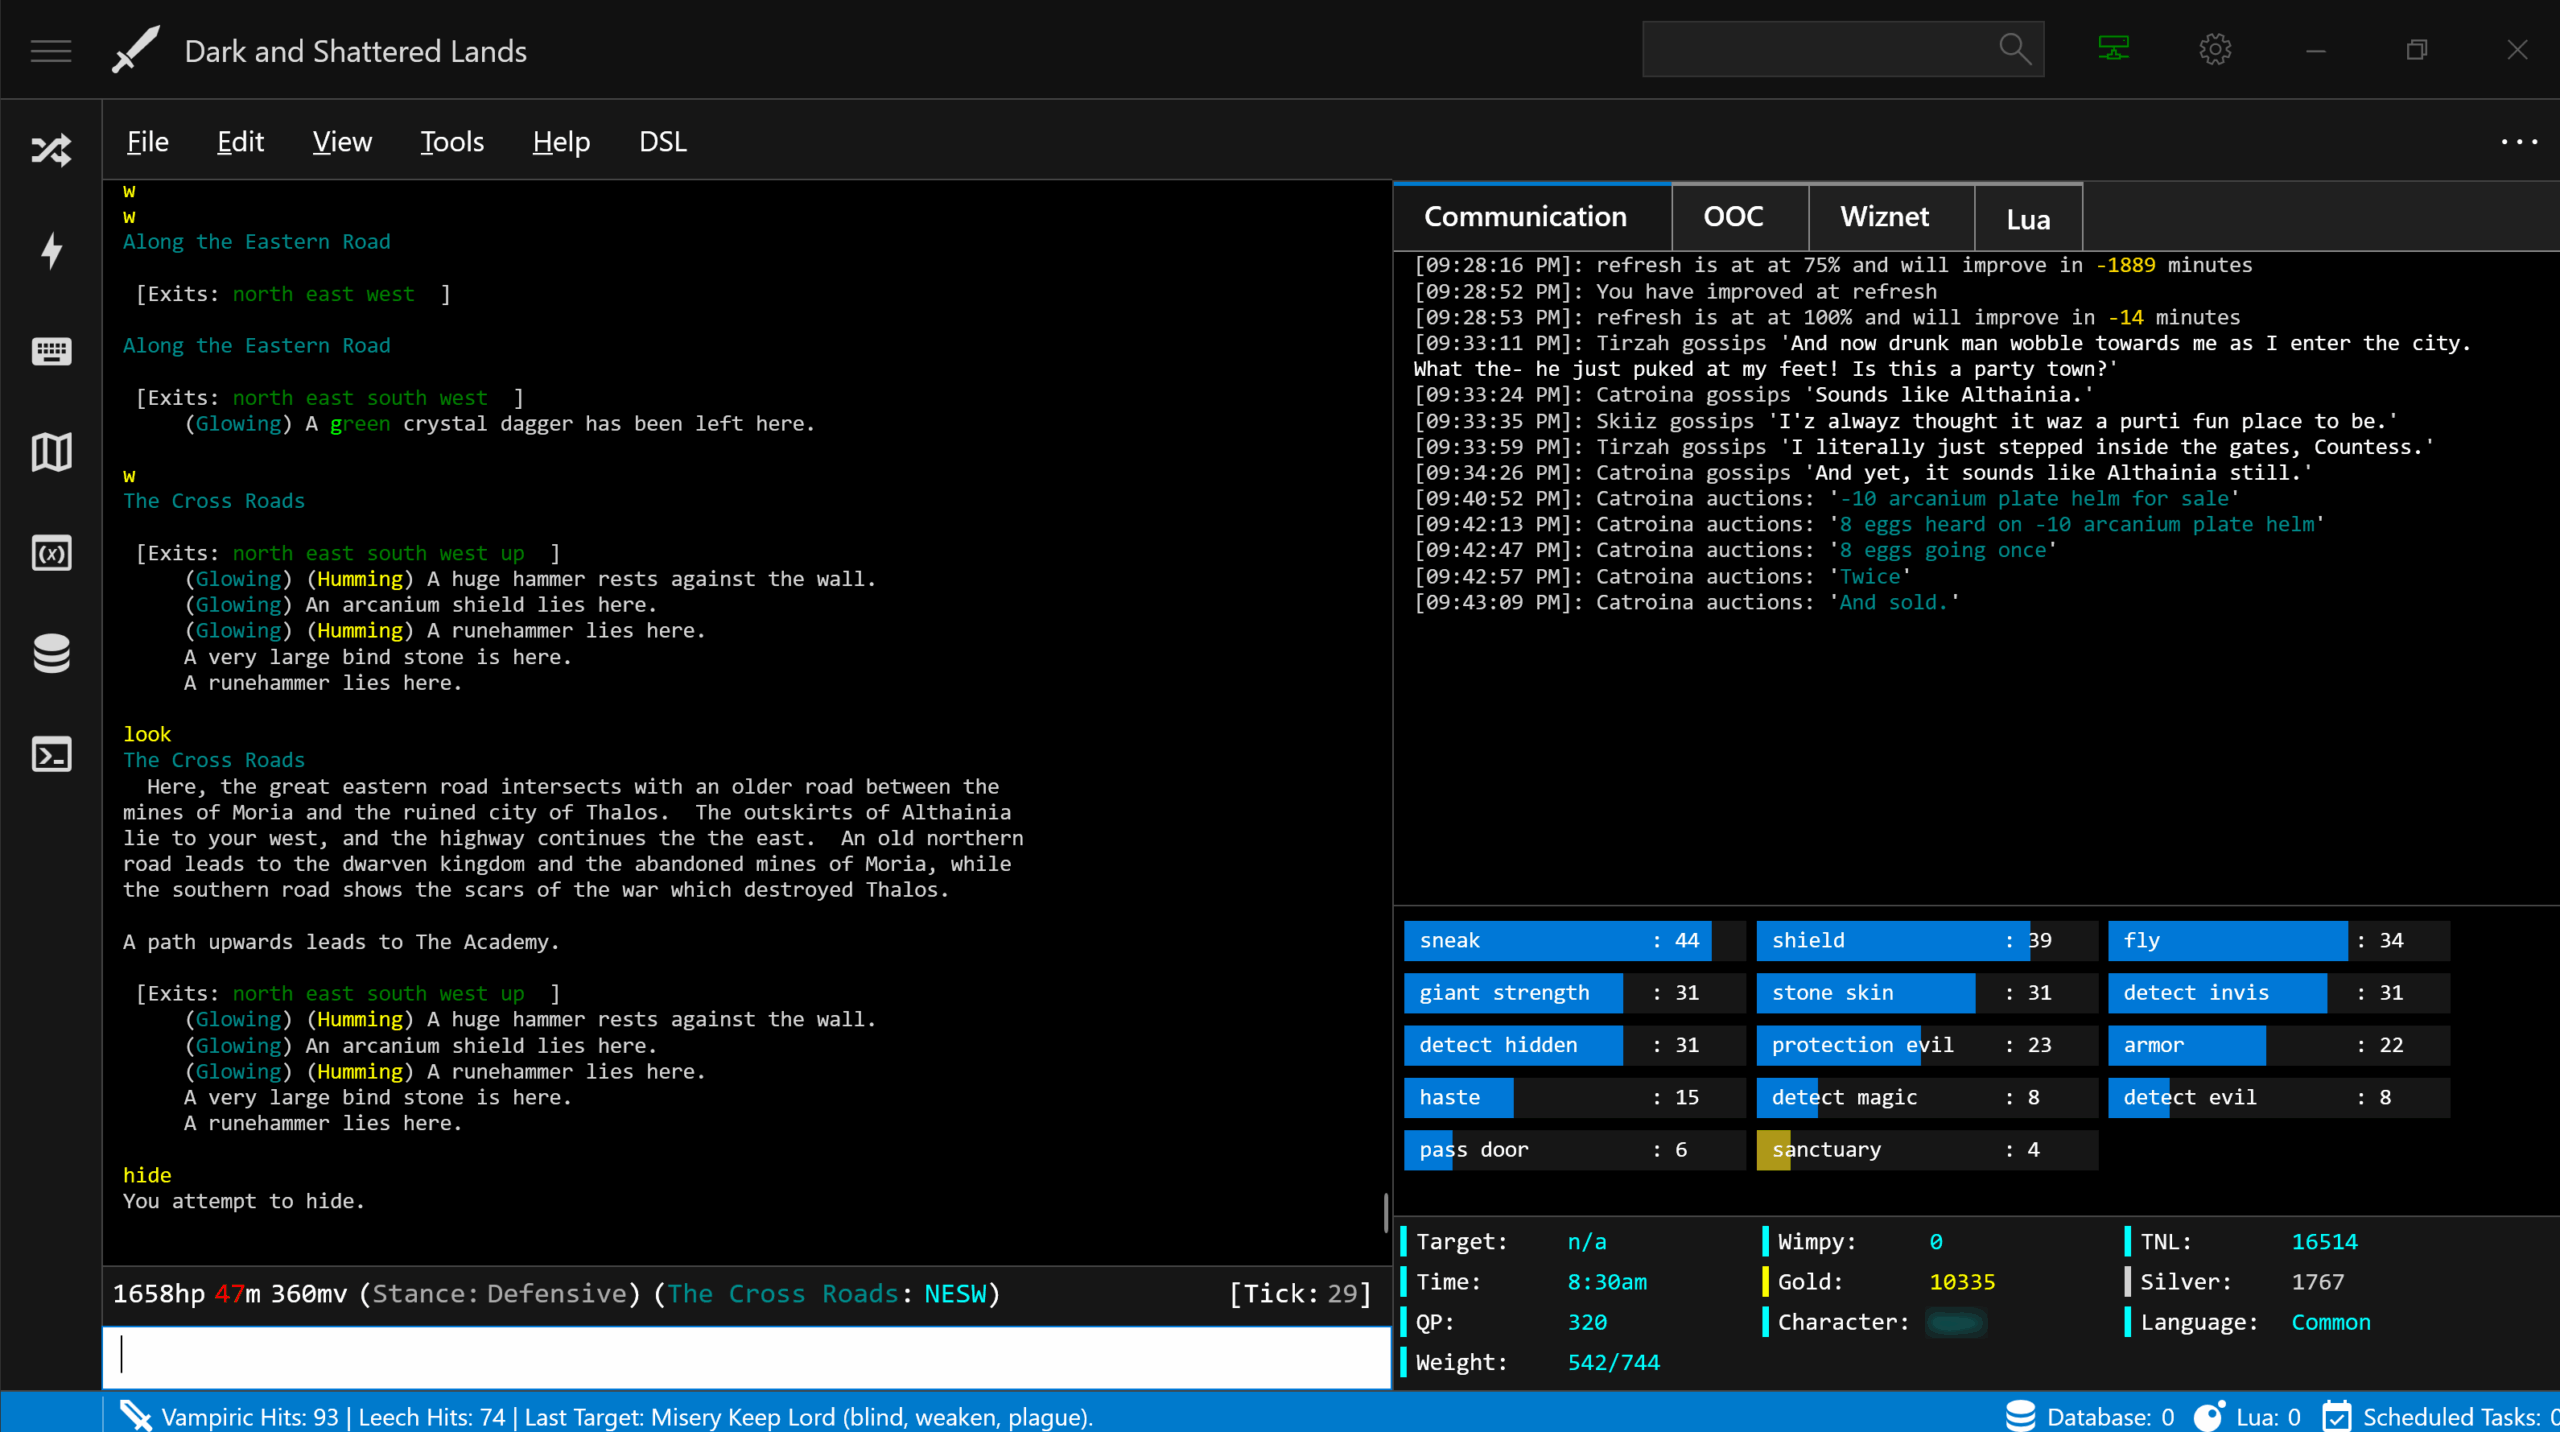
OS Support for Windows Store Version: Windows 11, Windows 10, version 1809 (10.0; Build 17763)
Key Features
Aliases
Triggers (simple and regular expression)
Macros
Package Manager for installing packages that are built for a specific game.
LUA (LUA can be inlined as the output of an alias or a trigger)
Colored syntax editor for LUA with intellisense (code completion) for all of the extended API’s.
4K monitor support / responsive UI design.
Touch screen friendly.
SQLite Database Builtin with syntax highlighted query editor. Database/query editor with a color coded editor and auto completion built in.
Profiles can be used for multiple characters (any trigger or alias can be set to only run for certain characters).
Directions support
Global variable support in and outside of LUA that persists beyond mud sessions (Avalon also has temp variable support).
Plugin ability (extend Avalon by writing your own C# or Lua plugins)
Custom scraping that can be easily turned on and off via hash commands/LUA and then piped to variables (imagine an alias that scraped notes into a database for posterity, etc.).
Tick support.
Gagging, redirection and custom information panels.
Line rewriting (being able to transform the text sent from the server before it’s rendered to the mud client)
The Avalon Mud Client is being released under a modified MIT license with an additional clause requiring credit to the original author (Blake Pell). E.g. this means the license should be flexible enough to do what you need to do with it.
GPG REMOTE
==========


Motivation
----------

Using GnuPG in a networked environment always poses certain risk that a
remote attacker who is able to compromise one of the client applications
(e.g. MUA, IM client, etc.) could easily leak the private key by calling
``gpg --export-secret-keys``. A common mitigation of such risk are
smartcards, however they are specialized hardware which a) may not be
readily available, or b) could be not trusted for various of reasons.


Overview
--------

GPG Remote is a client-server application allowing to delegate GnuPG
private key operations to a remote server running in a trusted environment.
Server filters client input according to specified rules, and runs GnuPG
operations on behalf of a client.

GPG Remote separates GnuPG execution between a front-end client and a
back-end server. The client tries to replicate GnuPG command line
interface, taking up command line arguments and STDIN data. Internally,
it then parses args input, figures out files which the user may want to
process, packs all that into a request package, and sends it to the server.

The server operating in a trusted environment is tasked to execute ``gpg``
in a safe manner. For this end it uses a whitelist of ``gpg`` command line
options to filter out everything inappropriate of the received client
command line arguments (especially, commands like ``--export-secret-keys``).
Files received from the client are saved into temporary location, and their
paths in command line arguments are updated accordingly. Finally, ``gpg``
is called, and its output (comprised of STDERR, STDOUT, exit code, as well
as newly generates files) is sent back to client.


Installation
------------

Make sure you have Python 3.3.x or later installed on all systems you plan
to use for client and server operation. Both client and server modules are
self-contained, and can be placed anywhere on the system.

Running GPG Remote Client as a drop-in replacement for system-wide ``gpg``
requires ``gpgremote_client.py`` script to be moved to or symlinked from
``/usr/bin/gpg`` path. If both components are running on the same system,
ensure only the server user has read-write access to GnuPG keyring files.

In order to enable passphrase input over a network connection, follow these
steps:

1. Make sure standard ``gpg`` ``pinentry`` application is installed on the
   client.
2. Install [``pyassuan``](https://pypi.python.org/pypi/pyassuan/) library
   on both client and server systems.
3. Ensure ``gpg-agent`` is properly configured and running on the server,
   and path to bundled GPG Remote ``pinentry.py`` is passed to ``gpg-agent``
   using ``--pinentry-program`` option (see ``man gpg-agent`` for details).

If "panic" rules support is required (see the corresponsing section below),
install [``pbkdf2``](https://pypi.python.org/pypi/pbkdf2) Python module on
the server system.


Configuration
-------------

The client reads configuration data (specifically, server listening
host:port) from ``gpgremote_client.conf`` file located in ``~/.gnupg``
directory unless path is overridden with ``GNUPGHOME`` environment variable.

By default server reads its configuration from ``gpgremote_server.conf``
file located in ``~/.gnupg`` (the path can be overridden with ``GNUPGHOME``
environment variable). However, specific path can be provided with
``-c``/``--config`` option to server invocation. Most server parameters
can be reconfigured from the command line as well (``-h``/``--help`` will
print all available options).


Whitelist
---------

The second part of server configuration is ``gpg`` options whitelist
defined in ``whitelist.conf`` in the same directory as server config file.
The syntax is simple, yet configuring the whitelist correctly is critical
to server security (see _Security considerations_ section for details).

1. Lines not starting with a dash sign are ignored.
2. A single set of options per line.
3. A set is either a single option (in long or short form), or a
   space-separated long and short forms (in arbitrary amount and order).
4. Non dash-prefixed words in a set (if any) have special meaning:

    * A bracketed word is considered a wildcard parameter turning options
      in a set into parameterized ones.
    * An unbracketed word is a whitelisted parameter value, and, as such,
      options in a set can be passed with this value only. Multiple
      whitelisted values must be provided on the same line (quoting /
      space-escaping is supported).
    * If a word is bracketed ``#NO_FILES``, it means no files should be
      expected in arguments list for this options set (see _Security
      considerations_ section below).


One-time passwords
------------------

An extra security measure for private key protection is _one-time passwords
(OTP)_. When enabled, it will require user to enter a short random string
(from a pre-generated list) along with private key passphrase. This will
thwart adversary's attempts to use private key over GPG Remote by passing a
sniffed passphrase. (Please note: bundled GPG Remote ``pinentry.py`` must
be used, see _Installation_ section above for detailed requirements.)

To use this feature, enable it in server configuration file or with
``--otp`` startup option. Then run the server with ``--gen-otp`` option and
enter the number of one-time passwords to generate. The longer the list,
the later it will has to be replenished, but the wider will be the window
of opportunity for the attacker if OTP list gets compromised. Note: the
list can be regenerated at any moment, and any passwords left in it will be
invalidated; regenerating OTP list does not requires server restart.

Once OTP is enabled, a next password from the list will be required each
time a private key passphrase is prompted - an OTP must be appended to
the end of passphrase (without spaces or other delimiters). An entered OTP
is invalidated, i.e. if the passphrase is mistyped, the next OTP will be
requested on each retry. Once OTP list is depleted, any private key
operation will fail until the new list is generated.

Please note that ``gpg-agent`` passphrase caching bypasses OTP: while the
passphrase is cached, the key could be used without user interaction.


"Panic" rules
-------------

It is possible to configure an arbitrary amount of so called "panic" rules.
These rules can be used to execute specific shell commands on the server in
the event a predefined passphrase is entered in ``pinentry`` dialog.
(Please note: bundled GPG Remote ``pinentry.py`` must be used, see
_Installation_ section above for detailed requirements.)

Each rule is specified as an entry in the server configuration file. Entry
name must begin with ``panic_`` prefix followed by a unique name. Entry
value consits of a space-sperated security token and shell command(s) in
regular notation (i.e. no quoting or escaping is necessary), or a special
command (see below). Security token is a PBKDF2 hash string generated from
a passphrase that should trigger a specific rule. Running server with
``--gen-token`` option will help to generate a token for a particular
passphrase.

A single passphrase can trigger any amount of rules if all of them use the
same passphrase protection (but not necesserily the same token literatim).
A triggered command is silently executed by the server-side ``pinentry``
process with access permissions of ``gpg-agent`` parent user prior to
resending the entered passphrase to ``gpg-agent``. Matched rules are
executed in the order they are defined in the configuration file.

The following environment variables are passed to "panic" shell commands:

* ``GPG_REMOTE_PID``: PID of the GPG Remote server process.
* ``GPG_REMOTE_KEYRINGS``: Space-separated list of paths to non-empty
  ``gpg`` keyring files.

The following special commands may be used instead of shell commands in
"panic" rule definitions. Please note that a single special command only
can be specified for any rule:

* ``STOP``: Stop GPG Remote server gracefully. Server will send the client
  a general error message, finish processing of any concurrent requests,
  clean up all the data received from the client, and exit.
* ``KILL``: Terminate GPG Remote server immediately. Server will send
  ``SIGKILL`` signal to itself without performing any cleanup procedures.

Please take into account that ``gpg-agent`` reads the private key in memory
_before_ spawning ``pinentry``, and simply running ``rm``/``wipe`` to
delete private keyring files will not destroy the key immediately - it is
necessary to terminate the running GPG Remote server process (using ``STOP``
or ``KILL`` special commands) to prevent sending ``gpg`` operation results
back to the client. Use rules chaining (by assigning the same security
token / passphrase to multiple rules) to run multiple commands when needed.


Security considerations
-----------------------

Communication channel authentication/encryption is out of the scope of this
application. The user may employ SSH or VPN tunnelling to create a trusted
channel for client-server communication.

The threat model and main attack scenario is a client-side remote attacker
(e.g. compromised network application) exfiltrating ``gpg`` private keys.
The server mitigates this risk by using ``gpg`` command line options
whitelist.

Note that even if keyring modifying options (e.g. ``--delete-key``,
``--import``) are not whitelisted, client user would still be able to add
keys to the keyring by simply sending them to STDIN (``gpg`` processes it
contextually). If this should be avoided, it's up to the server
administrator to run the server as a user without write access to ``gpg``
keyring files. Remember that default ``gpg`` keyrings can be overridden
with ``--no-default-keyring``, ``--secret-keyring`` and ``--keyring``
options.

Another potential risk to the server is its local files exfiltration. In
the naive case the user could ask the server to run ``gpg -o - --enarmor
[path_to_local_file]``, and the server would happily send that file contents
in STDOUT. In order to protect against such attacks the server makes sure
the number of filename arguments is equal to the number of files received
in client request package. (These complications are necessary as simply
refusing to process requests containing server local filepaths would lead
to information leakage about server filesystem contents.) However, it
requires correct configuration of the server whitelist in respect to
options parameter specification: in case an option accepts parameters,
its set MUST include parameter wildcard/value, otherwise the server might
become vulnerable to the described attack.

Note also that a number of ``gpg`` command line options (namely,
``--list-keys``, ``--list-sigs``, etc.) receive arbitrary amount of
non-file arguments. This case is supported with special ``[#NO_FILES]``
placeholder. If such an option is provided by the client, the server strips
out any ``-o``/``--output`` options, and prevents sending any files back to
the client.

Files received from the client (which may contain sensitive cleartext data)
are written by the server to a temporary location. By default it is a
system-wide temp directory (commonly, ``/tmp``), but in case this directory
is unsafe, it can be overridden using ``TEMP`` environment variable, or
``--temp`` command line option for server invocation. (Note that files
aren't written directly to tempdir, but to temporary subdirectories with
0700 access mode, i.e. accessable only by GPG Remote server user).

As neither client nor server employ any semantic analysis of command line
arguments (i.e. does not understand the meaning of options and commands),
the client assumes an option parameter or trailing argument named as an
existing client local file to be a file indended for ``gpg`` processing,
and optimistically sends it to the server. Note that client unconditionally
writes out all files received from the server (on the assumption it has
write access to a given path) without asking for overwrite if the same file
exist.

The client may try to cause DoS on the server by sending it excessively
huge input(s). This scenario is addressed with server resources management
parameters: ``size_limit``, ``threads`` and ``queue``. The first limits the
size of client request package and, as a result, memory usage. The second
limits the number of CPU threads used for requests processing (each request
is single-threaded). Note that the total amount of RAM the server might use
is around ``S * T * 2``, where ``S`` is the package size limit and ``T`` is
the threads count (i.e. with default ``S=1GB`` and ``T=2`` maximum RAM
usage would be 4 GB). Finally, the ``queue`` value is the amount of
requests that can be queued for processing. If the value is higher than
threads count then the remaining requests will wait until active ones are
finished. Awaiting requests does not take up additional resources except
for a socket connection.

When remote passphrase input is used, an entered passphrase never touches
long-lived server process memory. However it remains in the client memory
for the whole duration of ``gpg`` execution, and during that period it's
subject to a risk of memory swapping. Make sure client swapping device is
encrypted, disabled, or other protective measures are employed.

One-time passwords (OTP) is a mere access control mechanism enforced by GPG
Remote. As such, it does not affects any cryptographic material, and must
not be expected to deliver specific cryptographic properties, e.g. PFS.

If "panic" rules are configured on the server with high hashing iterations
count, an adversary can potentially deduce this fact from a delay of ``gpg``
output as user passphrase must be matched to each unique security token.
It is also possible to detect "panic" rules execution if the executed
command takes a long time to complete.


Technical details
-----------------

Communication protocol is a simple two-step request-response. Package
format for both directions is as follows:

``<len_p> | <len_j> | JSON(<header>, <type>, <fields>, <files_meta>) |
[binary]``

* ``len_p`` (8 bytes): Overall package length.
* ``len_j`` (8 bytes): JSON packet length.
* ``header`` (list): ``auth`` token (optional) and application ``version``.
* ``type`` (str): Package identifier.
* ``fields`` (list): Arbitrary data fields.
* ``files_meta`` (dict): ``File_pathname->file_len`` mapping.
* ``binary`` (bytes): Concatenated files data (optional).

If authentication token is provided, it is expected to be a HMAC-SHA256 hex
digest of all JSON-packed metadata, and is calculated as follows: the
metadata elements (except for ``auth``) are packed as a flat list in the
above mentioned order into a JSON-encoded string, which is passed to HMAC
context. Authentication is currently used for server<>``pinentry`` IPC
only. As such, binary data is not authenticated.

Remote passphrase input is implemented using custom ``pinentry.py`` shim
application. It employs the following communication steps (``pinentry``
actor below is the custom ``pinentry.py`` shim application unless otherwise
stated):

1. ``server>gpg-agent``: uses ``PINENTRY_USER_DATA`` environment variable
   (which is passed over ``gpg > gpg-agent > pinentry`` execution stack) to
   provide ``pinentry`` with IPC communication details including IPC socket
   and session authentication key.
2. ``gpg-agent>pinentry``: calls ``pinentry`` with ``PINENTRY_USER_DATA``
   environment variable and initiates Assuan protocol.
3. ``pinentry>server``: initiates IPC protocol and asks for client network
   connection data.
4. ``server>pinentry``: sends opened client network socket directly to the
   custom ``pinentry`` over IPC channel (UNIX socket).
5. ``pinentry>client``: uses the provided network connection to send the
   client all the required ``pinentry`` data (text strings and startup
   parameters) got from ``gpg-agent`` at step 2.
6. ``client``: runs standard ``pinentry`` to aquire user response data (in
   the form of Assuan protocol response).
7. ``client>pinentry``: sends user response data.
8. ``pinentry``: executes "panic" commands if any are triggered by the
   client passphrase.
9. ``pinentry>gpg-agent``: replays user response in Assuan protocol
   exchange.

If wrong passphrase is entered, steps 2-9 are performed again up to the
number of retries required by ``gpg-agent``.

It should be noted that although IPC UNIX socket (used for
server<>``pinentry`` communication) access is not resticted (in order to
allow running server and ``gpg-agent`` under different users), server
verifies authenticity of packages received using the session auth key it
provides ``pinentry`` process with.

The one-time passwords (OTP) list is stored on the server in plaintext.
Each line of OTP list file is a colon-delimited ID number and the actual
password string.

"Panic" rules security token is a PBKDF2[SHA-1, HMAC] output with effective
entropy limit of 256 bits. 64-bit salt value is used. Token format is a
string of colon-delimited Base62-encoded elements: iterations count
(in bytes representation), salt, hash.

Default server listening port (29797) was produced in Python as follows:

```
#!python

int.from_bytes(b'gpgremote', 'big') % 2 ** 16
```

(Although it has been noted only ``b'te'`` bytestring has any effect in
such procedure.)


Issues, limitations
-------------------

* Interactive console UI operations (e.g. key generation, key edit, etc.)
  are not supported.

* Client does not support reading input from TTY, data must be piped to
  STDIN.

* Passing file descriptors and implementing other forms of advanced IPC
  interaction with ``gpg`` is not supported.

* No environment variables are passed from the client. If ``gpg`` must be
  invoked with specific environment (e.g. ``LANG``), start GPG Remote
  Server with all the necessary variables instead.

* If GnuPG 2.x or higher is used without custom Pinentry, secret key
  operations would spawn standard Pinentry dialog on the server side which
  will prevent ``gpg`` process from terminating. This might be a feature if
  both GPG Remote server and client are running on the same system,
  otherwise it's up to the server administrator to disable ``gpg-agent``
  server-side (for example, by downgrading to GnuPG 1.4.x or starting
  ``gpg-agent`` with ``--batch`` option).


ToDo
----

* One-time passwords support.
* Minimize memory footprint.


Version history
---------------

* 2015-03-18 - ``v1.3``
    - Added support for one-time passwords.
    - Fixed a case with pinentry and stdin pipe.

* 2015-03-16 - ``v1.2``
    - Passphrase confirmation while generating "panic" security token.
    - Minor aesthetic and code documentation cleanups.
    - First stable release.

* 2015-02-17 - ``v1.2b``
    - Updated minimum Python version requirement to 3.3 (it was mistakenly
      lower).
    - Raised default logging verbosity to info level.
    - Matched "panic" rules are executed in the defined order.
    - New "panic" rules security token format replacing ``crypt(3)`` one.
      Output length limit is 256 bits now instead of 192 bits.
    - Optimized security token matching scheme (speed-wise) if the same
      token is used for multiple rules.
    - Changed Server<>Pinentry IPC interface and protocol.
    - Set IPC message size limit to 64 KB (was a possible DoS scenario).
    - Special "panic" commands to properly terminate server.
    - Fixed IPC socket permissions which prevented running server and
      ``gpg-agent`` under different users.
    - Fixed error handling if ``gpg`` executable cannot be found.
    - Code cleanup and reorganization.

* 2015-02-06 - ``v1.1b1``
    - Fixed 'ttyname' Assuan option update on the client side.
    - Honour PINENTRY_USER_DATA="USE_CURSES=1" environment variable.
    - Support for "panic" commands.

* 2015-02-05 - ``v1.0b1``
    - Graceful server shutdown on SIGTERM.
    - Custom Pinentry to support passphrase input over a network.
    - Updated timeout defaults to make them compatible with passphrase
      input.
    - Code cleanup.

* 2015-01-27 - ``v0.9b2``
    - Fixed ``--output -`` case.
    - Versioned protocol.
    - Config parser updates.
    - More unittest coverage.
    - ``README`` file updates.

* 2015-01-23 - ``v0.9b1``
    - First beta release.


License
-------

See ``COPYING``.


Author
------

Vlad "SATtva" Miller

sattva@vladmiller.info

http://vladmiller.info

``0x8443620A``
This is a Github action that looks for Sphinx documentation folders in your
project. It builds the documentation using Sphinx and any errors in the build
process are bubbled up as Github status checks.
The main purposes of this action are:
Run a CI test to ensure your documentation still builds.
Allow contributors to get build errors on simple doc changes inline on Github
without having to install Sphinx and build locally.
You can choose a Sphinx version by using the appropriate tag. For example, to
specify Sphinx 7.0.0 you would use ammaraskar/sphinx-action@7.0.0. master
currently uses Sphinx 2.4.4.
If you have any Python dependencies that your project needs (themes,
build tools, etc) then place them in a requirements.txt file inside your docs
folder.
If you have multiple sphinx documentation folders, please use multiple
uses blocks.
If you wish to customize the command used to build the docs (defaults to
make html), you can provide a build-command in the with block. For
example, to invoke sphinx-build directly you can use:
- uses: ammaraskar/sphinx-action@masterwith:
docs-folder: "docs/"build-command: "sphinx-build -b html . _build"
If there’s system level dependencies that need to be installed for your
build, you can use the pre-build-command argument like so:
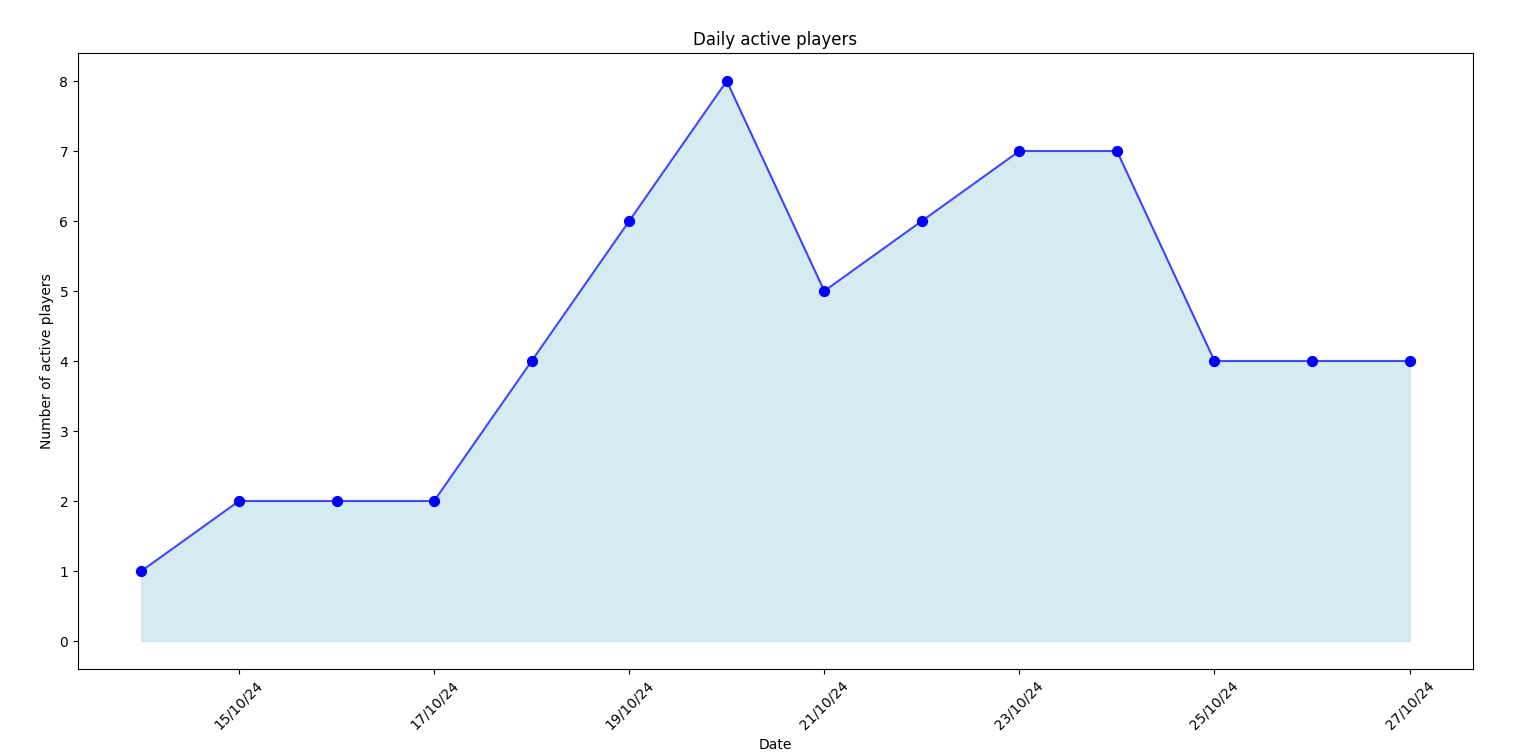
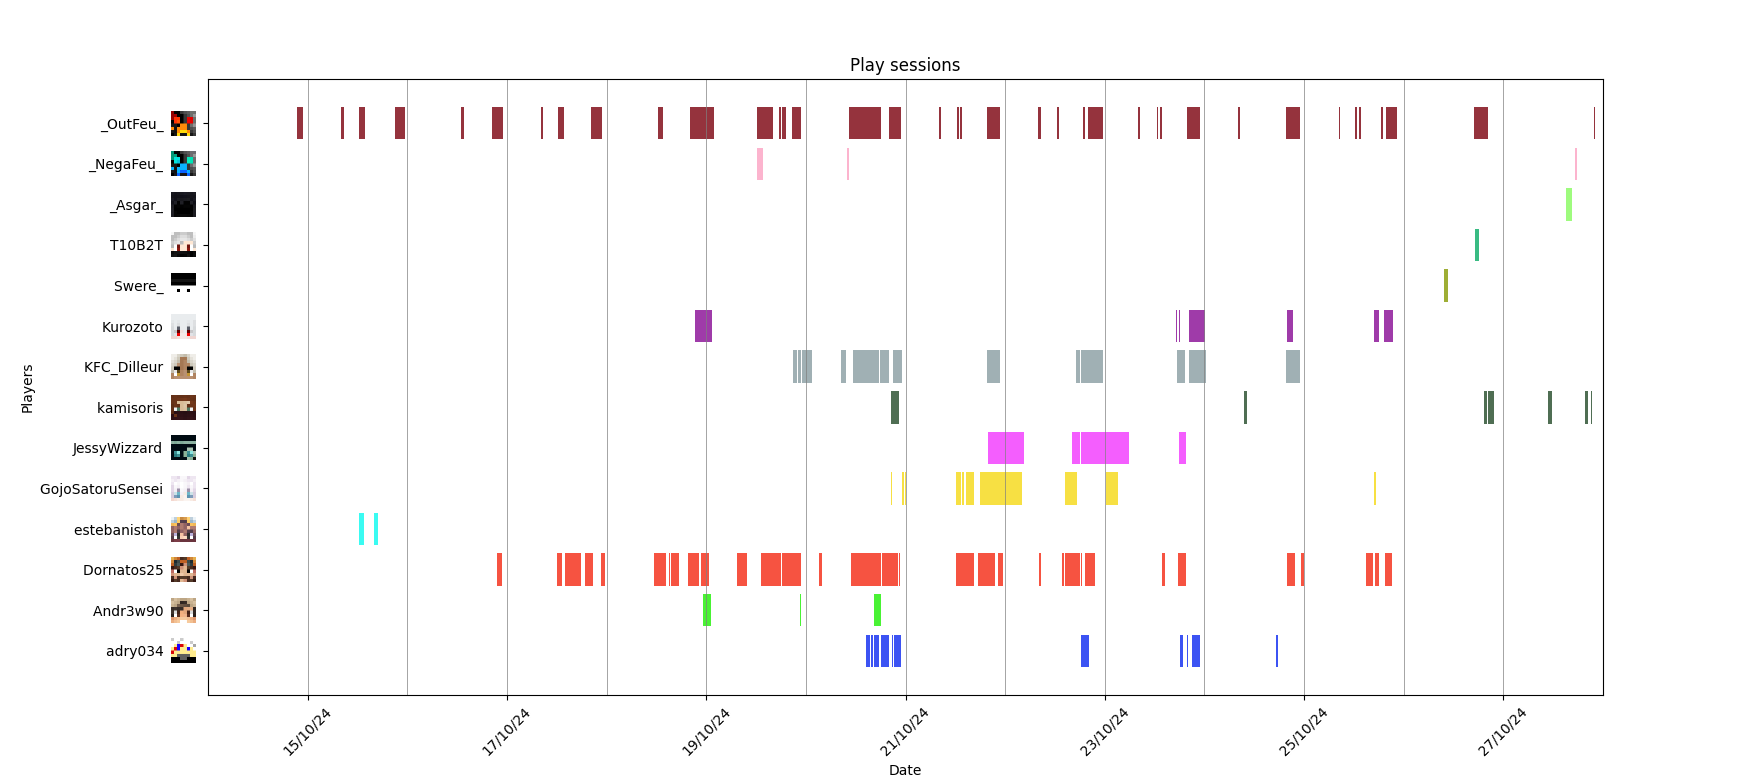
A simple python program originally designed to display custom data from a .csv file in a monthly stacked bar chart.
Can now be used to display the data with different type of charts (Stacked bar / Line / Bar / Pie), but only the stacked bar chart will display all of the provided data as the other types will either loose the categories or the dates.
The .csv file used by default is ./data/data.csv and its content must follow the following format:
1st line: Chart title;Y axis title;X axis title
2nd line: Starting month (MM-YYYY format)
Other lines Category name;Category color (#RRGGBB);Category values per month