注:YouTube 频道 ID 可以通过频道地址获取,https://www.youtube.com/ID,频道 ID 以 @ 开头;YouTube 播放列表 ID 可以通过播放列表地址获取,https://www.youtube.com/playlist?list=ID,播放列表 ID 以 PL 开头。
yt-scraper allows you to download video information and cover images from YouTube. yt-scraper uses the yt-dlp and jq tools to obtain video data from a specified YouTube channel or playlist, including the upload date, duration, video title, video description, and cover image of all videos in the channel or playlist. yt-scraper records the video IDs that have been saved, so it can also be used to subscribe to channels or playlists. By running yt-scraper regularly, you can track and download updated video data.
Requirements
MacOS
Installed necessary third-party tools: yt-dlp and jq.
Windows
Installed Windows Subsystem for Linux (WSL), Cygwin, or Git for Windows.
Installed necessary third-party tools in WSL, Cygwin, or Git for Windows: yt-dlp and jq.
Usage (MacOS)
Clone or download the repository to a directory on your computer.
Modify the script parameters as needed: video_list_id, download_info, and download_covers.
video_list_id: The ID of the YouTube channel or playlist you want to process.
download_info: Whether to download video information (true means download, false means do not download).
download_covers: Whether to download cover images (true means download, false means do not download).
Note: The YouTube channel ID can be found in the channel’s URL, which is in the format https://www.youtube.com/ID, where the channel ID starts with @. The YouTube playlist ID can be found in the playlist’s URL, which is in the format https://www.youtube.com/playlist?list=ID, where the playlist ID starts with PL.
Modify the path in start.command to point to the directory where you stored the yt-scraper.sh script.
Double-click the start.command script to run the yt-scraper.sh script.
The script will start retrieving all video information (if selected for download) and cover images (if selected for download) from the specified channel or playlist and write the results to a folder named after the specified channel or playlist in the same directory. The script will create a file named infos.txt to store video information; The script will create a subfolder named covers in this folder to store downloaded cover images; It will also create a subfolder named archive to store processed video IDs so that these videos can be skipped when running the script next time.
Notes
If the script cannot connect to the YouTube website, please check your network connection and make sure that the website is accessible.
If you need to download cover images, please make sure that your working directory has enough storage space.
Heads Up
yt-scraper defaults to directly obtaining video upload date, duration, video title, video description, and cover image, but by modifying the script we can customize these contents.
I provide two sample scripts in customized-demo for obtaining video data from YouTube channel DUST and YouTube playlist 小姐不熙娣. These two scripts extract and reprocess upload date, video title, and video description and redefine the save name of cover images.
In actual use, we may need to filter and reorganize the data obtained. Due to differences in channel or playlist content, if you have custom content requirements, you may need to modify the script yourself in order to extract only useful data for saving.
val base16 =Base16 {
// Ignore whitespace and new lines when decoding
isLenient =true// Insert line breaks every X characters of encoded output
lineBreakInterval =10// Use lowercase instead of uppercase characters when encoding
encodeToLowercase =true
}
// Shortcutsval base16StrictSettings =Base16(strict =true)
val base16DefaultSettings =Base16()
// Alternatively, use the static instance with its default settingsBase16
val base32Crockford =Base32Crockford {
isLenient =true
encodeToLowercase =false// Insert hyphens every X characters of encoded output
hyphenInterval =5// Optional data integrity check unique to the Crockford spec
checkSymbol('*')
// Only apply the checkSymbol & reset hyphen interval counter// when Encoder.Feed.doFinal is called (see builder docs for// more info)
finalizeWhenFlushed =false
}
// Alternatively, use the static instance with its default settingsBase32.Crockfordval base32Default =Base32Default {
isLenient =true
lineBreakInterval =64
encodeToLowercase =true// Skip padding of the encoded output
padEncoded =false
}
// Alternatively, use the static instance with its default settingsBase32.Defaultval base32Hex =Base32Hex {
isLenient =true
lineBreakInterval =64
encodeToLowercase =false
padEncoded =true
}
// Alternatively, use the static instance with its default settingsBase32.Hex
// NOTE: Base64 can _decode_ both Default and UrlSafe, no matter what// encodeToUrlSafe is set to.val base64 =Base64 {
isLenient =true
lineBreakInterval =64
encodeToUrlSafe =false
padEncoded =true
}
// Alternatively, use the static instance with its default settingsBase64.Default// Inherit settings from another EncoderDecoder's Configval base64UrlSafe =Base64(base64.config) {
encodeToUrlSafe =true
padEncoded =false
}
// Alternatively, use the static instance with its default settingsBase64.UrlSafe
Encoding/Decoding Extension Functions
val text ="Hello World!"val bytes = text.encodeToByteArray()
// Choose the output type that suits your needs// without having to perform unnecessary intermediate// transformations (can be useful for security // purposes, too, as you are able to clear Arrays// before they are de-referenced).val encodedString = bytes.encodeToString(Base64.Default)
val encodedChars = bytes.encodeToCharArray(Base32.Default)
val decodedString =try {
encodedString.decodeToByteArray(Base64.Default)
} catch (e:EncodingException) {
Log.e("Something went terribly wrong", e)
null
}
// Swallow `EncodingException`s by using the `*OrNull` variantsval decodedChars = encodedChars.decodeToByteArrayOrNull(Base32.Default)
Encoding/Decoding Feed(s) (i.e. Streaming)
Feed‘s are a new concept which enable some pretty awesome things. They break
the encoding/decoding process into its individual parts, such that the medium
for which data is coming from or going to can be anything; Feed‘s only
care about Byte(s) and Char(s)!
// e.g. Concatenate multiple encodingsval sb =StringBuilder()
// Use our own line break out feed in order to add a delimiter between// encodings and preserve the counter.valout=LineBreakOutFeed(interval =64) { char -> sb.append(char) }
Base64.Default.newEncoderFeed(out).use { feed ->"Hello World 1!".encodeToByteArray().forEach { b -> feed.consume(b) }
feed.flush()
out.output('.')
"Hello World 2!".encodeToByteArray().forEach { b -> feed.consume(b) }
}
println(sb.toString())
// SGVsbG8gV29ybGQgMSE=.SGVsbG8gV29ybGQgMiE=
// e.g. Writing encoded data to a File in Java.// NOTE: try/catch omitted for this example.
file.outputStream().use { oStream ->Base64.Default.newEncoderFeed { encodedChar ->// As encoded data comes out of the feed,// write it to the file.
oStream.write(encodedChar.code)
}.use { feed ->// Push data through the feed.//// There are NO size/length limitations with `Feed`s.// You are only limited by the medium you use to store// the output (e.g. the maximum size of a ByteArray is// Int.MAX_VALUE).//// The `Feed.use` extension function calls `doFinal`// automatically, which closes the `Encoder.Feed`// and performs finalization of the operation (such as// adding padding)."Hello World!".encodeToByteArray().forEach { b ->
feed.consume(b)
}
}
}
As Feed(s) is a new concept, they can be “bulky” to use (as you will see in
the example below). This is due to a lack of extension functions for them, but
it’s something I hope can be built out over time with your help (PRs and
FeatureRequests are always welcome)!
// e.g. Reading encoded data from a File in Java.// NOTE: try/catch omitted for this example.// Pre-calculate the output size for the given encoding// spec; in this case, Base64.val size =Base64.Default.config.decodeOutMaxSize(file.length())
// Since we will be storing the data in a StringBuilder,// we need to check if the output size would exceed// StringBuilder's maximum capacity.if (size >Int.MAX_VALUE.toLong()) {
// Alternatively, one could fall back to chunking, but that// is beyond the scope of this example.throwEncodingSizeException(
"File contents would be too large after decoding to store in a StringBuilder"
)
}
val sb =StringBuilder(size.toInt())
file.inputStream().reader().use { iStreamReader ->Base64.Default.newDecoderFeed { decodedByte ->// As decoded data comes out of the feed,// update the StringBuilder.
sb.append(decodedByte.toInt().toChar())
}.use { feed ->val buffer =CharArray(4096)
while (true) {
val read = iStreamReader.read(buffer)
if (read ==-1) break// Push encoded data from the file through the feed.//// The `Feed.use` extension function calls `doFinal`// automatically, which closes the `Decoder.Feed`// and performs finalization of the operation.for (i in0 until read) {
feed.consume(buffer[i])
}
}
}
}
println(sb.toString())
Alternatively, create your own EncoderDecoder(s) using the abstractions provided by encoding-core
// build.gradle.kts
dependencies {
val encoding ="2.4.0"
implementation("io.matthewnelson.encoding:base16:$encoding")
implementation("io.matthewnelson.encoding:base32:$encoding")
implementation("io.matthewnelson.encoding:base64:$encoding")
// Only necessary if you just want the abstractions to create your own EncoderDecoder(s)
implementation("io.matthewnelson.encoding:core:$encoding")
}
Alternatively, you can use the BOM.
// build.gradle.kts
dependencies {
    // define the BOM and its version
    implementation(platform("io.matthewnelson.encoding:bom:2.4.0"))

    // define artifacts without version
    implementation("io.matthewnelson.encoding:base16")
    implementation("io.matthewnelson.encoding:base32")
    implementation("io.matthewnelson.encoding:base64")

    // Only necessary if you just want the abstractions to create your own EncoderDecoder(s)
    implementation("io.matthewnelson.encoding:core")
}
Mercurius is an event system designed for Unity game engine. It’s lightweight and expendable by design. Easy to use by non-programmers. Includes a journaling (a log) extension window.
As an added bonus also includes a Shared Variable system.
Please see Description below for more details.
How to use the Event System
Copy or clone everything here to your Unity project’s Assets folder (for example [Project Name]\Assets\Mercurius Event System).
Use FloatEvent.cs and FloatEventListener.cs (example events with a single float parameter) or create your own based on them.
Create a new event asset (just like you create a new material or folder): Create->Events->Float Event.
In the class that will send an event please add public FloatEvent myEvent;and drag the created asset in to the inspector field.
In the same script you can call the event like so myEvent.Broadcast( gameObject, 1.4f );The 1.4f is an example and gameObject is used in the Log Window.
Subscribing
Either attach FloatEventListener.cs (or your own event listener) to a GameObject that you want to listen to your event and like in point 3. drag the event asset to Game Event field in the inspector. Every listener (like FloatEventListener.cs) has a standard Unity Event slots (like Unity’s new UI Buttons or Sliders) that can be used to call methods in respons to the event being broadcast.
Or add public FloatEvent myEvent; in your script and subscribe directly the the event myEvent.Subscribe(OnMyEventHandler);. Please remember to drag the event asset file in the inspector window. Also please remember to unsubscribe (for example in OnDisable).
Please see Examples folder for some examples.
Optional
You can open the companion Event Log windows from Windows->Event Log to track the events being broadcast and recived.
How to use Shared Veriables
Copy or clone everything here to your Unity project’s Assets folder (for example [Project Name]\Assets\Mercurius Event System).
Use SharedFloatVariable.cs (example events with a single float parameter) or create your own based on it.
Create a new shared variable asset (just like you create a new material or folder): Create->Shared Events->Float Variable.
In classes that will need access to that variable please add public ShaderFloatVariable hp;and drag the created asset in to the inspector field.
In any of the scripts you can read or write to the shared variable like so hp.Value = 10f;
Shared Variables also have read-only (and settable via the inspector) StartValue.
Please see Examples folder for some examples.
Description
Mercurius is an event system designed for Unity game engine. It’s lightweight and expendable by design. Easy to use by non-programmers.
It also features a journaling (a log) extension window for easy tracking of events.
It’s designed to work with no external dependencies – so it can be extremely easily added to production code and prototypes alike.
The main purpose of this library is to make the code more maintainable by decoupling one piece of the code (one that wants to send information or notification) from another piece of code (one that would like to be notified).
For example, in a game, an enemy getting killed can lead to: emitting a sound, player getting points, visual effects and even winning the game. Thanks to an event system like this one non of the different scripts have to know anything about each other. They only need to know the event they are interested in.
I would also like to thank mko, who rekindled my interest in event systems during Ludum Dare 39. And Christian Richards for inspiring me to create the 2nd version of this library (the one you are seeing here).
A special thanks goes to all the great folks who contributed to the many great Unity forum threads, Unity Answers and made Unity tutorials that helped me to learn Unity over the years. And, of course, all the lovely people who make Unity.
You guys rock!
License
MIT License, please see LICENSE file for the full license.
split your data into train and test and put it this way under the same project folder.
/lfw-deepfunneled
    ├── train
    └── test
Designed Model
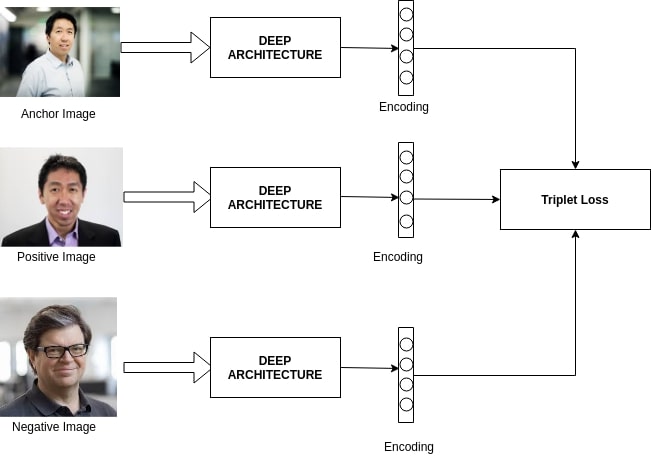
The model was designed to embedd the images into a vector of 128 D and train it to make the images of the same person as close as possible and the images of different persons as far as possible using the triplet loss.
This is similar to the FaceNet paper. You can check it in the file model/FaceMatch.py ..
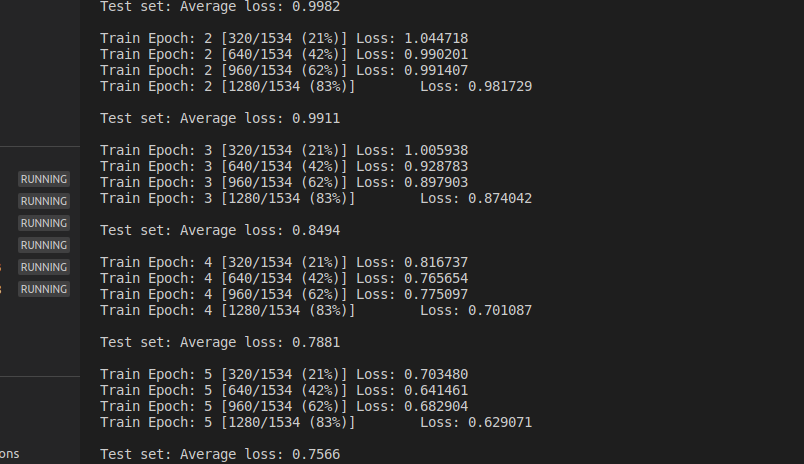
Here I specified the batch_size to be 16 and I specified the paths for my training and testing data.
Test
After training, you can test the model on a pair of images (to decide whether they belong to the same person or no) you can use the folowing comand. You should simply specify the paths of the images to compare.
in testing we use the model to get the embeddings of the images (each images is mapped to a vector), then we compute an euclidian distance between the two vectors and decide basing on this distance of they are from the same person or no. I used a threshold of 1.1 (same as facenet) to make the decision of same/different.
This is a $LD_PRELOAD-able library and a wrapper script to
run a command with the special syslog(3) function for redirecting
syslog output to the standard error (stderr).
Use case
Run a syslog-aware service in a container environment (e.g., Docker)
without a syslog daemon or the /dev/log.
How to build
Required packages: autoconf, automake, libtool, make, cc (gcc or misc)
$ sh autogen.sh
$ ./configure --prefix=/usr/local
$ make
$ sudo make install
The Kubernetes Learning Roadmap is constantly updated with new content, so you can be sure that you’re getting the latest and most up-to-date information available.
Learning Kubernetes can seem overwhelming. It’s a complex container orchestration system, that has a steep learning curve. But with the right roadmap and understanding of the foundational concepts, it’s something that any developer or ops person can learn.
In this Kubernetes learning roadmap, I have added prerequisites and complete Kubernetes learning path covering basic to advanced Kubernetes concepts.
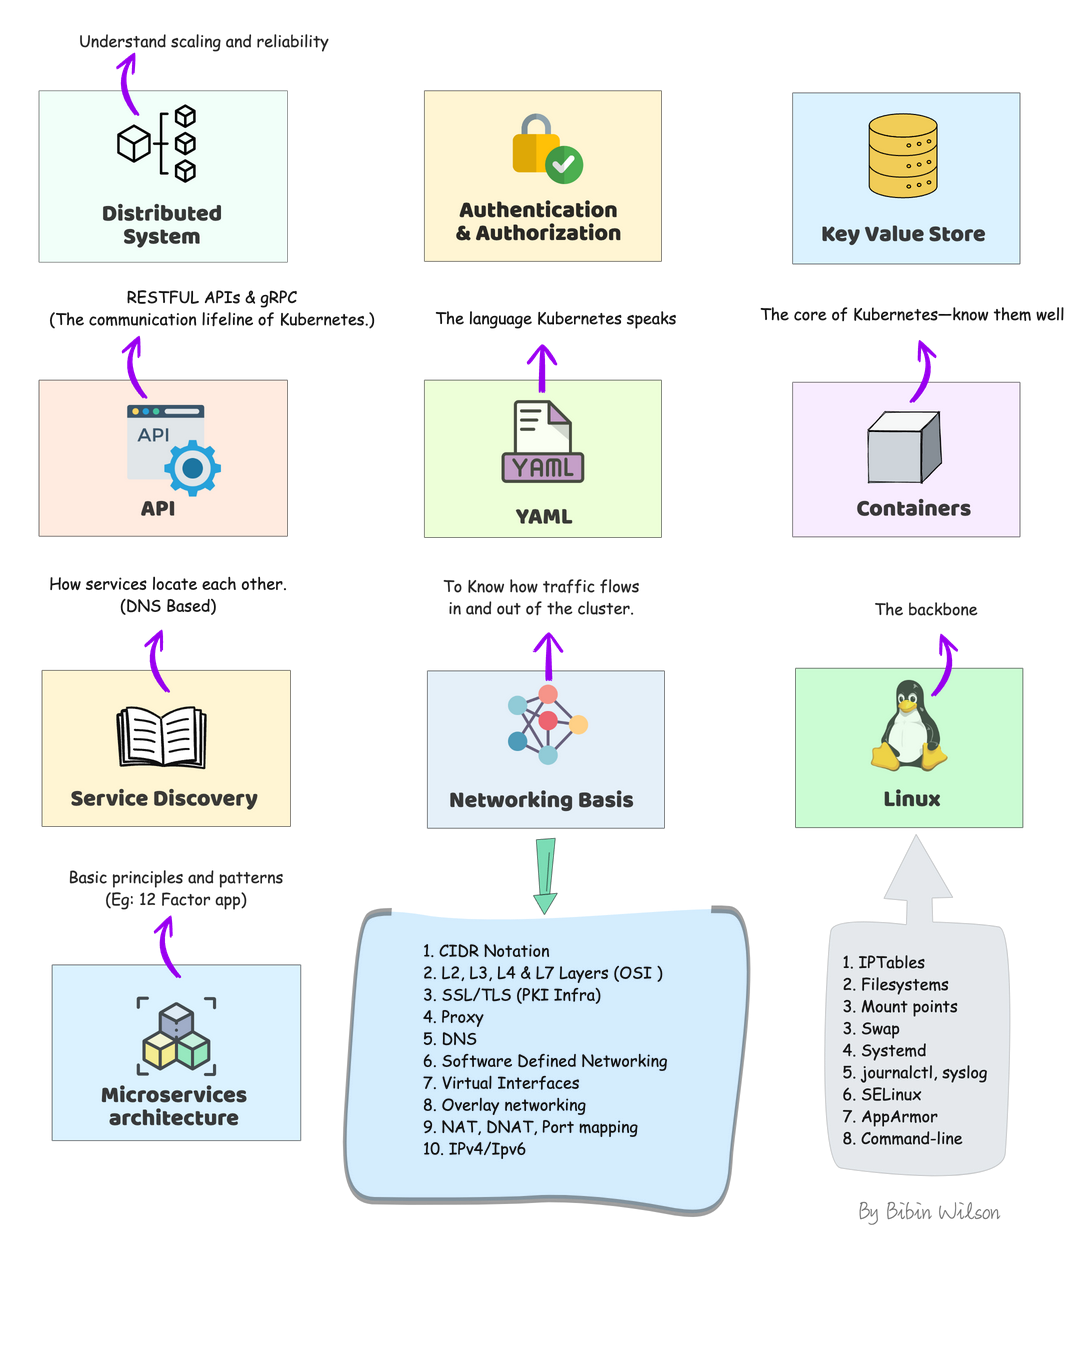
Kubernetes Learning Prerequisites
Before jumping into learning kubernetes, you need to have a fair amount of knowledge of some of the underlying technologies and concepts.
Distributed system: Learn about distributed system basics & their use cases in modern IT infrastructure. CAP theorem is good to have knowledge.
Authentication & Authorization: A very basic concept in IT. However, engineers starting their careers tend to get confused. So please get a good understanding of learning from analogies. You will quite often see these terms in Kubernetes.
Key Value Store: It is a type of NoSQL Database. Understand just enough basics and their use cases.
API: Kubernetes is an API-driven system. So you need to have an understanding of RESTFUL APIs. Also, try to understand gRPC API. It’s good to have knowledge.
YAML: YAML stands for YAML Ain’t Markup Language. It is a data serialization language that can be used for data storage and configuration files. It’s very easy to learn and from a Kubernetes standpoint, we will use it for configuration files. So understanding YAML syntax is very important.
Container: Container is the basic building block of kubernetes.The primary work of Kubernetes is to orchestrate containers. You need to learn all the container basics and have hands-on experience working on container tools like Docker or Podman. I would also suggest reading about Open container initiative and Container Runtime Interface (CRI)
Service Discovery: It is one of the key areas of Kubernetes. You need to have basic knowledge of client-side and server-side service discovery. To put it simply, in client-side service discovery, the request goes to a service registry to get the endpoints available for backend services. In server-side service discovery, the request goes to a load balancer and the load balancer uses the service registry to get the ending of backend services.
Networking Basis
CIDR Notation & Type of IP Addresses
L3, L4 & L7 Layers (OSI Layers)
SSL/TLS: One way & Mutual TLS
Proxy
DNS
IPTables
IPVS
Software Defined Networking (SDN)
Virtual Interfaces
Overlay networking
Learn Kubernetes Architecture
Understanding Kubernetes architecture is not an easy task. The system has many moving parts that need to be understood in order for you to get a grip on what’s happening beneath the surface. While learning architecture, you will come across the concepts we discuss in the prerequisites.
As Kubernetes is a complex system, trying to understand the core architecture could be a little overwhelming for DevOps Engineers. As you get more hands-on experience, you would be able to understand the core architecture better.
Here is my suggestion. Learn the high-level architecture and key components involved in Kubernetes. If you are not able to grasp the concept, either you can spend time and do more research on a specific topic or you can learn the concept while doing hands-on. It’s your choice.
Check out the Kubernetes Architecture guide to learn about all the Kubernetes components in detail.
Overall you need to learn the following:
Control plane components: Understand the role of each component like API server, etcd, Scheduler, and Controller manager.
Worker node components: Learn about Kube Proxy, Kubelet, Container Runtime
Addon Components: CoreDNS, Network plugins (Calico, weave, etc), Metric Server
Cluster high availability: Most organizations use managed Kubernetes services (GKE, EKS, AKS, etc). So the cloud provider takes care of the cluster’s control plane’s high availability. However, it is very important to learn the high availability concepts in scaling the cluster in multi zones and regions. It will help you in real-time projects and devops interviews.
Network Design: While it is easy to set up a cluster in an open network without restrictions, it is not that easy in a corporate network. As a DevOps engineer, you should understand the Kubernetes network design and requirements so that you can collaborate with the network team better. For example, When I was working with kubernetes setup on Google cloud, we used a CIDR pod range that was not routable in the corporate network. As a workaround, we had to deploy IP masquerading for the pod network.
$1000+ Free Cloud Credits to Launch Clusters
Deploying big clusters on the cloud could be expensive. So make use of the following cloud credits and learn to launch clusters as if you would on a real-time project. All platforms offer managed k8s services.
Use one account at a time. Once the credits are expired. move to the next account. You need to keep a watch on your credits as well as expiry. Or else you could get charged. Also, check the terms and instance usage limits if any.
Also, setting up servers on this platform is very easy and every cloud provider had extensive documentation to get started.
The Best Resources to Learn Kubernetes Online
Here are some of the best online resources to learn Kubernetes practically:
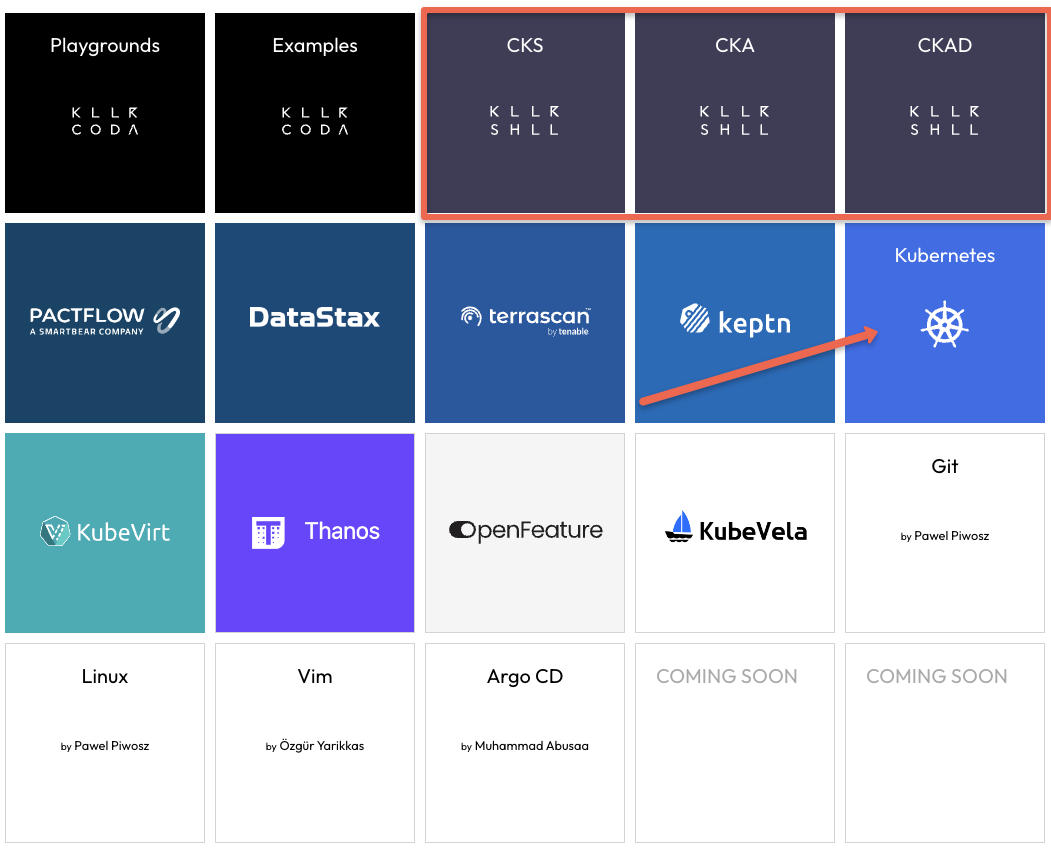
1️. The Official Kubernetes Basics Tutorial
The official Kubernetes website offers browser-based, hands-on tutorials powered by Katacoda scenarios. It covers:
Kubernetes Basics
Configurations
Stateless & Stateful Application Deployment
Services & Networking
Security & Access Control
🔹 You can also explore the official Kubernetes tasks for hands-on experience with real-world Kubernetes implementations. This will also help in preparing for Kubernetes certifications.
For a fully interactive browser-based learning experience, KillerCoda offers scenario-based Kubernetes playgrounds, where you can practice commands and learn in real-time.
Learn Kubernetes Cluster Setup & Administration
Kubernetes Cluster Setup
As DevOps engineers, it is very important to learn every component and cluster configuration. While there are many options to deploy a Kubernetes cluster, It is always better to learn to deploy multi-node clusters from scratch.
With multi-node clusters, you can learn about all the concepts like Cluster security, High Availability, Scaling, Networking, etc.
It gives you the feeling of working on a real-world project. It will also help you in interviews and you can be confident about production-level cluster configurations.
Following are my cluster setup suggestions.
Kubernetes the Hard Way: I would suggest you start with Kubernetes the hard way set up. It helps you understand all the configurations involved in bootstrapping a kubernetes cluster. If you want to work on production clusters, this lab will help you a lot. The setup is based on google cloud. You can use the $300 free credits to complete the lab.
Kubeadm Cluster Setup: Learning kubeadm cluster setup helps you in Kubernetes certification preparation. Also, it helps you automate Kubernetes cluster setup with best practices.
Minikube: If you want to have a minimal development cluster setup, minikube is the best option.
Kind: Kind is another local development Kubernetes cluster setup.
Vagrant Automated Kubernetes: If you prefer to have a multi-VM-based local Kubernetes cluster setup, you can try the automated vagrant setup that uses Kubeadm to bootstrap the cluster.
Learn About Cluster Configurations
Once you have a working cluster, you should learn about the key cluster configurations. This knowledge will be particularly helpful when working in a self-hosted Kubernetes setup.
Even if you use a managed Kubernetes cluster for your project, there may be certain cluster configurations that you need to modify.
For example, if you set up a cluster in a hybrid network, you may need to configure it with an on-premises private DNS server for private DNS resolution. This can be done via CoreDNS configuration.
Also, having a solid understanding of cluster configurations will help you with Kubernetes certifications (CKA & CKS) where you need to troubleshoot cluster misconfiguration and issues.
Understand KubeConfig File
Kubeconfig file is a YAML file that contains all the cluster information and credentials to connect to the cluster.
As a Devops Engineer, You should learn to connect to kubernetes clusters in different ways using the Kubeconfig file. Because you will be responsible for setting up cluster authentication for CI/CD systems, providing cluster access to developers, etc.
So spend some time, understanding the Kubeconfig file structure and associated parameters.
Understand Kubernetes Objects And Resources
You will quite often come across the names “Kubernetes Object” and “Kubernetes Resource“
First, you need to Understand the difference between an object and a resource in kubernetes.
To put it simply, anything a user creates and persists in Kubernetes is an object. For example, a namespace, pod, Deployment configmap, Secret, etc.
Before creating an object, you represent it in a YAML or JSON format. It is called an Object Specification (Spec). You declare the desired state of the object on the Object Spec. Once the object is created, you can retrieve its details from the Kubernetes API using Kubectl or client libraries.
As we discussed earlier in the prerequisite section, everything in Kubernetes is an API. To create different object types, there are API endpoints provided by the Kubernetes API server. Those object-specific api-endpoints are called resources. For example, an endpoint to create a pod is called a pod resource.
So when you try to create a Kubernetes Object using Kubectl, it converts the YAML spec to JSON format and sends it to the Pod resource (Pod API endpoint).
Learn About Pod & Associated Resources
Once you have an understanding of Kubernetes Objects and resources, you can start with a native Kubernetes object called Pod. A pod is a basic building block of Kubernetes.
You should learn all the Pod concepts and their associated objects like Service, Ingress, Persistent Volume, Configmap, and Secret. Once you know everything about a pod, it is very easy to learn other pod-dependent objects like deployments, Daemonset, etc.
First, learn about the Pod Resource Definition (YAML). A typical Pod YAML contains the following high-level constructs.
Kind
Metadata
Annotations
Labels
Selectors
Once you have a basic understanding of the above, move on to hands-on learning. These concepts will make more sense when you do hands-on.
Following are the hands-on tasks to learn about Pod and its associated objects.
Deploy a pod
Deploy pod on the specific worker node
Add service to pod
Expose the pod Service using Nodeport
Expose the Pod Service using Ingress
Setup Pod resources & limits
Setup Pod with startup, liveness, and readiness probes.
Add Persistent Volume to the pod.
Attach configmap to pod
Add Secret to pod
multi-container pods (sidecar container pattern)
Init containers
Ephemeral containers
Static Pods
Learn to troubleshoot Pods
Few advanced pod scheduling concepts.
Pod Preemption & Priority
Pod Disruption Budget
Pod Placement Using a Node Selector
Pod Affinity and Anti-affinity
Container Life Cycle Hooks
Learn About Pod Dependent Objects
Now that you have a better understanding of Pod and independent kubernetes resources, you can start learning about objects that are dependent on the Pod object. While learning this, you will come across concepts like HPA (Horizontal Pod Autoscaling) and VPA (Verification Pod Autoscaling)
Replicaset
Deployment
Daemonsets
Statefulset
Jobs & Cronjobs
Deploy End to End Application on Kubernetes
Once you understand the basics of these objects, you can try deploying an end-to-end microservices application on Kubernetes. Start with simple use cases and gradually increase complexity.
I would suggest you get a domain name and try setting up a microservice application from scratch and host it on your domain.
You don’t need to develop an application for this. Choose any open-source microservice-based application and deploy it. My suggestion is to choose the open-source pet clinic microservice application based on spring boot.
Following are the high-level tasks.
Build Docker images for all the services. Ensure you optimize the Dockerfile to reduce the Docker Image size.
Create manifests for all the services. (Deployment, Statefulset, Services, Configmaps, Secrets, etc)
Expose the front end with service type ClusterIp
Deploy Nginx Ingress controller and expose it with service type Loadbalancer
Map the load balancer IP to the domain name.
Create an ingress object with a DNS name with the backend as a front-end service name.
Validate the application.
Learn About Securing Kubernetes Cluster
Security is a key aspect of Kubernetes. There are many ways to implement security best practices in Kubernetes starting from building a secure container image.
Following the native ways of implementing security in kubernetes.
Service account
Pod Security Context
Seccomp & AppArmor
Role Based Access Control (RBAC)
Attribute-based access control (ABAC)
Network Policies
The following are the open-source tools you need to look at.
Open Policy Agent
Kyverno
Kube-bench
Kube-hunter
Falco
Learn About Kubernetes Operator Pattern
Kubernetes Operators is an advanced concept.
To understand operators, first, you need to learn the following Kubernetes concepts.
Custom resource definitions
Admission controllers
Validating & Mutating Webhooks
To get started with operators, you can try setting the following operators on Kubernetes.
Prometheus Operator
MySQL Operator
If you are a Go developer or you want to learn to extend/customize kubernetes, I would suggest you create your own operator using Golang.
Learn Important Kubernetes Configurations
While learning kubernetes, you might use a cluster in open network connectivity. So most of the tasks get executed without any issues. However, it is not the case with clusters set up on corporate networks.
So following are the some of the custom cluster configurations you should be aware of.
Custom DNS server
Custom image registry
Shipping logs to external logging systems
Kubernetes OpenID Connect
Segregating & securing Nodes for PCI & PII Workloads
Learn Kubernetes Production Best Practices
Following are the resources that might help and add value to the Kubernetes learning process in terms of best practices.
12 Factor Apps: It is a methodology that talks about how to code, deploy and maintain modern microservices-based applications. Since Kubernetes is a cloud-native microservices platform, it is a must-know concept for DevOps engineers. So when you work on a real-time kubernetes project, you can implement these 12-factor principles.
Kubernetes Failure Stories: Kubernetes failure stories is a website that has a list of articles that talk about failures in Kubernetes implementation. If you read those stories, you can avoid those mistakes in your kubernetes implementation.
Case Studies From Organizations: Spend time on use cases published by organizations on Kubernetes usage and scaling. You can learn a lot from them. Following are some of the case studies that are worth reading.
Scheduling 300,000 Kubernetes Pods in Production Daily
Scaling Kubernetes to 7,500 Nodes
Real-World Kubernetes Case Studies
When I spoke to the DevOps community, I found that a common issue was the lack of real-world experience with Kubernetes. If you don’t have an active Kubernetes project in your organization, you can refer to case studies and learning materials published by organizations that use Kubernetes. This will also help you in Kubernetes interviews.
Here are some good real-world Kubernetes case studies that can enhance your Kubernetes knowledge:
Resources: Links to official documentation, practice labs, and study guides.
Community and News Sources
News and Blogs: Resources to stay updated with Kubernetes trends, like CNCF blog, Kubernetes Podcast, and KubeWeekly.
Community Forums: Links to Kubernetes Slack channels, Stack Overflow, and other communities for support.
Contribute and Collaborate
Tip
This repository thrives on community contributions and collaboration. Here’s how you can get involved:
Fork the Repository: Create your own copy of the repository to work on.
Submit Pull Requests: Contribute your projects or improvements to existing projects by submitting pull requests.
Engage with Others: Participate in discussions, provide feedback on others’ projects, and collaborate to create better solutions.
Share Your Knowledge: If you’ve developed a new project or learned something valuable, share it with the community. Your contributions can help others in their learning journey.
Join the Community
Important
We encourage you to be an active part of our community:
Join Our Telegram Community: Connect with fellow DevOps enthusiasts, ask questions, and share your progress in our Telegram group.
Follow Me on GitHub: Stay updated with new projects and content by following me on GitHub.
Code of Conduct
Caution
We are committed to fostering a welcoming and respectful environment for all contributors. Please take a moment to review our Code of Conduct before participating in this community.
Hit the Star! ⭐
If you find this repository helpful and plan to use it for learning, please give it a star. Your support is appreciated!
🛠️ Author & Community
This project is crafted by Harshhaa 💡.
I’d love to hear your feedback! Feel free to share your thoughts.
The Kubernetes Learning Roadmap is constantly updated with new content, so you can be sure that you’re getting the latest and most up-to-date information available.
Learning Kubernetes can seem overwhelming. It’s a complex container orchestration system, that has a steep learning curve. But with the right roadmap and understanding of the foundational concepts, it’s something that any developer or ops person can learn.
In this Kubernetes learning roadmap, I have added prerequisites and complete Kubernetes learning path covering basic to advanced Kubernetes concepts.
Kubernetes Learning Prerequisites
Before jumping into learning kubernetes, you need to have a fair amount of knowledge of some of the underlying technologies and concepts.
Distributed system: Learn about distributed system basics & their use cases in modern IT infrastructure. CAP theorem is good to have knowledge.
Authentication & Authorization: A very basic concept in IT. However, engineers starting their careers tend to get confused. So please get a good understanding of learning from analogies. You will quite often see these terms in Kubernetes.
Key Value Store: It is a type of NoSQL Database. Understand just enough basics and their use cases.
API: Kubernetes is an API-driven system. So you need to have an understanding of RESTFUL APIs. Also, try to understand gRPC API. It’s good to have knowledge.
YAML: YAML stands for YAML Ain’t Markup Language. It is a data serialization language that can be used for data storage and configuration files. It’s very easy to learn and from a Kubernetes standpoint, we will use it for configuration files. So understanding YAML syntax is very important.
Container: Container is the basic building block of kubernetes.The primary work of Kubernetes is to orchestrate containers. You need to learn all the container basics and have hands-on experience working on container tools like Docker or Podman. I would also suggest reading about Open container initiative and Container Runtime Interface (CRI)
Service Discovery: It is one of the key areas of Kubernetes. You need to have basic knowledge of client-side and server-side service discovery. To put it simply, in client-side service discovery, the request goes to a service registry to get the endpoints available for backend services. In server-side service discovery, the request goes to a load balancer and the load balancer uses the service registry to get the ending of backend services.
Networking Basis
CIDR Notation & Type of IP Addresses
L3, L4 & L7 Layers (OSI Layers)
SSL/TLS: One way & Mutual TLS
Proxy
DNS
IPTables
IPVS
Software Defined Networking (SDN)
Virtual Interfaces
Overlay networking
Learn Kubernetes Architecture
Understanding Kubernetes architecture is not an easy task. The system has many moving parts that need to be understood in order for you to get a grip on what’s happening beneath the surface. While learning architecture, you will come across the concepts we discuss in the prerequisites.
As Kubernetes is a complex system, trying to understand the core architecture could be a little overwhelming for DevOps Engineers. As you get more hands-on experience, you would be able to understand the core architecture better.
Here is my suggestion. Learn the high-level architecture and key components involved in Kubernetes. If you are not able to grasp the concept, either you can spend time and do more research on a specific topic or you can learn the concept while doing hands-on. It’s your choice.
Check out the Kubernetes Architecture guide to learn about all the Kubernetes components in detail.
Overall you need to learn the following:
Control plane components: Understand the role of each component like API server, etcd, Scheduler, and Controller manager.
Worker node components: Learn about Kube Proxy, Kubelet, Container Runtime
Addon Components: CoreDNS, Network plugins (Calico, weave, etc), Metric Server
Cluster high availability: Most organizations use managed Kubernetes services (GKE, EKS, AKS, etc). So the cloud provider takes care of the cluster’s control plane’s high availability. However, it is very important to learn the high availability concepts in scaling the cluster in multi zones and regions. It will help you in real-time projects and devops interviews.
Network Design: While it is easy to set up a cluster in an open network without restrictions, it is not that easy in a corporate network. As a DevOps engineer, you should understand the Kubernetes network design and requirements so that you can collaborate with the network team better. For example, When I was working with kubernetes setup on Google cloud, we used a CIDR pod range that was not routable in the corporate network. As a workaround, we had to deploy IP masquerading for the pod network.
$1000+ Free Cloud Credits to Launch Clusters
Deploying big clusters on the cloud could be expensive. So make use of the following cloud credits and learn to launch clusters as if you would on a real-time project. All platforms offer managed k8s services.
Use one account at a time. Once the credits are expired. move to the next account. You need to keep a watch on your credits as well as expiry. Or else you could get charged. Also, check the terms and instance usage limits if any.
Also, setting up servers on this platform is very easy and every cloud provider had extensive documentation to get started.
The Best Resources to Learn Kubernetes Online
Here are some of the best online resources to learn Kubernetes practically:
1️. The Official Kubernetes Basics Tutorial
The official Kubernetes website offers browser-based, hands-on tutorials powered by Katacoda scenarios. It covers:
Kubernetes Basics
Configurations
Stateless & Stateful Application Deployment
Services & Networking
Security & Access Control
🔹 You can also explore the official Kubernetes tasks for hands-on experience with real-world Kubernetes implementations. This will also help in preparing for Kubernetes certifications.
For a fully interactive browser-based learning experience, KillerCoda offers scenario-based Kubernetes playgrounds, where you can practice commands and learn in real-time.
Learn Kubernetes Cluster Setup & Administration
Kubernetes Cluster Setup
As DevOps engineers, it is very important to learn every component and cluster configuration. While there are many options to deploy a Kubernetes cluster, It is always better to learn to deploy multi-node clusters from scratch.
With multi-node clusters, you can learn about all the concepts like Cluster security, High Availability, Scaling, Networking, etc.
It gives you the feeling of working on a real-world project. It will also help you in interviews and you can be confident about production-level cluster configurations.
Following are my cluster setup suggestions.
Kubernetes the Hard Way: I would suggest you start with Kubernetes the hard way set up. It helps you understand all the configurations involved in bootstrapping a kubernetes cluster. If you want to work on production clusters, this lab will help you a lot. The setup is based on google cloud. You can use the $300 free credits to complete the lab.
Kubeadm Cluster Setup: Learning kubeadm cluster setup helps you in Kubernetes certification preparation. Also, it helps you automate Kubernetes cluster setup with best practices.
Minikube: If you want to have a minimal development cluster setup, minikube is the best option.
Kind: Kind is another local development Kubernetes cluster setup.
Vagrant Automated Kubernetes: If you prefer to have a multi-VM-based local Kubernetes cluster setup, you can try the automated vagrant setup that uses Kubeadm to bootstrap the cluster.
Learn About Cluster Configurations
Once you have a working cluster, you should learn about the key cluster configurations. This knowledge will be particularly helpful when working in a self-hosted Kubernetes setup.
Even if you use a managed Kubernetes cluster for your project, there may be certain cluster configurations that you need to modify.
For example, if you set up a cluster in a hybrid network, you may need to configure it with an on-premises private DNS server for private DNS resolution. This can be done via CoreDNS configuration.
Also, having a solid understanding of cluster configurations will help you with Kubernetes certifications (CKA & CKS) where you need to troubleshoot cluster misconfiguration and issues.
Understand KubeConfig File
Kubeconfig file is a YAML file that contains all the cluster information and credentials to connect to the cluster.
As a Devops Engineer, You should learn to connect to kubernetes clusters in different ways using the Kubeconfig file. Because you will be responsible for setting up cluster authentication for CI/CD systems, providing cluster access to developers, etc.
So spend some time, understanding the Kubeconfig file structure and associated parameters.
Understand Kubernetes Objects And Resources
You will quite often come across the names “Kubernetes Object” and “Kubernetes Resource“
First, you need to Understand the difference between an object and a resource in kubernetes.
To put it simply, anything a user creates and persists in Kubernetes is an object. For example, a namespace, pod, Deployment configmap, Secret, etc.
Before creating an object, you represent it in a YAML or JSON format. It is called an Object Specification (Spec). You declare the desired state of the object on the Object Spec. Once the object is created, you can retrieve its details from the Kubernetes API using Kubectl or client libraries.
As we discussed earlier in the prerequisite section, everything in Kubernetes is an API. To create different object types, there are API endpoints provided by the Kubernetes API server. Those object-specific api-endpoints are called resources. For example, an endpoint to create a pod is called a pod resource.
So when you try to create a Kubernetes Object using Kubectl, it converts the YAML spec to JSON format and sends it to the Pod resource (Pod API endpoint).
Learn About Pod & Associated Resources
Once you have an understanding of Kubernetes Objects and resources, you can start with a native Kubernetes object called Pod. A pod is a basic building block of Kubernetes.
You should learn all the Pod concepts and their associated objects like Service, Ingress, Persistent Volume, Configmap, and Secret. Once you know everything about a pod, it is very easy to learn other pod-dependent objects like deployments, Daemonset, etc.
First, learn about the Pod Resource Definition (YAML). A typical Pod YAML contains the following high-level constructs.
Kind
Metadata
Annotations
Labels
Selectors
Once you have a basic understanding of the above, move on to hands-on learning. These concepts will make more sense when you do hands-on.
Following are the hands-on tasks to learn about Pod and its associated objects.
Deploy a pod
Deploy pod on the specific worker node
Add service to pod
Expose the pod Service using Nodeport
Expose the Pod Service using Ingress
Setup Pod resources & limits
Setup Pod with startup, liveness, and readiness probes.
Add Persistent Volume to the pod.
Attach configmap to pod
Add Secret to pod
multi-container pods (sidecar container pattern)
Init containers
Ephemeral containers
Static Pods
Learn to troubleshoot Pods
Few advanced pod scheduling concepts.
Pod Preemption & Priority
Pod Disruption Budget
Pod Placement Using a Node Selector
Pod Affinity and Anti-affinity
Container Life Cycle Hooks
Learn About Pod Dependent Objects
Now that you have a better understanding of Pod and independent kubernetes resources, you can start learning about objects that are dependent on the Pod object. While learning this, you will come across concepts like HPA (Horizontal Pod Autoscaling) and VPA (Verification Pod Autoscaling)
Replicaset
Deployment
Daemonsets
Statefulset
Jobs & Cronjobs
Deploy End to End Application on Kubernetes
Once you understand the basics of these objects, you can try deploying an end-to-end microservices application on Kubernetes. Start with simple use cases and gradually increase complexity.
I would suggest you get a domain name and try setting up a microservice application from scratch and host it on your domain.
You don’t need to develop an application for this. Choose any open-source microservice-based application and deploy it. My suggestion is to choose the open-source pet clinic microservice application based on spring boot.
Following are the high-level tasks.
Build Docker images for all the services. Ensure you optimize the Dockerfile to reduce the Docker Image size.
Create manifests for all the services. (Deployment, Statefulset, Services, Configmaps, Secrets, etc)
Expose the front end with service type ClusterIp
Deploy Nginx Ingress controller and expose it with service type Loadbalancer
Map the load balancer IP to the domain name.
Create an ingress object with a DNS name with the backend as a front-end service name.
Validate the application.
Learn About Securing Kubernetes Cluster
Security is a key aspect of Kubernetes. There are many ways to implement security best practices in Kubernetes starting from building a secure container image.
Following the native ways of implementing security in kubernetes.
Service account
Pod Security Context
Seccomp & AppArmor
Role Based Access Control (RBAC)
Attribute-based access control (ABAC)
Network Policies
The following are the open-source tools you need to look at.
Open Policy Agent
Kyverno
Kube-bench
Kube-hunter
Falco
Learn About Kubernetes Operator Pattern
Kubernetes Operators is an advanced concept.
To understand operators, first, you need to learn the following Kubernetes concepts.
Custom resource definitions
Admission controllers
Validating & Mutating Webhooks
To get started with operators, you can try setting the following operators on Kubernetes.
Prometheus Operator
MySQL Operator
If you are a Go developer or you want to learn to extend/customize kubernetes, I would suggest you create your own operator using Golang.
Learn Important Kubernetes Configurations
While learning kubernetes, you might use a cluster in open network connectivity. So most of the tasks get executed without any issues. However, it is not the case with clusters set up on corporate networks.
So following are the some of the custom cluster configurations you should be aware of.
Custom DNS server
Custom image registry
Shipping logs to external logging systems
Kubernetes OpenID Connect
Segregating & securing Nodes for PCI & PII Workloads
Learn Kubernetes Production Best Practices
Following are the resources that might help and add value to the Kubernetes learning process in terms of best practices.
12 Factor Apps: It is a methodology that talks about how to code, deploy and maintain modern microservices-based applications. Since Kubernetes is a cloud-native microservices platform, it is a must-know concept for DevOps engineers. So when you work on a real-time kubernetes project, you can implement these 12-factor principles.
Kubernetes Failure Stories: Kubernetes failure stories is a website that has a list of articles that talk about failures in Kubernetes implementation. If you read those stories, you can avoid those mistakes in your kubernetes implementation.
Case Studies From Organizations: Spend time on use cases published by organizations on Kubernetes usage and scaling. You can learn a lot from them. Following are some of the case studies that are worth reading.
Scheduling 300,000 Kubernetes Pods in Production Daily
Scaling Kubernetes to 7,500 Nodes
Real-World Kubernetes Case Studies
When I spoke to the DevOps community, I found that a common issue was the lack of real-world experience with Kubernetes. If you don’t have an active Kubernetes project in your organization, you can refer to case studies and learning materials published by organizations that use Kubernetes. This will also help you in Kubernetes interviews.
Here are some good real-world Kubernetes case studies that can enhance your Kubernetes knowledge:
Resources: Links to official documentation, practice labs, and study guides.
Community and News Sources
News and Blogs: Resources to stay updated with Kubernetes trends, like CNCF blog, Kubernetes Podcast, and KubeWeekly.
Community Forums: Links to Kubernetes Slack channels, Stack Overflow, and other communities for support.
Contribute and Collaborate
Tip
This repository thrives on community contributions and collaboration. Here’s how you can get involved:
Fork the Repository: Create your own copy of the repository to work on.
Submit Pull Requests: Contribute your projects or improvements to existing projects by submitting pull requests.
Engage with Others: Participate in discussions, provide feedback on others’ projects, and collaborate to create better solutions.
Share Your Knowledge: If you’ve developed a new project or learned something valuable, share it with the community. Your contributions can help others in their learning journey.
Join the Community
Important
We encourage you to be an active part of our community:
Join Our Telegram Community: Connect with fellow DevOps enthusiasts, ask questions, and share your progress in our Telegram group.
Follow Me on GitHub: Stay updated with new projects and content by following me on GitHub.
Code of Conduct
Caution
We are committed to fostering a welcoming and respectful environment for all contributors. Please take a moment to review our Code of Conduct before participating in this community.
Hit the Star! ⭐
If you find this repository helpful and plan to use it for learning, please give it a star. Your support is appreciated!
🛠️ Author & Community
This project is crafted by Harshhaa 💡.
I’d love to hear your feedback! Feel free to share your thoughts.
During the coronavirus pandemic the need for simulating I2C devices arose.
Students couldn’t physically attend their laboratories and therefore I came
up with the idea of making simulated (or virtual) I2C devices available.
This would allow the students to still exercise the usage of the API
to interact with the (simulated) devices. Of course, there are no physical
effects like blinking LEDs or alike, but … better than nothing.
The kernel already provides something close to this as I2C slave devices,
notably the i2c-eeprom-slave.
However, only a few I2C master device drivers support slaves and those
require hardware to work.
The first approach was to write a single I2C driver that would both
have the slaves attached and be used to interact with them (i.e.
write and read data as I2C transactions). As it turned out, having
a slave device at a given address prevents the usage of this address
for the simple I2C ioctl/read/write operations (at least for the
i2c-eeprom-slave which I wanted to use as a sample device).
The i2c-virt-bus driver therefore creates two I2C busses. The first
(“/dev/i2c-<n>“) is a dummy that manages the slave devices. It exposes
no other capabilities. Although there is no such thing with I2C busses,
you can think of it as a transparent hub to which all slave devices are
attached.
The second (“/dev/i2c-<n+1>“) I2C bus created when loading the module
uses an I2C master driver that can be used to access the slave devices
as if they were attached to its bus (see the setup-test target here). You can think of this bus as your connection
to the hub.
Future development
No. I’m making these sources available as is because they may be helpful
in an educational context. I have no plans to clean them up
(I’m not a kernel developer and I’m sure some things are horrible, e.g.
I have no idea how much locking is done by the i2c-core layer and
what I have missed here by not doing any locking at all) or maintain
them beyond my needs during the pandemic.
Eclipse settings for kernel modules
Of course, real kernel developers use vi or emacs. But I have grown
accustomed to using eclipse, its refactoring capabilities and the
ease of exploring unknown environments by hitting F3. I have no doubt
that something like this can be achieved with emacs (which I did use
as my main tool during the 80s), but I didn’t have time to explore this.
I achieved to setup eclipse for kernel module development, following these
hints. The setup is tied to the OS/compiler version I used when developing
these drivers (while make all should work anywhere). So you’ll have
to go through the setting if you want to use this in a different environment.