An utility to convert between available currencies for a given date. This repository provides a Ruby library for obtaining Foreign Exchange (FX) rates and a Ruby on Rails (RoR) web application.
Exchange Rate Library
The code is allocated at web/lib/exchange_rate and it is packaged as a Ruby gem. If you want to test it, please run:
  cd web/lib/exchange_rate
  rake test
The different end-points to interact with the library are:
Method
Description
ExchangeRate.init
Fetches an XML file from a remote source specified at ExchangeRate.configuration.url_historical; parses it according to an XSD defined at http://www.ecb.int/vocabulary/2002-08-01/eurofxref; and persists the data pulled into a sqlite database allocated at ExchangeRate.configuration.dbname. Note, if the database is already populated, the above steps are ignored.
ExchangeRate.update
Feeds the database with new data from a remote source specified at ExchangeRate.configuration.url_daily. This method unlike ExchangeRate.init populates the database with new rates unless data for a given data/currency already exist. It becomes useful to be called within a scheduler cron on a daily basis.
ExchangeRate.reset
Destroys the database configured at ExchangeRate.configuration.dbname.
ExchangeRate.at({date, amount, from, to})
Returns an exchange rate from currency ‘from’ to currency ‘to’ for a given date. If keyword date is missing, it defaults to Date.today. Similarly, if amount keyword is not given, it defaults to 1. The keywords from and to are expected to be strings (e.g. USD, GBP, PLN, etc).
Configuration of the library
Should you want to change the default configuration options, below are the available variables that may be modified:
ExchangeRate.configure do |c|
  c.url_historical = 'foo'  # An URL to retrieve an historical (e.g. 90 days data) XML file for currencies/rates
  c.url_daily = 'bar' # An URL to retrieve a daily XML file for currencies/rates
  c.temp_file = '/tmp/foo.xml'  # A path for where the XML file will be cached for parsing/persisting
  c.dbname = 'db/bar.sqlite3' # A relative path for where the database will be allocated
end
Web application
A RoR application is used to interact with the ExchangeRate library. Currently, only one controller (e.g. exchange_rates_controller.rb) is provided with the following actions:
Method
Description
exchange_rates#index
Asks the ExchangeRate library for the available Currencies and renders an HTML form located at web/app/views/exchange_rates/index.html.erb) together with a JS file. The JS file (app/assets/javascripts/exchangeRatesIndex.js) performs client-side validations and handles network responses to exchange_rates#at.
exchange_rates#at
Interacts with ExchangeRate.at through the parameters provided by the web client and returns a JSON string with a result key for a valid conversion or a detail message if any error is encountered (ArgumentError, RuntimeError, etc).
Cron
There is set up a cronjob at the OS level that runs ExchangeRate.update method every day at 16:00 (UTC) and persists new data in the database for the library, if not already present there. See exchange-rate-cron and exchange-rate-cron.sh for specification details.
How to install it
This utility runs on an isolated environment using Docker. If you have Docker installed locally, please type:
docker build -t ubuntu-sqlite3-rails .
to build an Ubuntu OS image together with all the dependencies needed to run this code.
How to run it
In order to run the app, please make sure that the image has been built successfully and afterwards you should be able to type:
docker run --rm -it -v "$PWD/web":/usr/src/app -p 3000:3000 ubuntu-sqlite3-rails
which runs a container in an interactive mode that is auto-destroyed whenever is terminated. Note that a volume is mounted within the container to easy changing any code within web folder without needing to re-build the image. The web interface should be accessible through http://localhost:3000/exchange_rates.
Stweart Platform Simulation with Trapezoidal Velocity Trajectory Planner and Local Singularity Avoidance
This Colab notebook simulates a Stewart Platform with a Trapezoidal Velocity Trajectory Planner and Local Singularity Avoidance, using four key classes:
The Robot class models the Stewart Platform, handling forward/inverse kinematics, actuator forces, and singularity detection.
The Trapezoidal Velocity class manages trajectory planning, generating desired joint trajectories.
The Controller class handles control logic, issuing joint commands and tracking desired trajectories.
The Simulation class ties it all together, running dynamic simulations, visualizing real-time behavior, and analyzing performance.
GitHubSingularityAvoidance.mov
Elements in the video:
In blue the Stewart Platform.
In black the closest singular configuration.
The static series of frames is the trajectory coming from the trapezoidal class.
The dynamic series of frames is the real trajectory of the robot.
In the top right corner is the table of the forces felt by the actuators under gravity (enumaration at the base of the platform).
A short description of the key features of the four classes used in this repository is made here below.
Stewart Platform Class
This Stewart Platform Class has multiple uses that we will not fully cover here. The main function of the class that will be used here are the Inverse Kinematics, Forward Kinematics , Load Singularities and Find Closest singularity. Inverse and Forward kinematics are used to move from joint space to task space and vice versa when needed. The main focus of this class will be around Load Singularities and Find Closest singularity functions. The first one is used to upload the singularity positions in task space found offline, the second one is used to find the closest singularity given a pose.
Key functions description:
In the _find_closest_singularity function:
Using the workspace boundaries, the pose of the robot and the singularities get normalized.
The euclidean distance between the pose and all the singularities is calculated
The minimum distance is found and the closest singularity is selected.
Trapezoidal Velocity Class
The Trapezoidal class is designed to generate a trapezoidal velocity profile for controlling the movement of a robotic system. This class functions as a path and trajectory planner which is generated in joint space and then converted to task space for the controller. Note : for each second of simulation 5 frames are needed, the correction factor is used to convert seconds into ticks and vice versa.
Key functions description:
In the _ init _ function:
A copy of the robot is initialized to use IK and FK
Initial and final pose are saved
The time vector is defined
The function calculate_q_profiles is called
The function calculate_q_vel_profiles is called
The function calculate_x_profiles is called
In the calculate_q_profiles function:
For every every joint q :
Limits of the trapezoidal trajectory are checked in the check_limits function. In case the minimum or maximum velocity constraints are not met, new values of velocities are proposed.
For every t in the time vector: the time profile relative to the joint q is built.
In the calculate_q_vel_profiles function:
For every every joint q :
the velocity profile relative to the joint q is built.
In the calculate_x_profiles function:
Using FK of the robot and the time profiles from calculate_q_profiles, time profiles in task space are calculated.
Controller Class
This controller stands in the middle between the trapezoidal velocity trajectory generation and the simulation environment. The objective is to maintain the robot onto the trapezoidal path while locally avoiding singularities if needed. Note : The controls are generated in task space and then converted into joint space for the motors.
Key functions description:
In the _ init _ function:
The robot class is passed.
The trapezoidal trajectory is initialized and generated.
The time vector, initial and final position are found.
Max joint velocity is defined.
Standard deviation for gaussian obstacle profile generation is defined.(to be tuned)
In the calculate_cmd function:
For every t (instant) in the time vector :
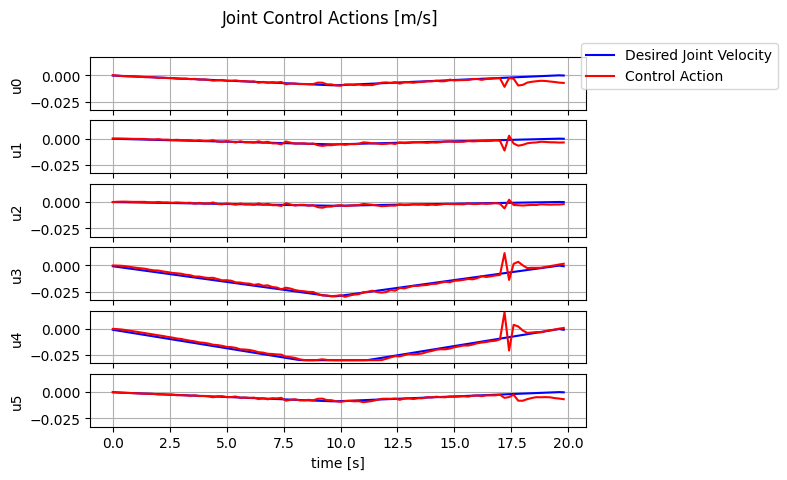
The trajectory part of the control action is found (u=K*error). The error is calculated as the difference of the reference coming from the trapezoidal trajectory and the position of the robot in time.
If the LocalConditionIndex is too low, the singularity part of the control action is found (u=K*closeness to singularity * direction). The closest singularity is found with the robot function getClosestSingularity. The closeness to the singularity (gaussian distance) to each component is found with the function findGaussianDistFromSingularity. K needs to be tuned.
Velocity command is calculated and is checked for saturation.
In the findGaussianDistFromSingularity function:
The pose of the robot and the closest singularity get normalized.
For each pose component (x,y,z,roll,pitch,yaw), the gaussian distance from the singularity is found.
The whole gaussian vector is then normalized.
Simulation Class
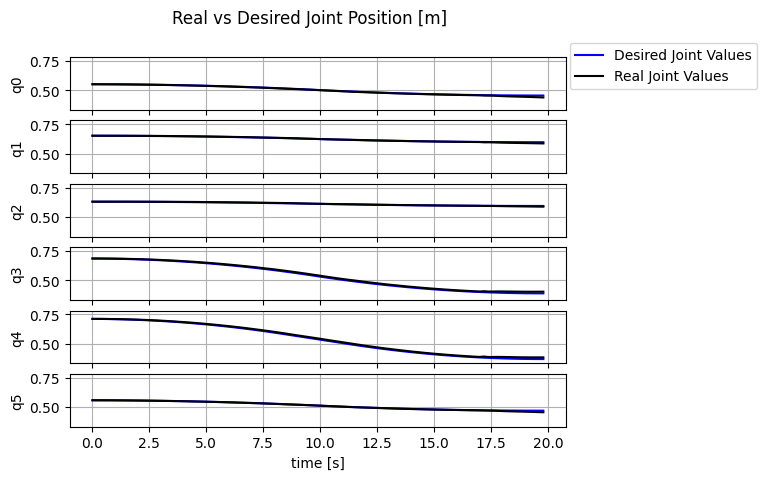
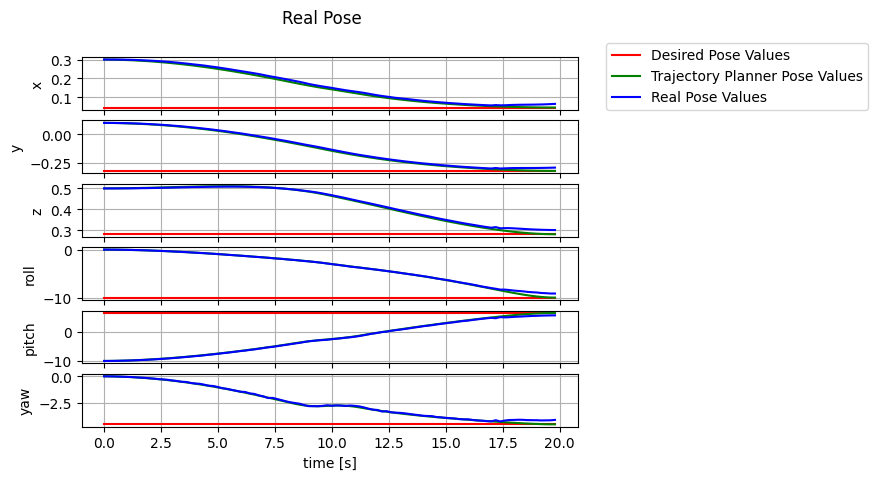
The simulation class is used to simulate the robot side of the system. Commands arrive from the controller at every timestep, the position of the robot is updated taking into consideration random noise, feedback of the new configuration is provided to the controller. Using the library FuncAnimation it is possible to generate a video at 5 frames per second showing : the robot, the robot closest singularity, the desired trajectory, the real trajectory and the table of the forces experienced by the legs under the effect of gravity.
Key functions description:
In the _ init _ function:
The controller and the robot are passed to the simulation class.
The time vector, initial and final position are retrieved.
The force to win gravity is defined (x direction).
In the start function
For every t (instant) in the time vector :
A new velocity command for the linear actuators is give by the controller.
The simulation gets updated through the updateSimulation function.
Feedback is given to the controller through the controller function updatePose.
Multiple functions for plotting are then called.
In the updateSimulation function
The theoretical displacement of the actuator is found.
Random noise is added to the new displacement of the actuator to simulate real case scenario.
New lenghts of actuators are found.
Robot pose is updated.
Code Execution
In this section, the steps necessary to use the various elements is shown
Variables Definition
Mount the google drive.
Define the Platform parameters.
Upload the singularities (calculated offline with the __find_singularity_workspace stewart platform function).
# access drive to load singularitiesdrive.mount('/content/drive')
# Platform definitionr_b=0.5# Radius of basephi_b=50# Angle between base jointsr_p=0.3# Radius of platformphi_p=80# Angle between platform joints# Workspace Boundaries definitionworkspace_limits= [-0.5, 0.5, -0.5, 0.5, 0.1, 0.6]
orientation_limits= [-10, 10, -10, 10, -10, 10]
# load singularities into google colabwithopen('/content/drive/My Drive/Github/filtered_singularities_task_space_2.txt', 'r') asf:
singularities_task_space=np.loadtxt(f)
# singularities_task_space = np.array([[0,0,0,0,0,0],[0,0,0,0,0,0]]) # uncomment if no singularities are available
Initialization
Initialize robot class.
Load the singularities into the robot object.
Define the controller’s parameters and initialize the controller. By initializing the controller, the trapezoidal velocity profile class is automatically constructed. Warning will pop up if the chosen set of speed and time does not meet the trapezoidal profile constraints.
Initialize the simulation.
# Platform initializationplatform=StewartPlatform(r_b , phi_b , r_p, phi_p)
# Loading Singularities into robot.platform.loadSingularitiesTaskSpace(singularities_task_space,workspace_limits,orientation_limits) # be coherent with the limits used for getSingularityWorkspace() function# Define initial and final positionpose_i=np.array([0.3,0.1,0.5,0,-10,0]) # Note: FK algorithm does not like high values for angles.pose_f=singularities_task_space[230]
# Define final timetf_seconds=20# defines the time in which you would like to reach the final pose# Define controller parametersmax_joint_vel=0.03# [m/s] # define max joint velocitiesK=np.array([1,1,1,0.03,0.03,0.03])*0.5# define proportional gain for the controller# Initialize controllercontroller=Controller(platform,pose_i,pose_f,tf_seconds,max_joint_vel,K)
# Initialize Simulationsim=Simulation(controller)
Simulation
Now that the robot, the controller with trapezoidal trajectory and the simulation are setted up.
Start the simulation
If, during the trajectory, the robot passes too close to a singularity, warnings will pop up.
A series of plots is then generated to show the simulation’s result.
# Start Simulationsim.start()
Video Generation
Generate the video from the simulation.
Note: this may take some time as the animation is generated with matplotlib. In each second, five frames are generated.
Elements:
In blue the Stewart Platform.
In black the closest singular configuration.
The static series of frames is the trajectory coming from the trapezoidal class.
The dynamic series of frames is the real trajectory of the robot.
In the top right corner is the table of the forces felt by the actuators under gravity (enumaration at the base of the platform).
For Arduino, I was using SSD1306 Brzo as well as ESP8266AUDIO and ESP8266SAM libraries and I think that’s it. You will need to install the two audio libraries manually unfortunately. They can be located here https://github.com/earlephilhower/ESP8266Audio and https://github.com/earlephilhower/ESP8266SAM . The audio libraries reccomend running at 160mhz, so I bumped it up to there, but depending on how complicated your code is, you could get away with less.
For linux build you need cmake, gcc and either SDL or ncurses-dev
SDL – ‘sudo apt-get install libsdl2-devel’
NCurses – Most systems can install this with a ‘sudo apt-get install ncurses-dev’
For Windows console build you will need cmake as well as Visual Studio and optionally Visual Studio Code.
Console – Should require nothing additional.
For emscipten, there is only a build command currently, but if there’s more demand I can clean this up. emcc game.cpp gameCommon.cpp myGame.cpp myfont.cpp platform_core.cpp -s WASM=1 -std=c++0x -DOPENAL_FOUND -s USE_SDL=2 -O3 --profiling -o index.html -s
There’s no tests, tut – tut, but I did a lot of play testing 🙂
The hope is that people can fork this repo and start writing their own games. You can see the Asteroids demo on the master branch or check out some other branches for other games I maybe write / have written.
You can change the mygame.cpp and mygame.h, to write your own game inside the ‘framework’
I imagined turning it into a library, but I haven’t thought of a clean way to do that and still maintain the cross platform build files, which I hope I can one day turn into and online IDE for creating and playing the games, with the ability to use backing hardware to play it on the a physical device you made.
And for the input I’ve used staples, with a 1 Mohm (Million) Resistor between the Output Pin to a staple, another staple across from it with a diode, to a Analog Input rail, which switched between in the input code (To Be Detailed Later)
There is the ability to run audio as well, which I will hopefully complete one day soon on my prototype badge, but the code has been partially tested on a few projects now, as per the instructions on the ESP8266Audio repo.
Boundless-commerce.com – API’s First Headless E-commerce CMS: We Provide An
Admin-Side For Store Management, Powerful API, And Ready-To-Use Checkout Area.
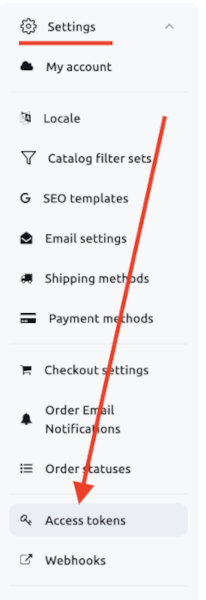
Go to “Control panel” -> “Settings” -> “Access tokens” and create a new one:
Copy .env.example to .env.local
Modify .env.local: put values for the NEXT_PUBLIC_BOUNDLESS_API_PERMANENT_TOKEN and NEXT_PUBLIC_BOUNDLESS_INSTANCE_ID, copy values from:
If you want to use Stripe, put values for NEXT_PUBLIC_STRIPE_PUBLISHABLE_KEY, STRIPE_SECRET_KEY and BOUNDLESS_MANAGEMENT_TOKEN.
BOUNDLESS_MANAGEMENT_TOKEN it is token like NEXT_PUBLIC_BOUNDLESS_API_PERMANENT_TOKEN, but management rights should be enabled.
Install dependencies: npm install
npm run dev – to start locally, then open http://localhost:3000
Set Up Webhook Handler
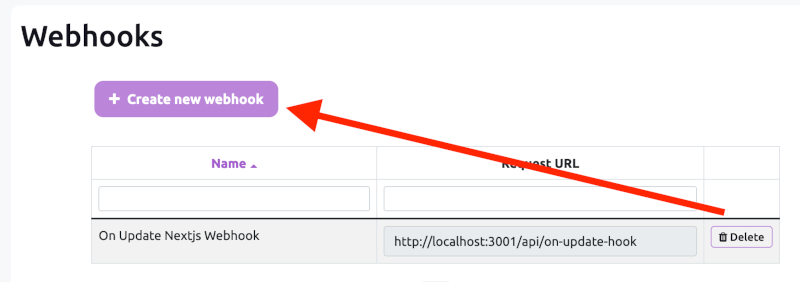
Go to “Control panel” -> “Settings” -> “Webhooks” and create a new one:
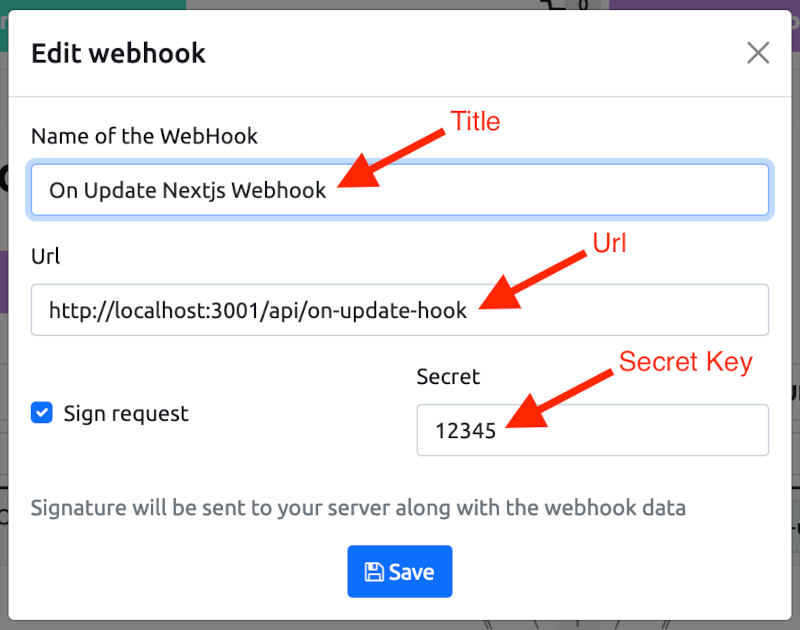
Create a new webhook:
You need to specify absolute URL to the webhook handler, e.g.: http://localhost:3000/api/on-update-hook. Then specify a secret key and put it as an ENV variable: WEBHOOK_SIGN_KEY.
Boundless-commerce.com – API’s First Headless E-commerce CMS: We Provide An
Admin-Side For Store Management, Powerful API, And Ready-To-Use Checkout Area.
Go to “Control panel” -> “Settings” -> “Access tokens” and create a new one:
Copy .env.example to .env.local
Modify .env.local: put values for the NEXT_PUBLIC_BOUNDLESS_API_PERMANENT_TOKEN and NEXT_PUBLIC_BOUNDLESS_INSTANCE_ID, copy values from:
If you want to use Stripe, put values for NEXT_PUBLIC_STRIPE_PUBLISHABLE_KEY, STRIPE_SECRET_KEY and BOUNDLESS_MANAGEMENT_TOKEN.
BOUNDLESS_MANAGEMENT_TOKEN it is token like NEXT_PUBLIC_BOUNDLESS_API_PERMANENT_TOKEN, but management rights should be enabled.
Install dependencies: npm install
npm run dev – to start locally, then open http://localhost:3000
Set Up Webhook Handler
Go to “Control panel” -> “Settings” -> “Webhooks” and create a new one:
Create a new webhook:
You need to specify absolute URL to the webhook handler, e.g.: http://localhost:3000/api/on-update-hook. Then specify a secret key and put it as an ENV variable: WEBHOOK_SIGN_KEY.
An extensible linter for OCaml programs.
Designed to be used as part of the grading infrastructure for CSCI2041.
Currently, only tested on Linux systems.
May work on macOS, but no guarantees are made.
Obtaining
Tagged releases are automatically built as static executables by Travis CI, and uploaded to this repo’s releases page.
Alternatively, the project can be built from source with the below instructions.
Building from Source
Dependencies
Requires a working Rust installation, which can be obtained with rustup.
Requires an installation of OCaml, OPAM, and ocamlfind.
Requires a C compiler.
just is recommended, and will be used in the instructions here.
It is technically optional, however; one can also run the commands in Justfile by hand.
If compiling a static executable, requires the 4.06.0+musl+static+flambda OPAM switch to be installed.
If compiling a dynamic executable, requires the 4.06.0 OPAM switch to be installed.
If the OPAMSWITCH environment variable is defined, that switch will be used instead.
Compiling
Run just package or just package-static.
This will compile extlint and its tools, and create the same extlint.tar.gz bundle as built by Travis.
Installation
Extract the binaries from extlint.tar.gz to somewhere on your PATH.
Code Organization
get-gitgrade-repos is a small helper program that clones all the student repos.
This is mainly for testing and assessments.
ocaml-ast is a hybrid Rust-OCaml crate to parse OCaml code.
rules contains rules developed for linting.
src/json_of_ocaml is a command-line tool that dumps an OCaml untyped AST as JSON.
It’s the best way to interface with ocaml-ast without linking directly to it.
src/ocaml-syntax-check is a command-line tool that pretty-prints any syntax error in the given file.
It’s mainly for debugging.
Known Bugs
Due to OCaml Bug #6754, there is a warning about topdirs.cmi when building ocaml-ast.
Unless you explicitly state otherwise, any contribution intentionally submitted for inclusion in the work by you, as defined in the Apache-2.0 license, shall be dual licensed as above, without any additional terms or conditions.
Last summer I was fortunate enough to take the trip of a lifetime with one of my work partners. Normally I’m a “hop-on, hop-off” trolley kind of tourist. For this trip, my friend and I wanted to find a healthier option that would allow us more freedome for sightseeing. We decided to use CitiBike, and we loved it so much we want to bring it back to Des Moines. We believe that CitiBike can lead to a heathier Des Monies overall by reducing emissions, increasing opportunities to breathe fresh air, and helping everyone close their Activity ring. We used data from New York City in August to create some visualizations that will help us communicate with our investors.
Results
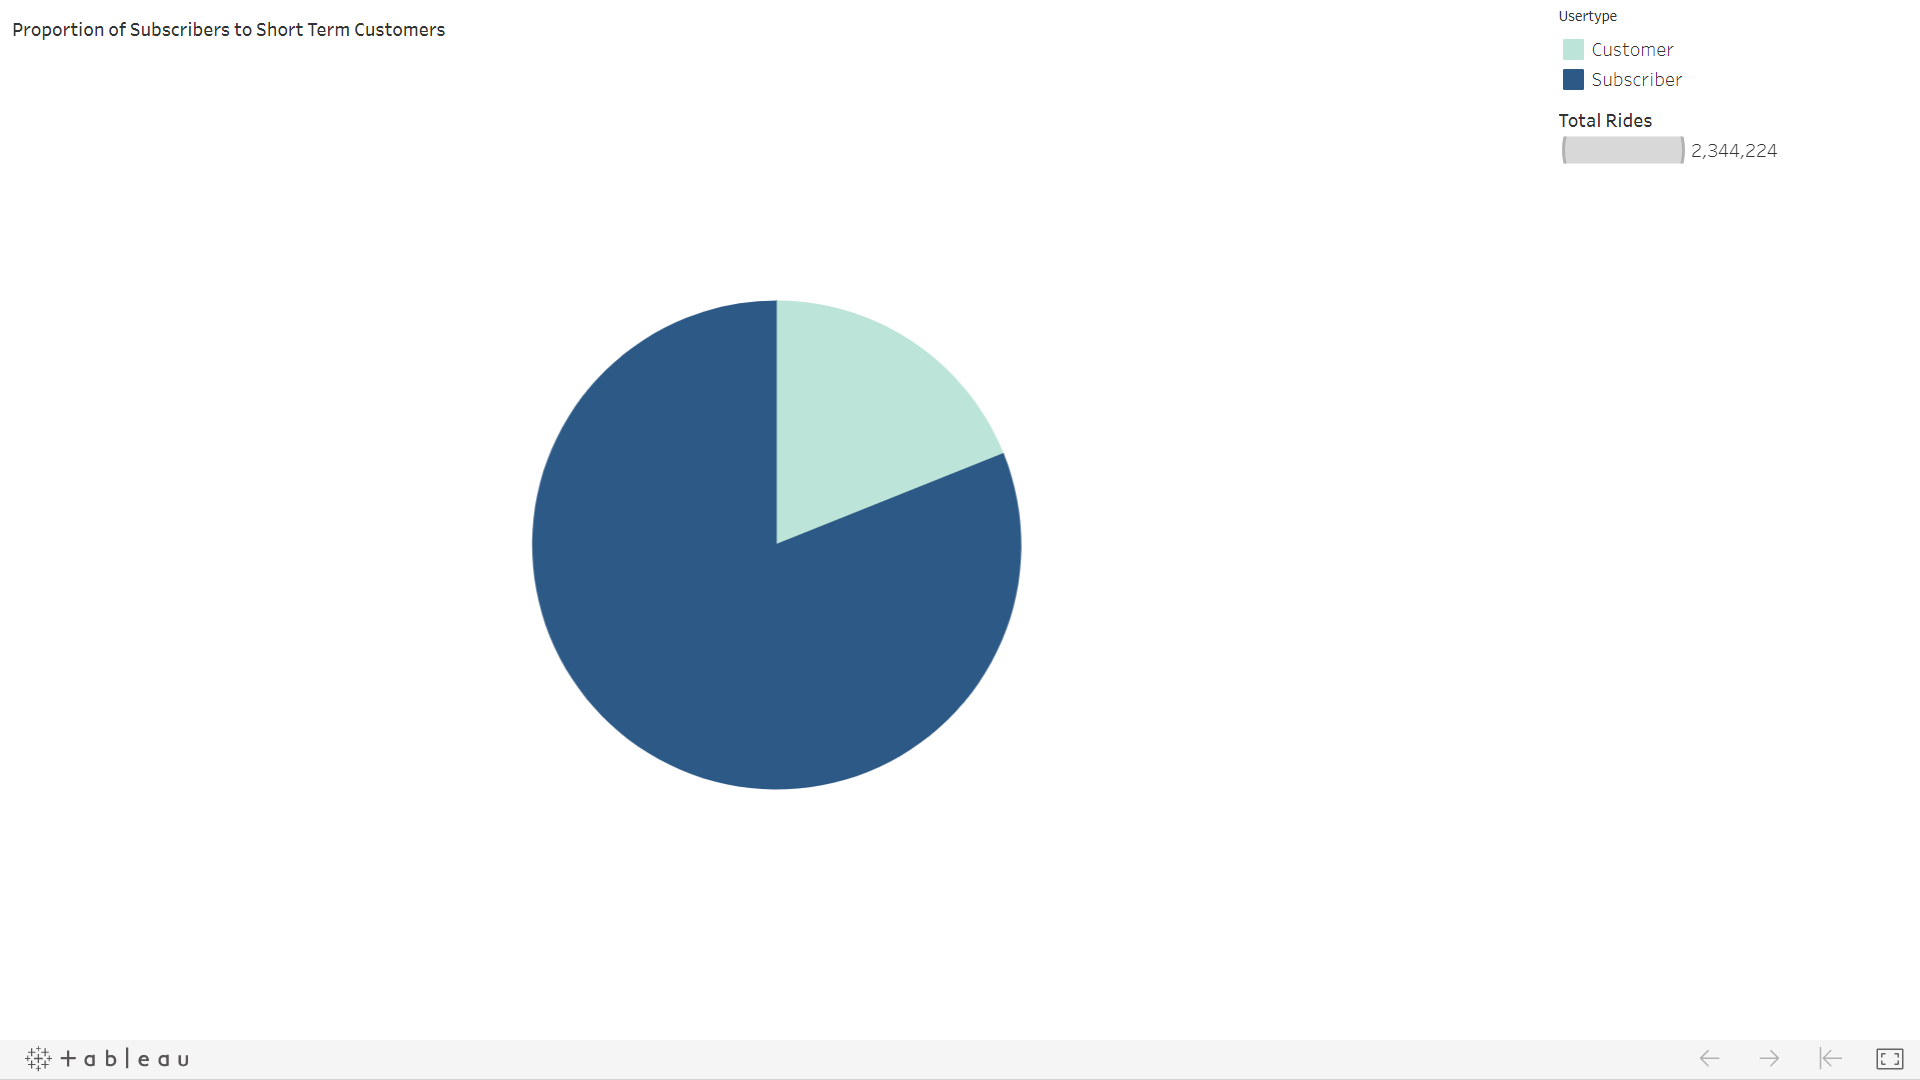
CitiBike customers took a total of 2,344,224 trips in the month of August. Let’s see what the data can tell us about what kind of customer uses CitiBike, and if it would be a good fit for Des Moines.
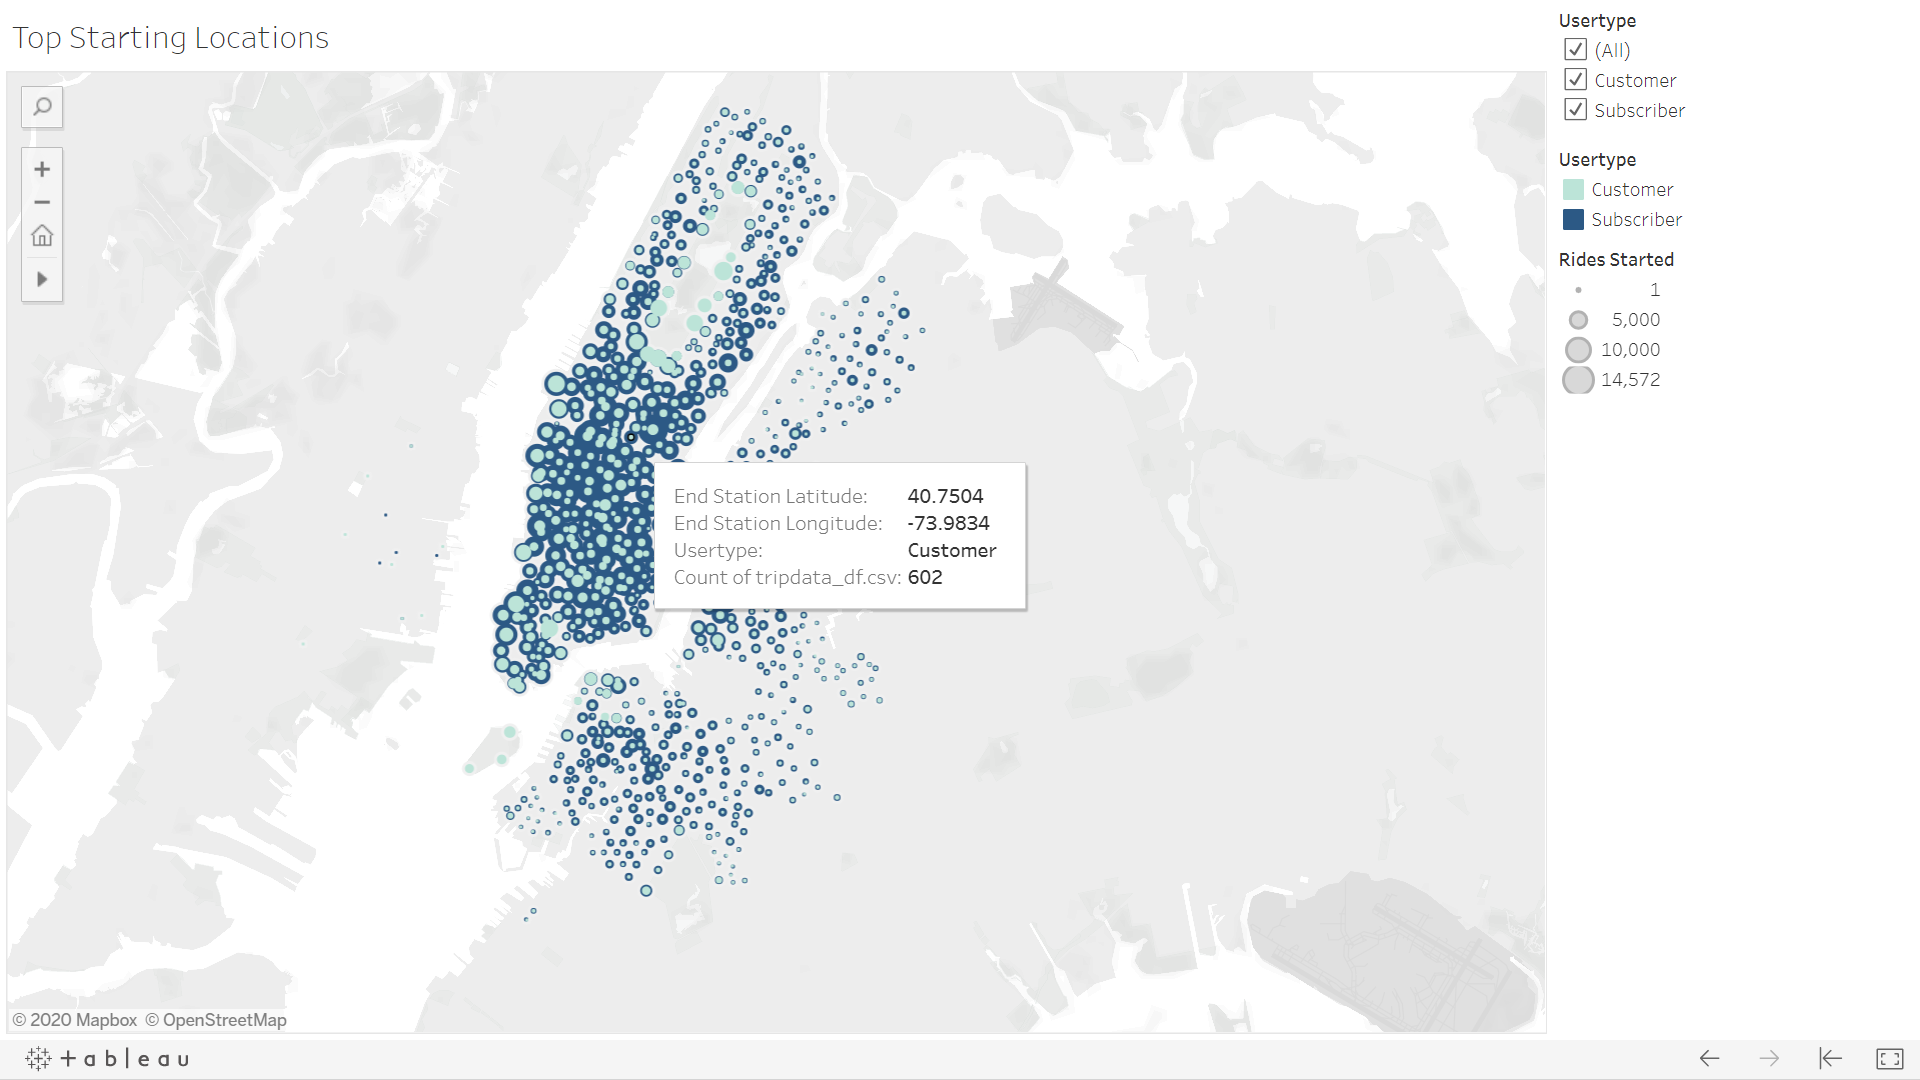
Here we can see that most trips begin in the downtown area. This begs the question, “Are the majority of riders tourists or commuters?” The filter on this map will help us compare, but we can also look at a little more information about the trips people are taking.
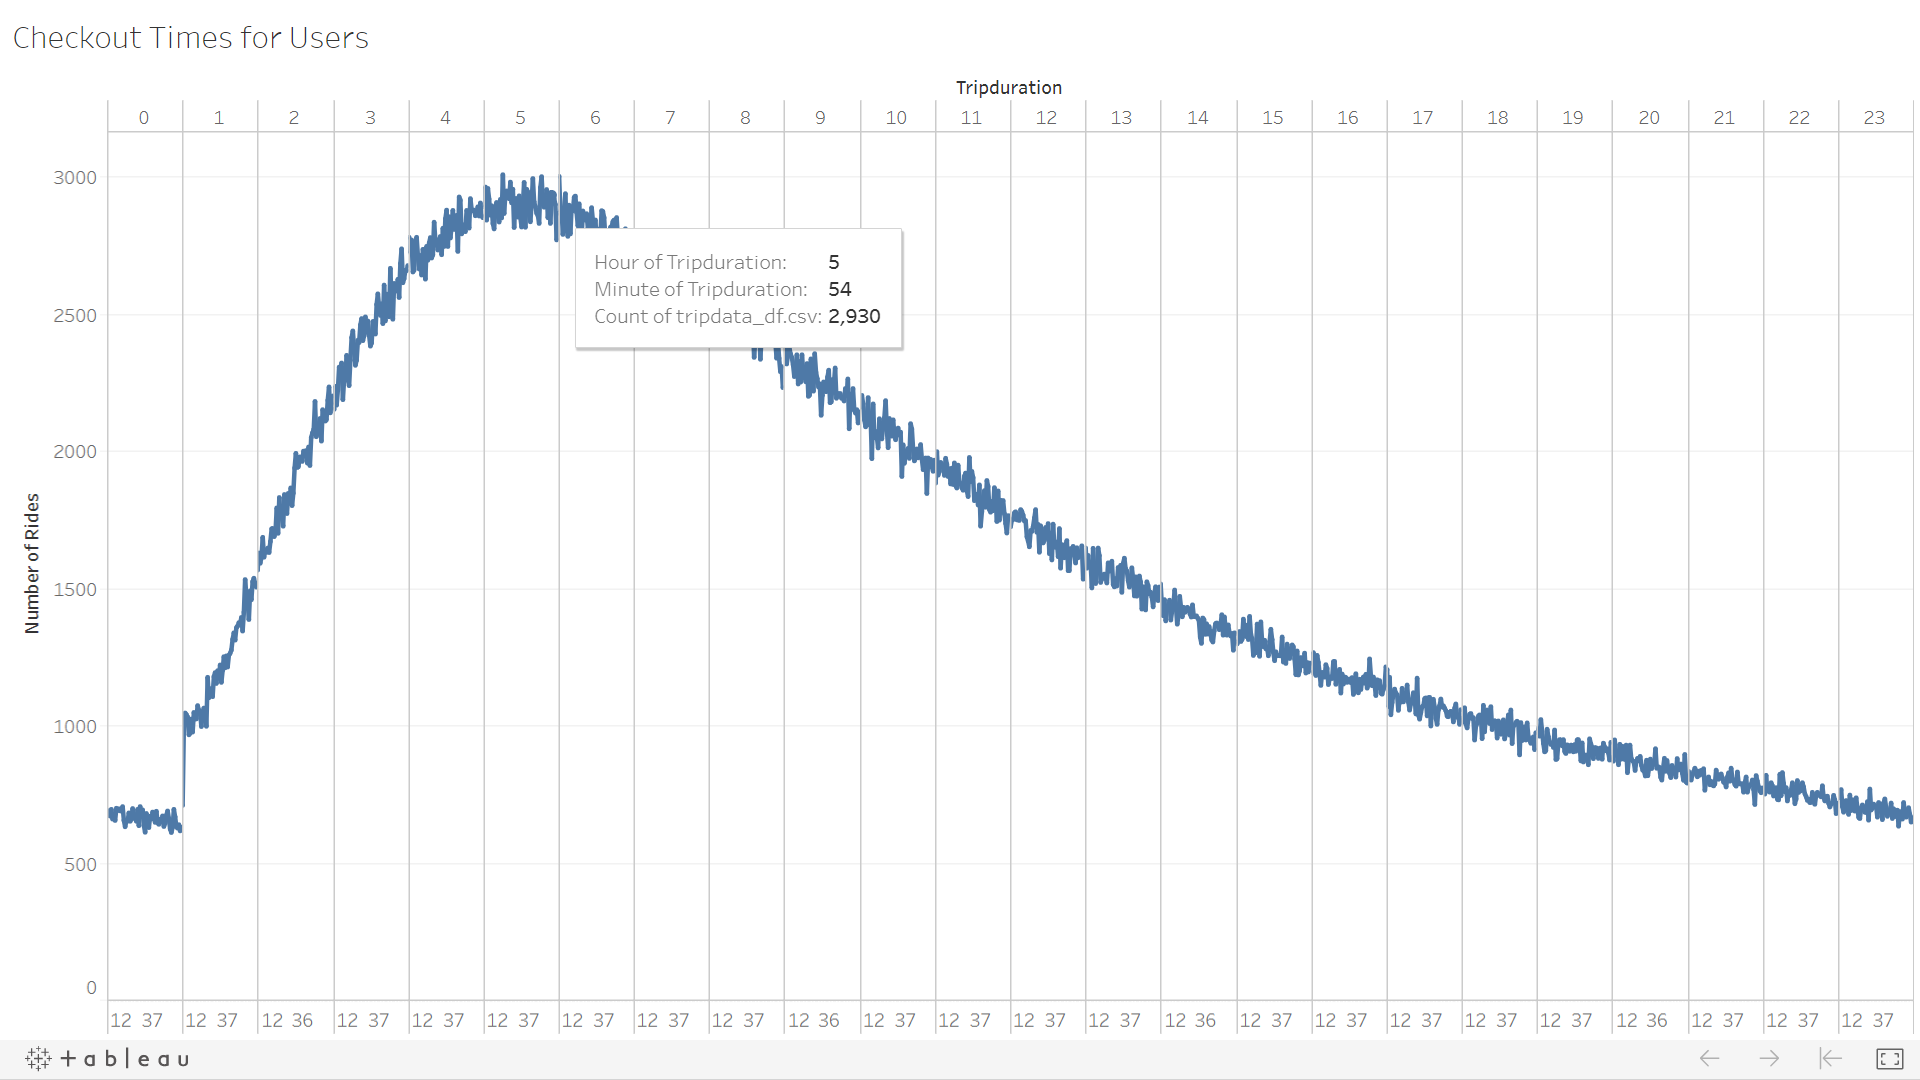
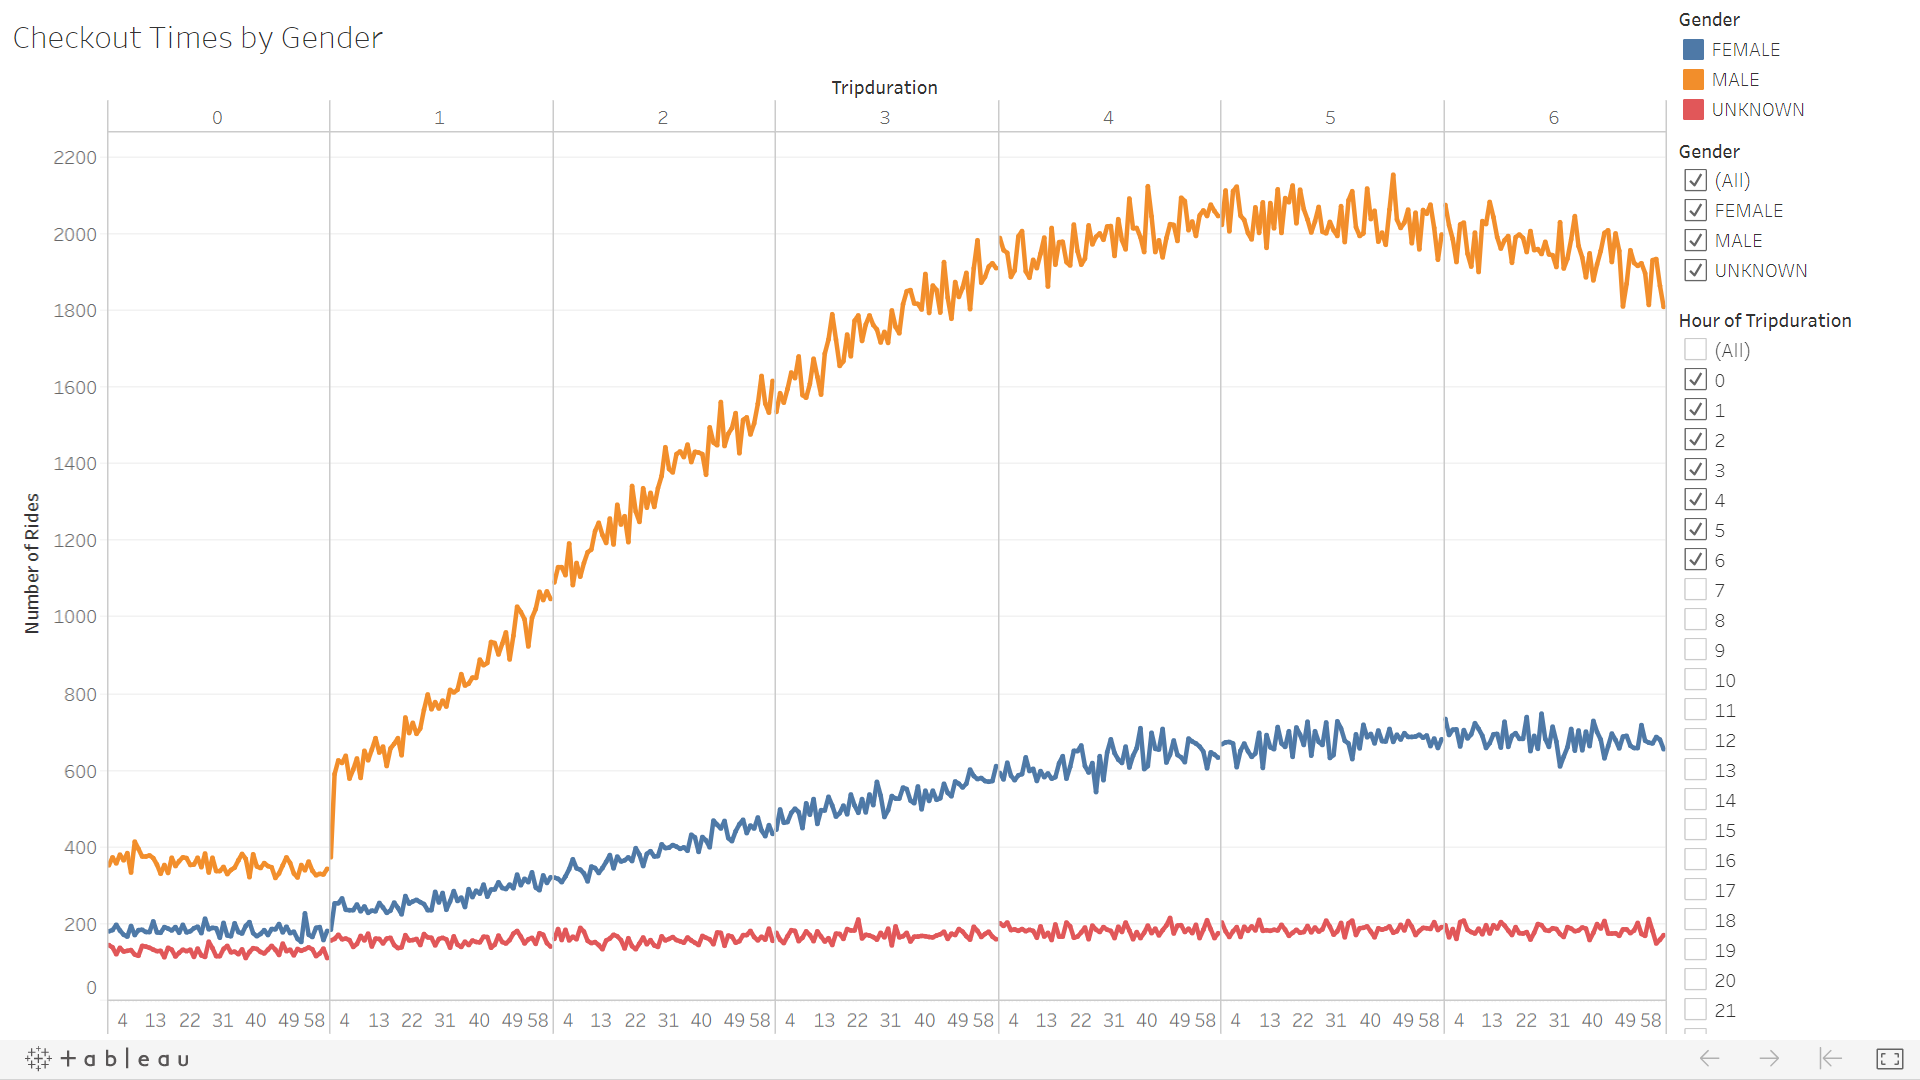
We can see on this line chart that most rides last between three and six hours. I wonder if these users are taking a long, scenic ride like my partner and I did. Maybe they are riders who commuted to work, but reserved the bike for the ride home. Let’s see what else we can learn.
Wow! When we breakdown those trips by the gender of the rider, we can see that most customers are males. We still aren’t sure if these guys are saving the environment on their way to work, or cruising around the city taking in the sights.
This heat map shows that most trips begin 8AM-9AM and 5PM-7PM on weekdays. There is some moderate afternoon acitivity on the weekends.
Drilling down to look at when each gender begins their trip, it appears Rush Hours are still the busiest regardelss of gender. It also confirms that males are the majority of riders.
When we split the heat map between Short Term Customers and Subscribers, we can see that the majority of rides are taken by male subscribers on any day of the week.
This pie chart shows the proportion of Subscribers to Short Term Customers. Overwhelmingly, the CitiBike customer is a subscriber.
Analysis
The above visualizations and the Tableau Story I’ve created tell us a lot about what kind of person uses CitiBikes. Based on the data we have, male subscribers (most likely on their work commute) are the heaviest users of CitiBike. This could work to keep Des Moines clean, green, and healthy. More information would be helpful to determine the cost of maintaining the bikes. It would be helpful to compare starting and ending locations of each individual bike trip. It would help us know if most trips are short, one-way rides or if the user is riding round-trip and possibly not putting as many miles on the bike. Number of rides by age would be helpful to know as well. Perhaps the bikes are being used by college students and future executives alike!
iFactr uses an container approach to execute a cross platform application on a computer or mobile device. At runtime the “bindings” instantiate the cross-platform control using a native UI object from the SDK for that target platform. In .NET Compact Framework, all controls are instatiated using objects from the WPF APIs.
iFactr is a C#.NET-based, cross-platform mobile application development framework.
Cross-platform UI controls
Bindings for Android, iOS and Windows, and Compact Framework
RESTful Data Services component
Features
Full set of cross platform GUI controls.
MVC application workflow engine.
Supporting libraries for file access, network, device integrations, and an IoC container.
You can:
Rapidly build mobile and desktop applications.
Mix and match fully native views with cross-platform views.
Integrate platform specific 3rd party libaries and views into the app.
Easily port your MonoCross app to iFactr.
Tech
iFactr uses a Model-View-Controller design pattern and navigation modeled after Microsoft’s ASP.NET and the Open-source Monocross.Navigation.
Support
StackOverflow is monitored. Post questions using the #iFactr tag.
Installation
Add References iFactr DLLs.
Development
Want to contribute? Great!
Open your favorite Terminal and run these commands.
Building from source
Building iFactr requires Microsoft Community Build Tasks v1.5 MSBuild
For production release:
$ build
This will create the iFactr.Wpf assembly for use when compiling a Win7, Win8, or Win10 executable for your iFactr application.
📎 Projet 01 – Découvrez le quotidien d’un développeur web
Début du projet le 21/04/2020
Le sujet du projet 01 du parcours Développeur web chez Openclassrooms est de vous donner toutes les clés pour réussir votre parcours, puis votre insertion professionnelle en tant que développeur !