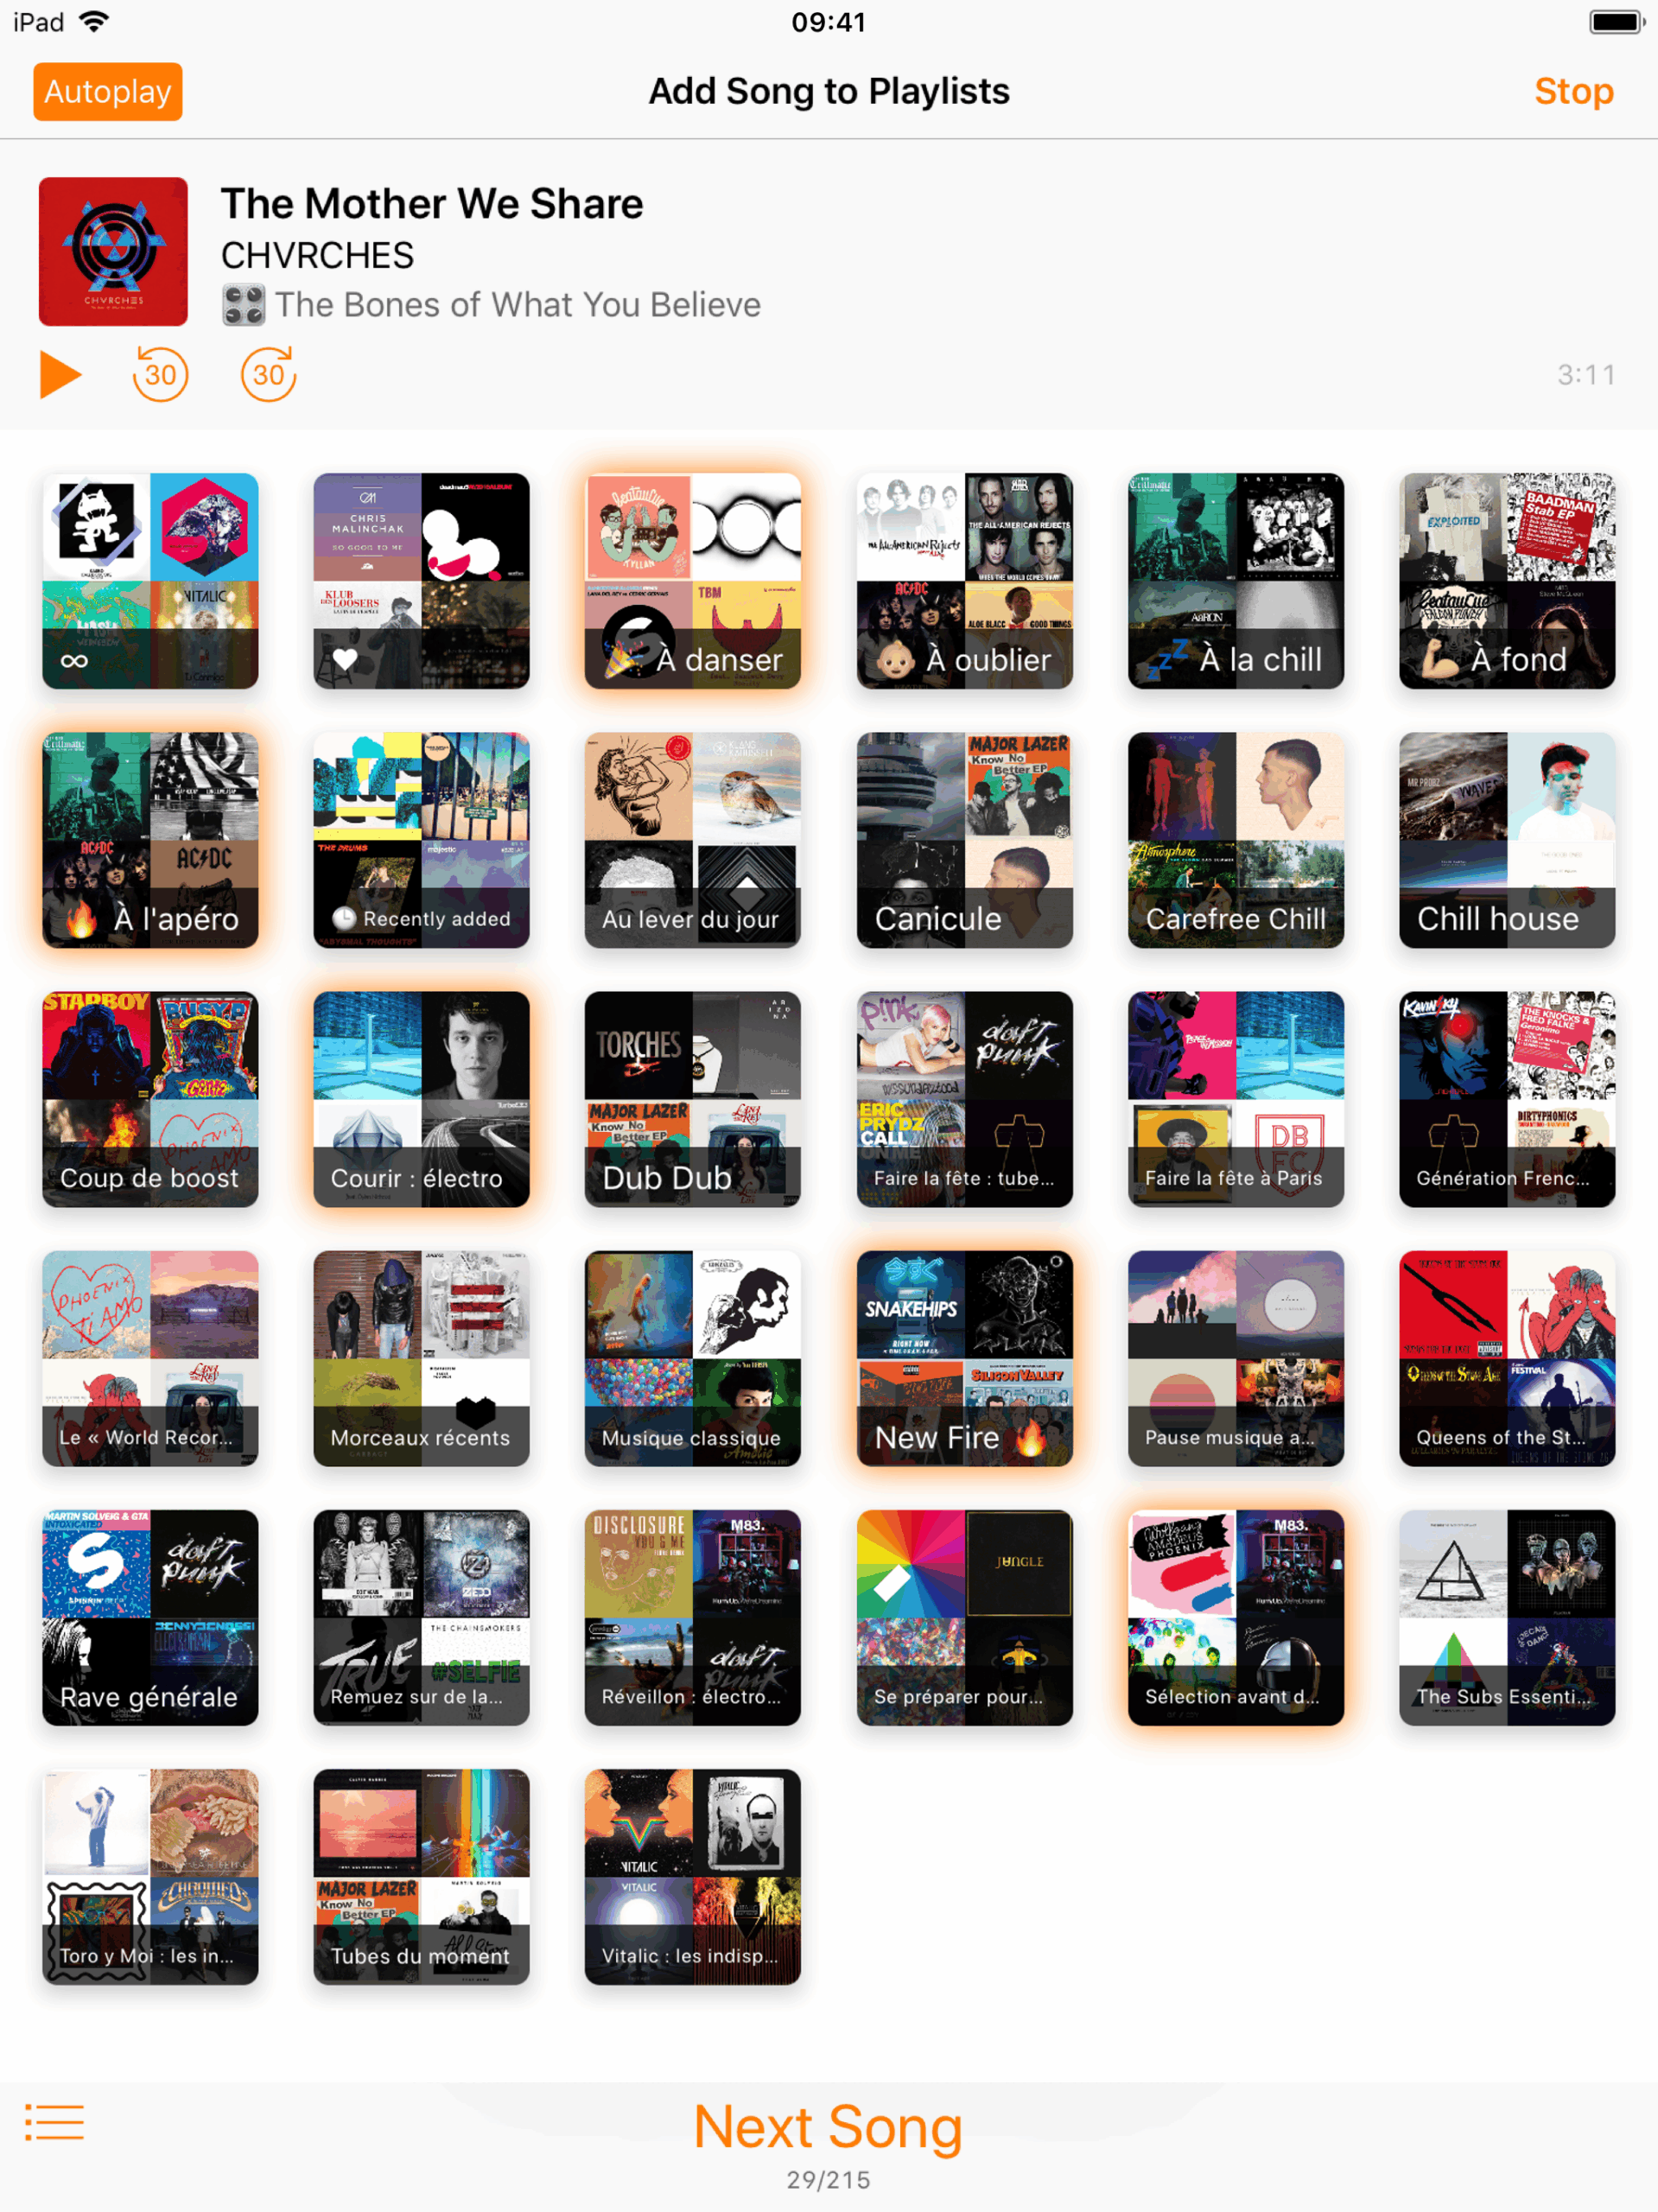
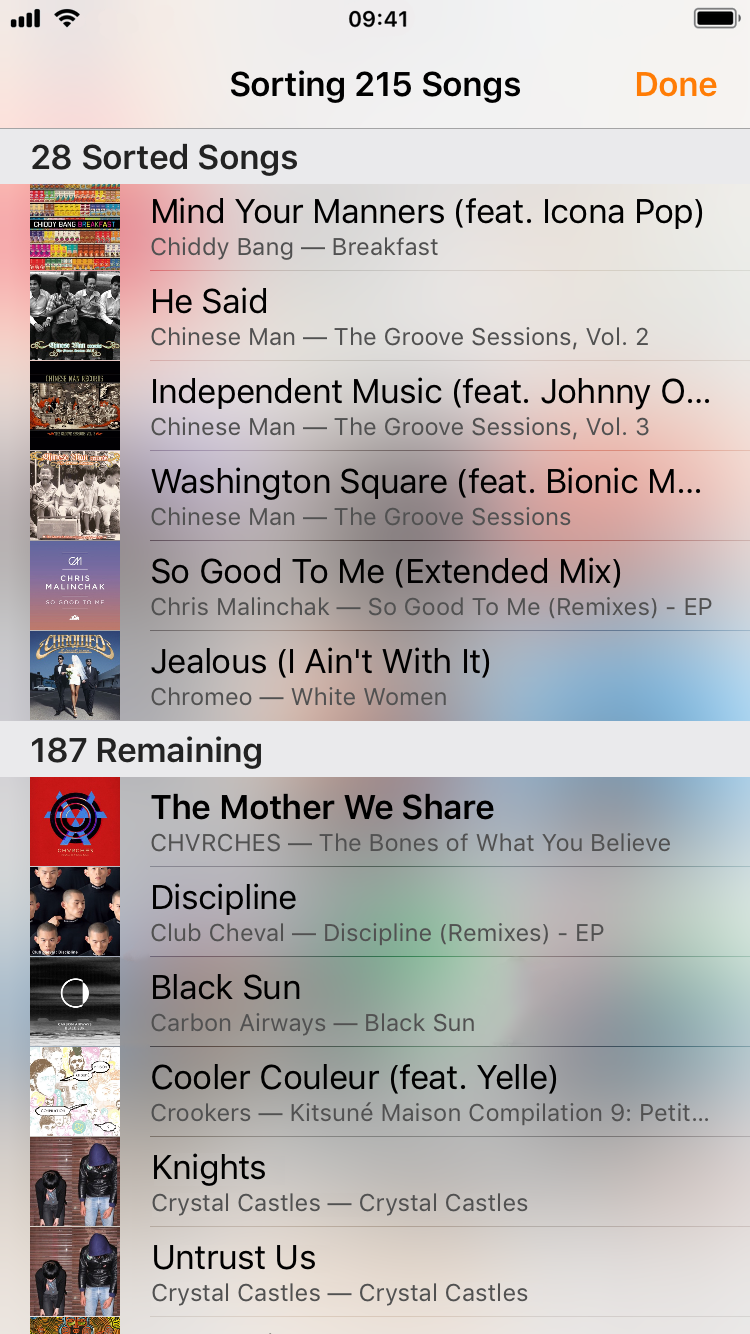
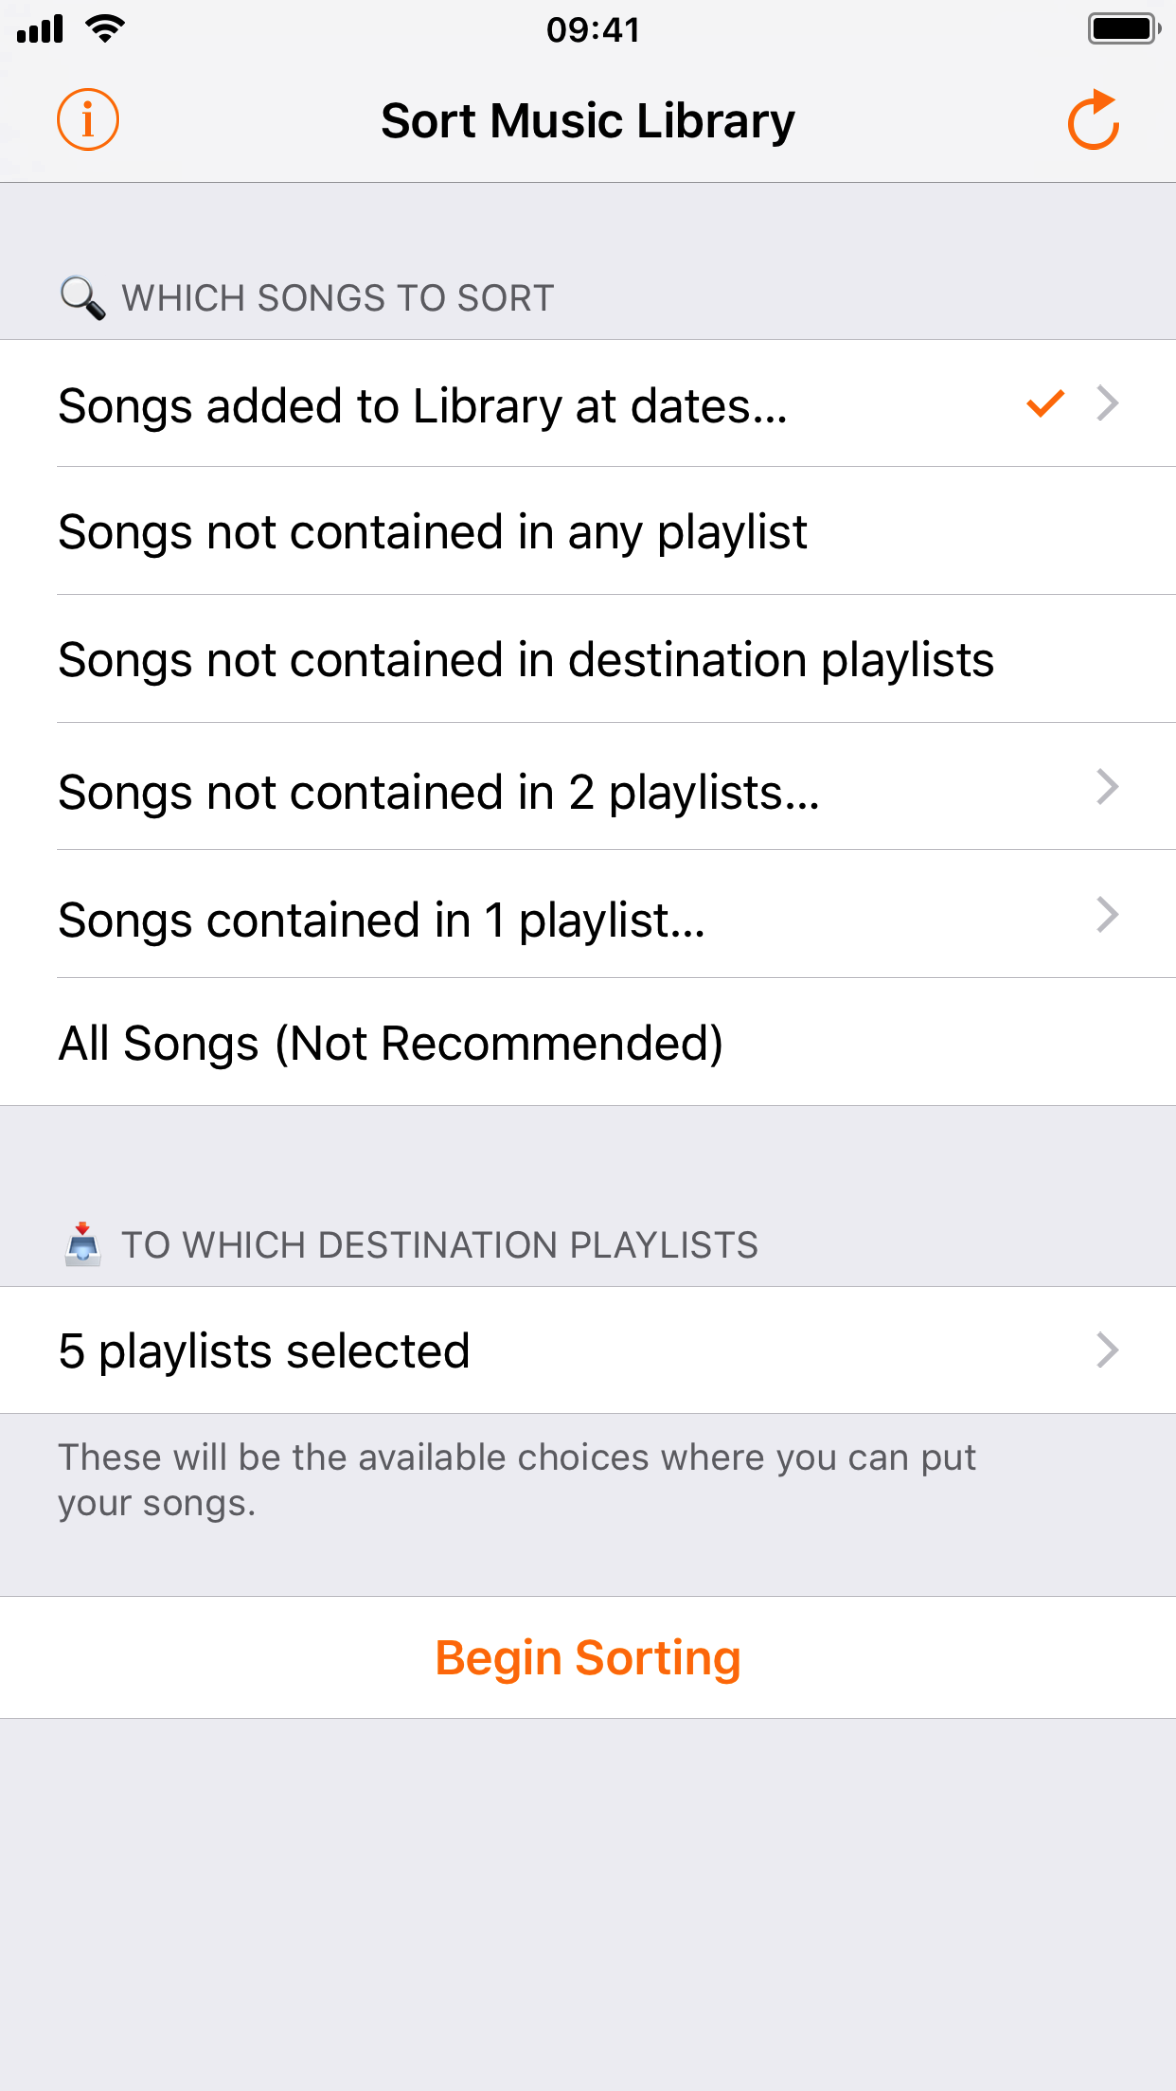
Quickly tidy your music library using Playlists Maker!
Select which songs you want to sort, then in which playlists these tracks can be added, and you’re ready.
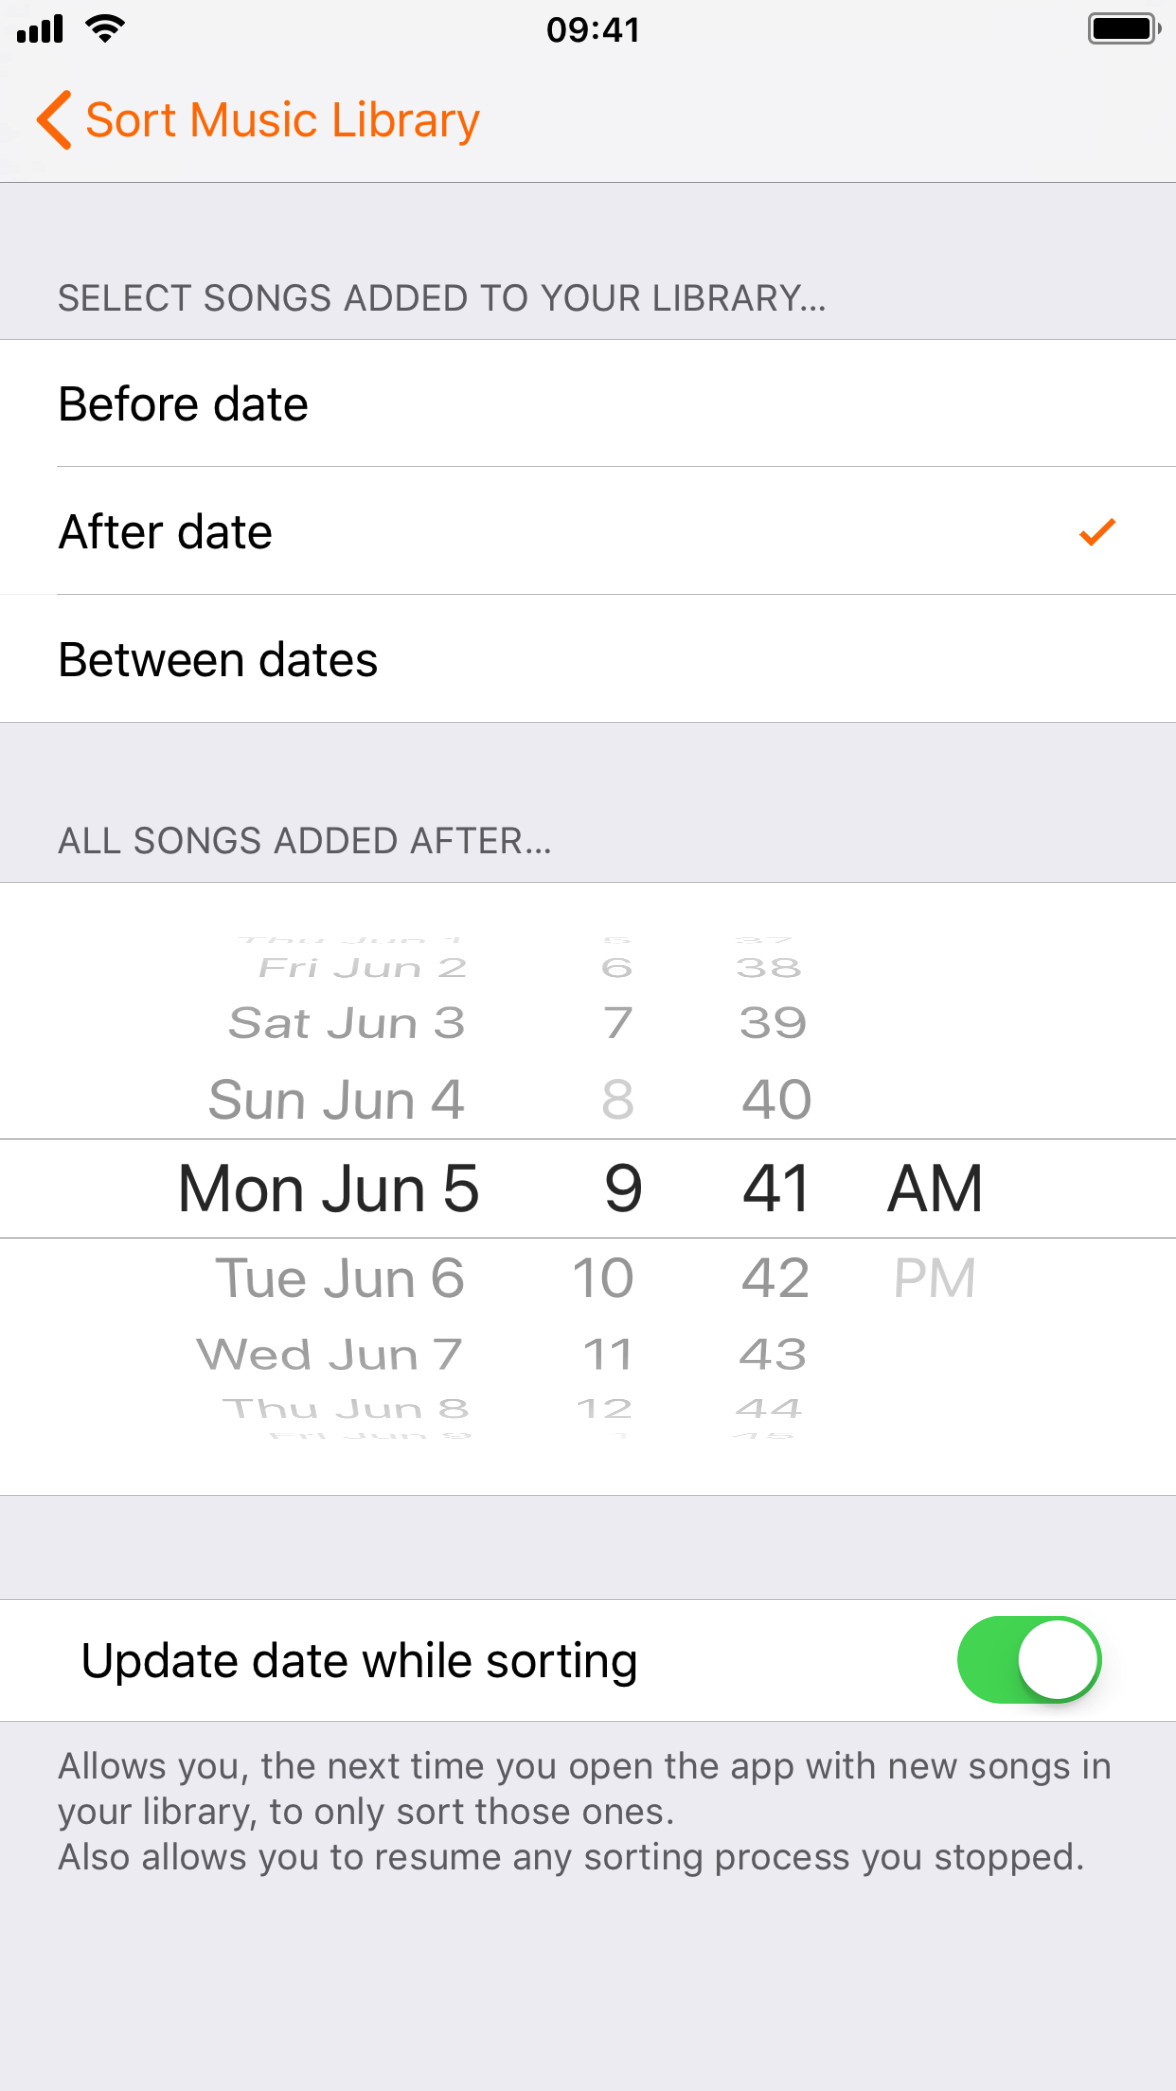
Filter song selection by date, or select specific playlists or collections.
Provides music info, and a music player as well to help you decide in which playlist this song should be.
To run the code in this repository, you will need to have the following installed:
RStudio
R
pdflatex (for rendering the .pdf files)
Data Setup
The link to the SQLite database used can be found here
To populate your local repository with the database, download the database from the link above and move it to the data folder in the root of the repository. The database should be named nyc_crash_data.db. If the data folder does not exist, create it in the root of the repository.
The original CSV files used to create the database were the most up-to-date data sets available at the time of the project. The data sets were downloaded from the NYC OpenData website and can be found here, here, and here.
“The Motor Vehicle Collisions crash table contains details on the crash event. Each row represents a crash event. The Motor Vehicle Collisions data tables contain information from all police reported motor vehicle collisions in NYC. The police report (MV104-AN) is required to be filled out for collisions where someone is injured or killed, or where there is at least $1000 worth of damage.”
The data sets we used are:
1. Motor Vehicle Collisions - Crashes: This data set contains information about the crashes themselves, such as the date, time, and location of the crash, as well as the number of people injured and killed.
2. Motor Vehicle Collisions - Persons: This data set contains information about the people involved in the crashes, such as their age, their unique identifier, etc.
3. Motor Vehicle Collisions - Vehicles: This data set contains information about the vehicles involved in the crashes, such as the vehicle type, the vehicle make, etc.
For a more detailed breakdown of the data sets used and how they relate, please see the data dictionary located in the data folder. This file details the foreign keys and their corresponding tables, as well as the data types and descriptions of each column in the data set.
Data Analyses
To see our incremental data analysis, please see the reports folder. This folder contains both the .qmd files and their corresponding .pdf files of each of our report iterations.
The Shiny app can be run by opening the app.R file in the in app/ directory in RStudio and clicking the “Run App” button in the top right corner of the script editor. This will open the app in a new window in your default web browser. (Note: You will have needed to have run the code in the report_final.qmd file to populate the database before running the Shiny app.)
A collection of python threaded camera support routines for
USB and laptop internal webcams
RTSP streams
MIPI CSI cameras (Raspberry Pi, Jetson Nano)
FLIR blackfly (USB)
Also support to save as
HD5
tiff
avi, mkv
Supported OS
Windows
MacOS
Unix
The routines primarily use OpenCV or PySpin to interface with the camera.
The image acquisition runs in a background thread to achieve maximal frame rate and minimal latency.
On windows GSTREAMER is not enabled by default. If you want RTSP functionaly you need to custom built opencv. See my windows installation instructions on Github.
Installation
camera
cd "folder where you have this Readme.md file"
pip install . or python setup.py bdist_wheel and pip3 install .\dist\*.whl
On Windows, the Camera utility will give you resolution options and frames per second.
To investigate other options you can use OBS studio (or any other capture program), establish camera capture device and inspect video options. py -3 list_cv2CameraProperties.py will show all camera options the video system offers. When an option states -1 it likely is not available for that camera.
B. Configuration file
Use one of the existing camera configutrations in examples/configs or create your own.
As first step set appropriate resolution and frames per second.
As second step figure out the exposure and autoexposure settings.
Run Example
Run capture_display.py from .\examples
You need to set the proper config file in the program. You should not need to edit python files in capture or streamer folder.
Example Programs
Display:
In general display should occur in main program.
OpenCV requires waitkey to be executed in order to update the display and limits update rate to about 50-90 fps.
Queue:
Data transfer between the main program and capture and storage threads.
Examples:
capture_display.py tests camera capture for all capture platforms except blackfly.
blackfly_display.py tests the blackfly capture module, displays images and reports framerate.
capture_saveavi_display.py display and save to avi files
capture_savemkv_display.py display and save to mkv files
test_display.py testing of opencv display framerate, no camera, just refresh rate.
test_savehd5.py testing of the disk throughput with hdf5, no camera
test_savetiff.py testing of the disk throughput with tiff, no camera
test_saveavi.py testing of the disk throughput with avi, no camera, only 3 color planes per image possible
test_savemkv.py testing of the disk throughput with mkv/mp4v, no camera, only 3 color planes per image possible
test_blackfly.py tests the blackfly capture module and reports framerate, no display
blackfly_savehdf5.py no display but incoporates saving to disk
blackfly_savetiff.py no display but incoporates saving to disk
blackfly_savehdf5_display.py display and incoporates saving to disk
blackfly_savetiff_display.py display andincoporates saving to disk
Simplifies the settings needed for the Blackfly camera.
Supports trigger out during frame exposure and trigger in for frame start.
Optimized settings to achieve full frame rate with S BFS-U3-04S2M.
nanoCapture
Uses gstreamer pipeline for Jetson Nano.
Pipline for nvidia conversion and nvarguscamera capture.
Settings optimized for Sony IMX219 Raspi v2 Module.
cv2Capture
Uses the cv2 capture architecture.
The video subsystem is choosen based on the operating system.
rtspCapture
gstreamer based rtsp network stream capture for all platforms.
gstreamer is called through OpenCV.
By default OpenCV supports ffmpeg and not gstreamer. Jetson Nano does not support ffmpeg but opencv is prebuilt with gstreamer for that platform.
piCapture
Interface for picamera module. Depricated since cv2Capture is more efficient for the Raspberry Pi.
Changes
2022 - February added libcamera capture for Raspian Bullseye
2022 - January added queue as intialization option, updated cv2Capture
2021 - November moved queue into class
2021 - November added rtp server and client
2021 - November added mkvServer, wheel installation, cleanup
2021 - October added aviServer and multicamera example, PySpin trigger fix
2021 - September updated PySpin trigger out polarity setting
2020 - Release
Urs Utzinger
# Plaintext and HTML manipulation.moduleTextServiceextendself## Return a new string enhanced with typographic characters:# Single quotes: ’# Double quotes: “”#defadd_typography(text : String) : String
text.gsub(/"([^"]+)"/, "“\\1”")
.gsub('\'', '’')
end## Add nicer typography that HTML can provide:# Fractions using superscript and subscript.#defadd_html_typography(text : String) : String
text.gsub(%r{\b(\d+)/(\d+)\b}, "<sup>\\1</sup>⁄<sub>\\2</sub>")
endend
Elixir
importStringdefmoduleTextServicedo@moduledoc""" Plaintext and HTML manipulation. """@doc""" Return a new string enhanced with typographic characters: Single quotes: ’ Double quotes: “” """@specadd_typography(binary)::binarydefadd_typography(text)dotext|>replace(~r/\"([^\"]+)\"/,"“\\1”")|>replace(~r/'/,"’")end@doc""" Add nicer typography that HTML can provide: Fractions using superscript and subscript. """@specadd_html_typography(binary)::binarydefadd_html_typography(text)dotext|>replace(~r/\b(\d+)\/(\d+)\b/,"<sup>\\1</sup>⁄<sub>\\2</sub>")endend
Python
"""Plaintext and HTML manipulation."""importreDOUBLE_QUOTED_TEXT=re.compile(r'"([^"]+)"') # "Hello"FRACTION=re.compile(r'\b(\d+)/(\d+)\b') # 1/2defadd_typography(text: str) ->str:
""" Return a new string enhanced with typographic characters: Single quotes: ’ Double quotes: “” """returnDOUBLE_QUOTED_TEXT.sub(r'“\1”', text).replace("'", "’")
defadd_html_typography(text: str) ->str:
""" Add nicer typography that HTML can provide: Fractions using superscript and subscript. """returnFRACTION.sub(r'<sup>\1</sup>⁄<sub>\2</sub>', text)
Rust
/// Plaintext and HTML manipulation.use lazy_static::lazy_static;use regex::Regex;use std::borrow::Cow;lazy_static!{static ref DOUBLE_QUOTED_TEXT:Regex = Regex::new(r#""(?P<content>[^"]+)""#).unwrap();static ref FRACTION:Regex = Regex::new(r"\b(\d+)/(\d+)\b").unwrap();}/// Return a new string enhanced with typographic characters:/// Single quotes: ’/// Double quotes: “”fnadd_typography(text:&str) -> String{DOUBLE_QUOTED_TEXT.replace_all(text,"“$content”").replace("'","’")}/// Add nicer typography that HTML can provide:/// Fractions using superscript and subscript.///fnadd_html_typography(text:&str) -> Cow<str>{FRACTION.replace_all(text,r"<sup>$1</sup>⁄<sub>$2</sub>")}
Swift
import Foundation
extensionString{
/// Provide a higher-level API for regexes.
func gsub(_ regex:NSRegularExpression, _ replacement:String)->String{return regex.stringByReplacingMatches(
in:self,
range:NSRange(location:0, length:self.utf16.count),
withTemplate: replacement
)}}letSINGLE_QUOTE=try!NSRegularExpression(pattern:"'")letDOUBLE_QUOTES=try!NSRegularExpression(pattern:#""([^"]+)""#)letFRACTION=try!NSRegularExpression(pattern:#"\b(\d+)/(\d+)\b"#)
/// Return a new String enhanced with typographic characters:
/// Single quotes: ’
/// Double quotes: “ ”
func addTypography(text:String)->String{return text
.gsub(SINGLE_QUOTE,"’").gsub(DOUBLE_QUOTES,"“$1”")}
/// Add nicer typography that HTML can provide:
/// Fractions using superscript and subscript.
func addHtmlTypography(text:String)->String{return text.gsub(FRACTION,#"<sup>\1</sup>⁄<sub>\2</sub>"#)}
Soo Ye Kim, Jihyong Oh, Munchurl Kim. Deep SR-ITM: Joint Learning of Super-Resolution and Inverse Tone-Mapping for 4K UHD HDR Applications. IEEE International Conference on Computer Vision, 2019.
Note: The code is completely adapted from https://github.com/sooyekim/Deep-SR-ITM but rewritten in pytorch format. This repository is NOT aimed to improve the baseline, but to retain the original settings in a different implementation. If you have any questions for the details of the implementations, please refer to the original repo.
# Prepare CUDA Installation
...

# git clone repository
git clone https://github.com/greatwallet/Pytorch-Implemented-Deep-SR-ITM.git
cd Pytorch-Implemented-Deep-SR-ITM

# create conda environment
conda create --n env-sr-itm python=3.7 -y
conda activate env-sr-itm
conda install -c pytorch pytorch -y
conda install -c pytorch torchvision -y
conda install -c conda-forge opencv -y
conda install numpy -y

# set soft link to data path
ln -s ${DATA_ROOT} ./
Usage
The default parameters in the scripts is set strictly according to the original repo. However, please modify the parameters in the script if you would like.
Please specify the path of the testset and other settings in the test.py.
python test.py
Note: The difference between the val and test phase in YouTubeDataset.__init__ would be that:
val: the SDR and HDR images must be both be provided, and the size of SDR image must be IDENTICAL with HDR images, and the YouTubeDataset will resize the SDR images for the net later on.
test: the HDR images may or may not be provided to the dataset. If provided, the size of SDR image should be k times smaller than HDR images (assuming k is the parameter scale of networks)
cfor (command for) is an AI-powered terminal assistant that helps you find and
execute commands without digging through man pages. Simply ask what you want to
do in natural language, and cfor will suggest relevant commands with brief
explanations.
The name reflects its usage pattern: cfor [what you want to do] is like asking
“what’s the command for [task]?” – making it intuitive to use for finding the
right commands for your tasks.
Features
Natural Language Queries: Ask for commands in plain English
Smart Command Suggestions: Get multiple command variations with inline
comments
Interactive Selection: Choose the right command from a list of suggestions
Terminal Integration: Selected commands are automatically inserted into
your terminal prompt
OpenAI Integration: Powered by OpenAI’s language models (supports multiple
models)
Installation
Using Homebrew (macOS and Linux)
brew install cowboy-bebug/tap/cfor
From Source
Requirements:
Go 1.24 or later
git clone https://github.com/cowboy-bebug/cfor.git &&cd cfor
make install
Usage
cfor [question]
Examples
cfor "listing directories with timestamps"
cfor "installing a new package for a pnpm workspace"
cfor "applying terraform changes to a specific resource"
cfor "running tests in a go project"
Configuration
cfor requires an OpenAI API key to function. You can set it up in one of two
ways:
# Use a general OpenAI API keyexport OPENAI_API_KEY="sk-..."# Or use a dedicated key for cfor (takes precedence)export CFOR_OPENAI_API_KEY="sk-..."
Model Selection
By default, cfor uses gpt-4o. You can switch to other supported models:
export CFOR_OPENAI_MODEL="gpt-4o"
Building from Source
make build    # Build the binary
make install  # Install to your GOPATH
make clean    # Clean build artifacts
Supported Platforms
Linux (amd64, arm64)
macOS (amd64, arm64)
Contributing
Contributions are welcome! Feel free to open issues or submit pull requests.


 https://github.com/Tomn94/Playlists-Maker